HOW TO POSTS: LIGHTING AND COMPOSITION
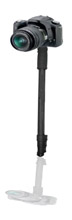
Benefits of using a monopod correctly
WRITTEN BY: BRUCE LOVELACE
UPDATED: DECEMBER 27, 2023

Using a monopod correctly will make your video and your still photographs come out better in several ways. You'll also make the whole shooting experience more enjoyable when you don't have to support all that weight with your arms.
Monopods make your videos look less like an amateur shot them and more like a professional was behind the video camera. As like many other skills, using the right equipment in the right way can have a dramatic effect on your results.
There are several aspects to this topic and each deserves some attention.
the correct stance for using a monopod
The first aspect is the most basic of all but quite important. If you're using the wrong technique with any tool, you'll be disappointed with the results you get. How to Use a Monopod for sharper photos.
If you are shooting still photos there are several ways to stand along with several positions to place your monopod tip and pole to get the sharpest pictures without blur.
The two primary reasons for using a monopod to shoot still photos are to steady the camera for sharper photos and also to support the weight of the camera. For shooting video, monopod make it much easier to creates smooth panning motions and a more fluid feel to your videos.
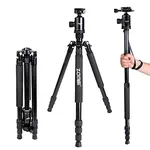
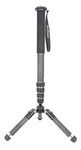
how to choose the right size monopod
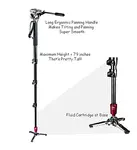
Size matters. You're probably wondering how tall should your monopod be. Get a monopod that is as tall as you are. Since there is only one leg on a monopod, even the tallest monopods are relatively light. This is different from tripods where you're adding 3 times the weight as you increase its maximum height.
In general, you only need a really light monopod for small point and shoot cameras and heavier-duty monopods for digital SLRs, bigger lenses and video cameras. You can adapt the formula for choosing the right height of a tripod and apply it to figure out how tall your monopod should be.
 How tall does your tripod need to be?
Both the maximum extended length and the minimum contracted length are important aspects of using your monopod tool. How tall you are affects the maximum height you need. Although almost all monopods will pack away easily, how you choose to transport your monopod affects how small you wish it to compact to.
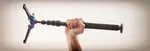
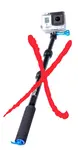
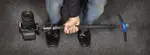
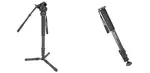
using a monopod without a head
It's awkward. Can you use a monopod without a head? Yes, but only when you're shooting in a very limited way. Here's what I mean by that. In order to shoot with your camera aiming upward or downward you'd have to tilt your entire monopod forward or backward to aim it at your subject.
Not only does that destroy your ability to hold your camera steady, it also makes it really hard to follow a moving subject. Using a ball head on your monopod makes it easier to adjust your camera to the precise position you want and follow the action if you have a moving target. Using your monopod without a head is fine if you're only shooting at a subject that is always positioned at the same height of the camera.
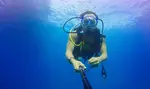
using a monopod for wildlife photography
When you're using a heavier long telephoto lens to get up close and personal with wildlife a monopod is very helpful. I shot this lion photo with a 100-400mm lens.
Combined with the full frame DSLR I was using, the lens and camera combination weigh over 5 lbs. Even if you're a regular at the gym, having the extra support from a monopod helps with steadiness for video and still photography.
This is even more true when your targeted subject for wildlife is bird photography. Whether you're using an even longer lens or you've added a tele-extender it's a challenge to hold a heavy lens steady with such high magnification.

using a monopod for sports photography
When you're using a powerful zoom lens to shoot sports photography a monopod lets you move quickly from spot to spot. I shot this goalie during warmups at 400mm.
I usually have a camera with a shorter lens around my neck and have my heavier lens and 2nd camera mounted on a monopod. This makes it real easy to switch from one to the other quickly. This might be a bit too much for you, but having the support of a monopod during an hour long game is always welcome, even if you're keeping it simple with one lens and one camera.
I find it very useful to be able to move around alot during a sporting event in search of the best angle to give me clean backgrounds. Monopods are easy to relocate with. This is very helpful when your targeted subject is on the move.
 Monopods are easy to reposition quickly to get the best angle on the fast moving subjects in sports photography.
monopod accessories

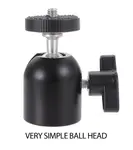
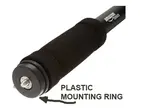
Another important aspect of using your monopod correctly is having it properly equipped. One of the first mistakes I made with my newly acquired monopod was using it without any kind of head. It was early on in my photo blogging experience and I had no prior experience with using a monopod.
It was not a very expensive monopod and it only came with the standard mounting screw and plastic plate to mount the camera. In some situations this can be an adequate set-up, but there isn't much versatility going on there.
First, you are limited to shooting photos with the camera in the horizontal of "landscape" position. Second, you have limited ability to aim you camera upward or downward without significantly tilting your monopod leg forward or backward to a less stable position.
I used my monopod to take a series of photos with intentionally blurred background while photographing a bicyclist at various shutter speeds. The photos were composed in a horizontal format and the only motion I used was panning horizontally, following the movement of the biker as he rode by. It worked well in that situation, but with a tilting monopod head, I didn't have much versatility.
You can buy tilting, panning or ball heads separately or some monopods come with a head as part of the package. This gives you the ability to shoot an infinite number of angles as well as change to vertical "portrait" compositions. Here are more thoughts on Monopod Accessories.
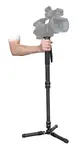
monopods for video
One of the least used methods of using your monopod is to use it as a video camera stabilizer. How many lousy videos have you seen with jerky movements that make it difficult to watch?
Using a basic monopod mounted underneath your video camera lowers the center of gravity and smooths out the effects of motion as you move your camera. Video on how to use a monopod for video:
This video is short and simple. It Explains and shows you how easily it is to improve your video with by using a simple monopod.
Whether it's a dedicated video camera, a point and shoot camera, and to a lesser extent a full-sized DSLR, the stabilizing effect still works.

This method is not as effective as the professional steadicam-type of image stabilizing brackets that sell for hundreds of dollars, but it is a great step in the right direction.
If you take a look at this Steadicam model, it's essentially a sophisticated monopod with a handle and balancing weights to fine tune its balance. The cheapest dedicated video stabilizers can be found for as low as $15 but their effectiveness is quite questionable. You can pick one up in the $75-$100 range that have goold solid ratings.
Using a monopod correctly involves using the right stance, the right accessories for the right situation and choosing a monopod that fits the camera you are using as well.
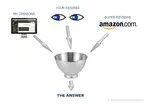
Monopods are a great tool for the beginning photographer, the enthusiast, the professional photographer and videographers. You can find out more information by reading monopod reviews by others who have bought and use monopods: Reviews by Buyers and Users of Monopods on Amazon.
Have a blast using your monopod!


ABOUT BRUCE LOVELACE
Bruce is the publisher of this website. He is the author of the book "Improve Your Photography Instantly." Read more on Bruce on his Bio Page. He's been known as The Traveling Photographer ever since 1994. Read more about this website.
View some of Bruce's photos on Instagram. Visit the Facebook Page. Watch him on YouTube. Bruce runs photo workshops for kids and adults, and provides one-on-one photography coaching.
Digital Photography Education Location on Google My Business
You might like these
Monopod Reviews-What You Need to Look For. Are Monopods Any Good?
Are monopods any good? If you're considering buying a camera monopod, here's what you need to know first These monopod reviews are a must read first. Consider the features, options and accessories that come along with monopods
3 best Hiking Monopod Tripod Options And What You Should Look For
Specialty digital camera accessory for outdoor enthusiasts. What's the best hiking monopod tripod combination? Helpful Guide
Monopod Feet. Which is Better, a Camera Tripod or a Monopod With Feet
An interesting monopod accessory. Why you should consider monopod feet to get better results with your image sharpness and video smoothness.
The 4 Best Monopods For Your DSLR Camera That Will Actually Work Well
Updated post on choosing the best monopod. What you need to know first. Monopod Reviews
Best Camera Monopods. Helpful Guide How to Choose and What to Look For
Confused about monopods? Here is what you need to know about camera monopods,video monopods and walking stick monopods
Are Gitzo Monopods Worth It? Feature., Pluses and Minuses
Seriously? Gitzo monopods only for professional photographers? Think again. Monopod Reviews, Features and Price for Gitzo


Recent Articles
-
Macro Photography Lighting Tips For Indoor Photography With Flash
Mar 29, 26 11:21 AM
 What is the best macro photo lighting set-up to use? Strobe lighting or spotlight? Several articles covering macro photography lighting tips.
 -
Nature Photography Composition Tips- Guide on How to Nail it Everytime
Mar 28, 26 01:46 PM
 Read these Nature Photography Composition Tips. Improve your digital photography technique.
 -
Are HDR Nature Photos Overdone? Answers to Your Questions About HDR
Mar 27, 26 03:44 PM
 Do you want high-impact HDR images rfor personal use? You're looking for the "wow factor" that High Dynamic Range provides. Is HDR photography still overdone
 -
20 Photography Tips-How To Instantly Improve Your Photography in 2026
Feb 09, 26 07:09 PM
 How to easily get better photos. These simple photography tips will steer you in the right direction for quickly improving your results as a photographer.
 -
How To Fix an Underexposed Photo + Simple Steps to Avoid Dark Photos
Feb 08, 26 07:18 AM
 Dark photos? How to avoid an underexposed photo. 5 simple ways to on how to fix underexposed photosed photos. Easy correction steps
 -
10 Useful Nature Photography Tips For Beginners That You Must Know
Jan 31, 26 08:12 PM
 Want to take better pictures of nature? These simple nature photography tips are sure to help you take better digital photos with your camera.
READ CONSUMER REVIEWS OF MONOPODS ON AMAZON:
As an Amazon affiliate I may receive a small commission from qualifying purchases, at NO added cost to you.
Improve your photography instantly. Get the 2 most important chapters of my photography book for free.