HOW TO POSTS: LIGHTING AND COMPOSITION
photography poses for 5 people
How to pose a group of 5 people
WRITTEN BY: BRUCE LOVELACE
PUBLISHED ON: NOVEMBER 14, 2023
Need some help with photography poses for 5 people? I'm confident this post will help you.
Here are some examples of poses of 5 people you can copy and improve your group posing technique. There are several standard pose arrangements that you can try to use, but each situation is different depending on the people that are in your photograph. Of course, you've got to start with the right lens first and there's nothing wrong with considering a used camera lens.
Before you dive into the sample poses, here are a few general ideas to getting attractive posing with your group portraits
Simple Tips For Posing 5 In a Group
Here are a few ideas you can try to incorporate into your posing depending on the situation and how tall each individual is.
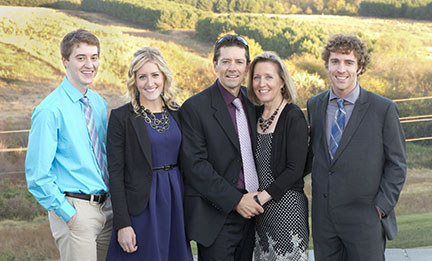
STAGGER HEIGHTS. It's rarely a good idea to have your group of 5 people lined up with their heads all at the same level or randomly placed. Staggering heights, every other, with the tallest person in the middle is usually a more attractive way to pose a group this sized. See the phot at the beginning of this post.
HUDDLING UP. This can be a casual fun way to show the closeness of a family. Have the group huddle in closely, perhaps with hands on shoulders or around waists with bodies overlapping
MIXED. Try poses where some people are sitting and some are standing. Position them in a way where no one individual is much lower or higher than all the rest.
INTERACTIVE. Try a few poses where the group is looking at and interacting with the other members in the photograph. Give them an interesting topic to discuss as you photograph them.
PYRAMID. For posing 5 people, you can create a pyramid with the tallest in the middle and shorter people arranged in descending order on both sides of the tallest person. See the "Upside Down Check Mark Pose" further down in this post.
Sample Poses You Can Copy
In this first portrait, I used the classic "W" pose. If you draw a line from 1 to 2, from 2 to 3, 3 to 4, and 4 to 5. You will see the letter "W". I had the 2 taller men sitting on chairs in front and three shorter women standing behind them.
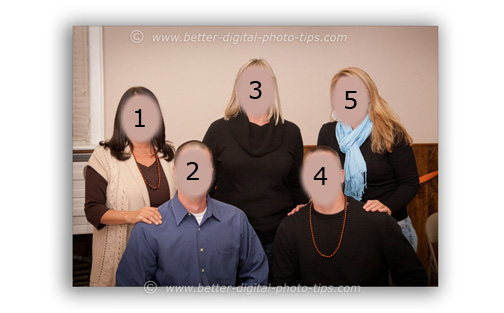 The classic "W" Pose
I kept with the posing technique of having the tallest person in the composition placed at or near the middle of the portrait.
You could call the family pose below a slanted "M" pose, but think of it as a modified oval pose. Connect the heads in this order: 1-3-5-4-2 and back to 1. The pose below is really the classic "M" pose on a slant. Draw a line from 1 to 2, from 2 to 3, 3 to 4, and 4 to 5, You will get the letter "M" from the connected lines.
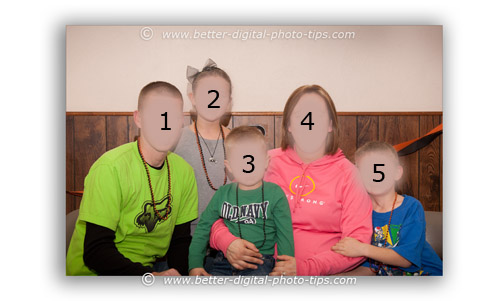
I've learned a lot of group posing techniques from printed books and have a collection of books on family portraits. I find it very useful to have these on my bookshelf, ready for a quick look at to generate some ideas before a family shoot. One of my favorites is called Photographing Families: Tips for Capturing Timeless Images.
In this portrait below I placed Grandmom in the middle between the parents and placed the elementary school-aged children standing behind.
Usually I prefer to place the smaller people (the children) closer to the camera than the larger people (the parents), but in this situation I did the opposite. This gave me the right heights for another "M" pose.
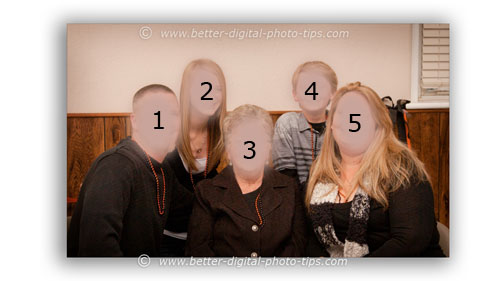 Posed in an "M" shape
teardrop pose for 5 people
You can use this pose for groups photos that have more than 5 people, but it works real well with groups of 5. It resembles an oval, where you position everyone's head fairly close to each other, but one side of the oval will have an extra person.
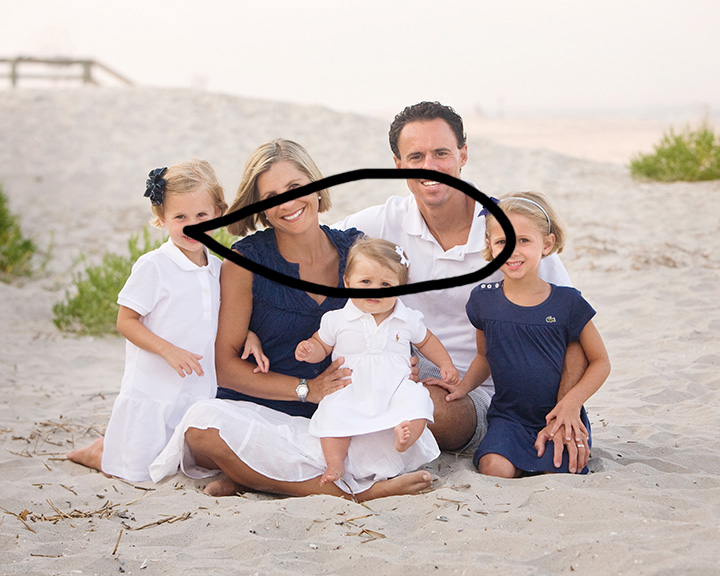 Sideways Teardrop Pose
The next example of a photography poses for 5 people I used the "X" pose. Draw a line from 1 to 4 and a line from 2 to 5 and you get the letter "X". You're probably wondering why this pose isn't just another "M" pose." You're right. It's asymmetric rather than symmetric. It really is a variation of my favorite photography pose for 5 people.
UPSIDE down check mark pose of 5 people

To pull this pose of 5 people off successful you need to be able to adjust the height of each person to get a nice straight stair step look. This is one of the poses that I should do more often, but it takes a bit more time to set up sometimes, particularly if your subjects are all of the same height.
In this case, I used an adjustable height stool for the boy on the right and had the dad sit on the arm of the couch.
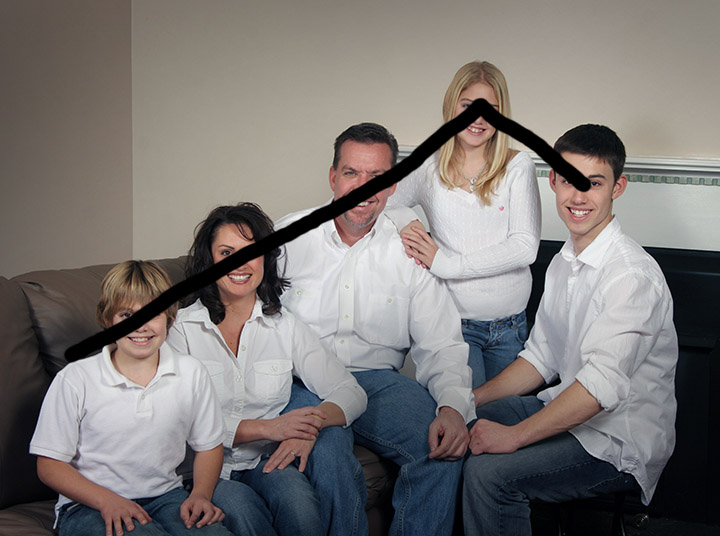 Upside Down Check Mark Pose
The upside down check mark pose is a version of the pyramid pose, Rather than keep the pose symmetric, you can make it asymmetric
In the outdoor family portrait below I used a folding posing stool and two small upside down barrels to get the desired height for each of my subjects. Subjects 2 and 4 were standing. Subject 3 was sitting on a stool and subjects 1 and 5 were sitting on the small upside down barrels

I cropped in tight enough to accomplish the often-requested task of not including the women's bottoms in the pose.
Here's a video showing several examples of posing you can try for groups of 5 people.
articles related to photography poses for 5 people
Posing ideas for 3 people. This is part 1 of the series on posing groups of people.
Photography Poses for 4 People. This is part 2 of the series on posing group photos. How to do photography poses for groups of 4 people.
Photography Poses for 6 People. It is a little more complicated with more people in your photo. Here are posing tips for group shots with 6 people.
These photography poses involve using the letters M, W and X as guidelines to improve your portrait posing. The key thing for you to remember is to modify them or extend them to smaller and larger group poses.
Remember, the aim is for your subjects to look natural and relaxed. Posing can sometimes feel awkward for people, so try to keep the mood light. Mix in some casual candid poses between the more formal poses.
I hope you found this post helpful. You can search for any topic on this website using the search box below, or check out the related article links below my signature.
Search for a new topic on this site:


ABOUT BRUCE LOVELACE
Bruce is the publisher of this website. He is the author of the book "Improve Your Photography Instantly." Read more on Bruce on his Bio Page. He's been known as The Traveling Photographer ever since 1994. Read more about this website.
View some of Bruce's photos on Instagram. Visit the Facebook Page. Watch him on YouTube. Bruce runs photo workshops for kids and adults, and provides one-on-one photography coaching.
Digital Photography Education Location on Google My Business
