HOW TO POSTS: LIGHTING AND COMPOSITION
8 group photography portrait tips
WRITTEN BY: BRUCE LOVELACE
UPDATED: August 18, 2025
Use these simple portrait photography tips for group poses to improve your own success.
Whether it's a family portrait, a group of friends, or a business gathering, you can to use a few techniques to improve your results.
Follow one or more of these tips and your group photos will come out looking great.
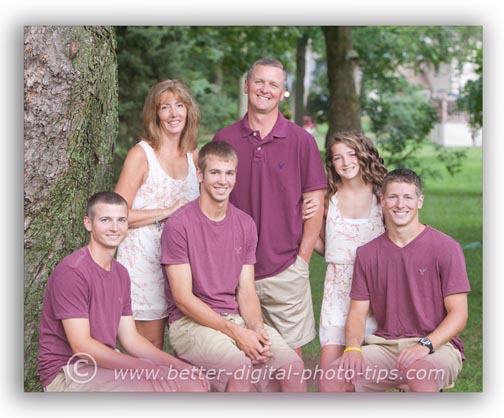
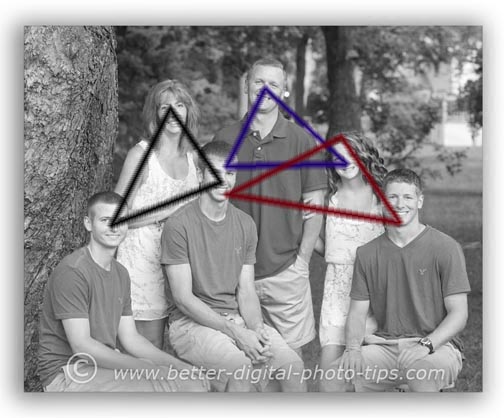
Generally speaking, your group posing should be done so that each individual is visually connected to another individual in your group photo.
What I mean by that is this. Look at the example of the family portrait pose below.
- Overlap the people.
- Pose like a pyramid.
- Tell your subjects to interact.
- Use triangles.
- Get their heads close
- Look for locations with levels
- Watch hand placements
- Shoot vertical poses too.
There are no large gaps in between any of the individual people in this group photo.
1. overlap your subjects' bodies
Notice how there are no gaps between the individual family members in this family portrait.
The individuals are spaced fairly evenly, at similar distances from each other, but they are connected by overlapping their bodies in the pose.
Smaller people (the children) should be posed in front of the larger people (the adults).
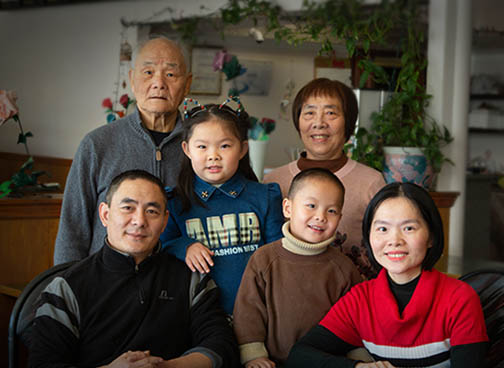
2. Use the pyramid posing technique
The other posing technique that is often used is to to have the pose wider at the base and narrower at the top. Some photographers refer to this as the pyramid pose.
It is not a perfect pyramid shape, but you can see that the portrait has a base that is wider at the bottom and visually supports the top of the pose.
This technique works best for groups with 4 people, but can be used for larger groups provided you have somebody posed in front, inside the outline of the pyramid.
3. Take an interaction pose
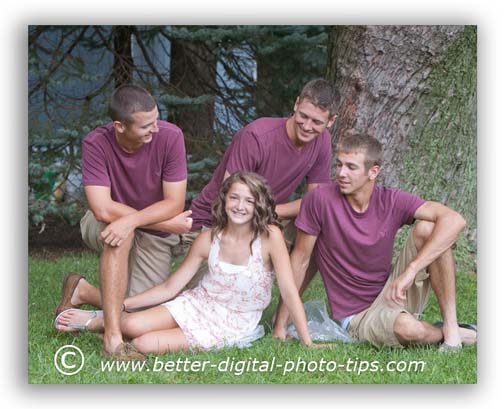
Another group photography portrait tip is to try a pose where your subjects are interacting with each other instead of all looking at the camera.
In the group portrait below, I had done a very similar pose of these four siblings about 8 years ago. Their mother reminded me how much she still enjoyed that portrait, so we re-created the pose.
One tip to remember is to avoid the mistake of having your subjects' faces hidden from the camera's view. I instructed the older brothers to slightly turn and lift their heads so they were at least partially viewable from the camera's perspective. This is an instance where I did not use a pyramid pose.
The third group photography portrait tip is to use geometric shapes in your family photos. Forming triangles with your subjects' heads within the frame is a good group technique. You can also use diamond shape compositions when you have 4 people in the group.
4. Compose By Using triangles
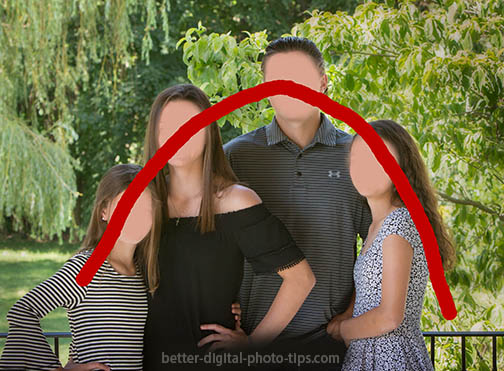
You can build your family portrait pose by using triangles. These are not equilateral triangle with equal sides, but will vary in shape and dimensions. Triangles create an opportunity for the viewer's eye to move from one face to another, to another in your pose.
Position your subjects so that there faces form triangles. You can use this portrait posing technique for small groups of three or more people, as well as much larger family portrait poses.
5. Get them in close
Finally, here is another posing technique to use when you want to show the love and affection family members have for one another. Build your portrait so that all of their faces are quite close. This often results in great natural smiles because the family members are truly enjoying their close connection.
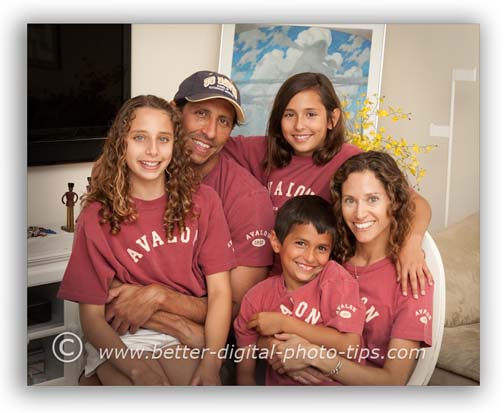 Try a pose with heads close together
This family pose happened spontaneously and I was ready to capture it because my camera and flash were ready to go. You can really feel the closeness and joy this family shares with each other.
As a professional photographer, I am always most critical of my own photography and there are always little elements of any photo to improve upon. Yes, I could have re-positioned a few hands in the pose above, and also perhaps tweaked the locations of my subjects a little.
The closeness in this pose made it a winner and the bottom line is to have fun with your photography subjects and you'll get more relaxed expressions.
6. Look For Locations With Levels
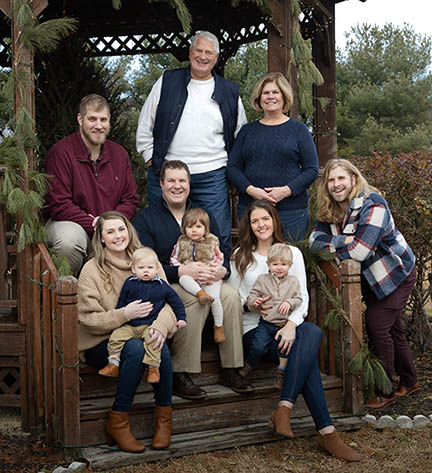
When posing larger groups look for locations with levels. Levels allow you build your pose vertically enabling visual separation.
This makes it so you don't have to compose your photograph super wide to fit every one in the pose.
Find a spot where there are objects your subjects can sit on.
This gazebo with steps was perfect for this family portrait of 8 people. Sturdy fences, tree stumps, benches, and terraced hills work well too.
7. Pay attension to Hand Positions
One more little tip is to pay attention to your subjects' hands. It's a mistake to have everyone in your pose doing the same exact thing with their hands.
Occasionally you should direct one or more of my subjects to change their hand position to improve the pose. If you look at every single group pose in this post, you'll notice that there is a little variety in the positioning of the individual's hands.
Keep it simple though, and don't overdo hand placement that will look unnatural.
8. Try Vertical Poses
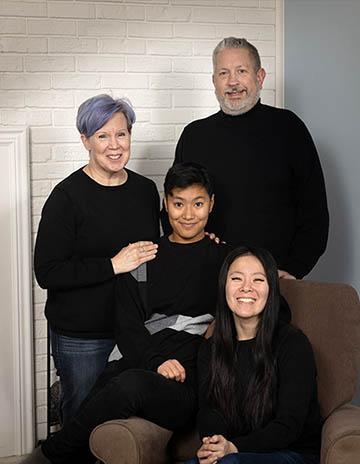 Vertical group portrait
The large majority of group portraits are taken using a horizontal (landscape) orientation because it's pleasing to the eye. Try a few poses using a vertical format too.
Generally speaking, vertical poses don't work as easily for large group portraits as they do for smaller groups like this indoor family portrait here.
I photographed this family of 4 both vertically and horizontally and liked both poses.
Shooting a few vertical poses in addition to the regular horizontal poses gives you more practice in composing and also gives the subjects photographed more choices to choose from.
If you are creating family portrait poses for someone else to enjoy, remember to make it a pleasant experience for them. These group photography portrait tips are just tips. They are not hard fast rules of photography that cannot be broken.
Following any of the digital photo tips on this web site should be a fun growth process. Digital Photography is a subjective art with a variety of opinions on the best composition tip or posing technique to use.
Stay inspired with your photography.


ABOUT BRUCE LOVELACE
Bruce is the publisher of this website. He is the author of the book "Improve Your Photography Instantly." Read more on Bruce on his Bio Page. He's been known as The Traveling Photographer ever since 1994. Read more about this website.
View some of Bruce's photos on Instagram. Visit the Facebook Page. Watch him on YouTube. Bruce runs photo workshops for kids and adults, and provides one-on-one photography coaching.
Digital Photography Education Location on Google My Business
More portrait photography Posts
If you are more interested in photography portrait tips for individuals, go here: Portrait Posing for Individuals.
Family Portrait Ideas. Creative ideas for family portraits , including many submissions by the readers of this website.
Family Portrait Tips. Instead of posing tips, this article covers portrait lighting and natural backgrounds.
Baby Poses. Here a few simple poses to use for baby portraits. Samples using simple lighting and simple posing.
