HOW TO POSTS: LIGHTING AND COMPOSITION

WRITTEN BY: BRUCE LOVELACE
UPDATED: March 28, 2024
how Pro photographers do their digital photo editing
(For Beginners To Copy)
If you are a digital photography enthusiast you must be aware that capturing photos on your camera is just one side of the story.
Using just a little digital photo editing can make a dramatic difference in the impact your photos have. Have you ever wondered how come the professional photographers images look so amazing. Well, as a pro, I can tell you it's not just about the talent photographers have or the equipment they use.
Stick around. I'll show you what I mean.
There are a lot of factors that go into a winning photograph no doubt. There's lighting, composition, lens and camera selection, and of course choosing a good subject. Putting that all aside, You can turn an average photo into a spectacular photo with photo editing software.
Here is the list of various edits that professional photographers do to turn their ho-hum photos into works of art. You can do the same!
1. Pro photographers start by shooting in RAW Mode
You don't have to shoot in RAW mode in order to be able to edit them, but it makes a big difference if you do. Shooting RAW gives you more precise control over color balance, exposure, sharpness, contrast, as well as several other image adjustments.
A big additional benefit to shooting in RAW mode is that you can edit any single photo in many different ways.
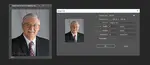
2. professional shooters use professional editing software
Photoshop is by far the most well know and most often used. It's become so popular in fact that the word Photoshop is now a verb. You can "Photoshop" part of or an entire image in an infinite number of ways to improve it.
According to Statista, Photoshop has the largest market share in terms of how much is spent on it.
We won't dive deep into the subject of professional digital photo editing programs but here's just a sampling. In addition to Photoshop, other popular professional editing programs include Lightroom, DxO PhotoLab, and Corel Paintshop Pro.
- Skylum Luminar is great for pro landscape photographers.
- PortraitPro is very useful for portrait photographers.
- Phase One Capture One is a good Adobe Lightroom alternative for processing RAW files.
3. Pro Photographers select only the photos with potential
Just like you and me, professional photographers take lousy photos too. You don't see the bad photos because photographers who earn money with their photography are unlikely to share their mistake photos with the public.
Secondly, they narrow down to edit just a few of the best photos out of all the images they shoot. Essentially, they're editing out poor quality, just like a writer who is editing out bad paragraphs in their novel.
It would be a waste of time to use software on the not-so-good images when there are plenty of better ones. Use only your better images to use editing software on.
4. what pro photographers edit
There are two main categories of editing that pro shooters do. These include adjusting the entire image (global editing) all at once and retouching only specific areas (local editing) of their image individually.
global editing
Processional photographers edit their photos is a large number of ways. Here are just 9 ways photographers edit the entire photograph all at once, often called global adjustments.
- Brightness will add brightness to all of the pixels whereas Exposure adjustments will affect the highlights more.
- Contrast adjustment makes the shadows darker and the highlights brighter.
- Leveling the horizon is a common edit to do with landscape photography.
- Sharpness editing can be done to the whole image or to just parts of an image.
- Saturation adds color to all of the pixels in an image
- Clarity is an increase in the contrast in the mid-tones that results in an overall appearance of more detail throughout the photo.
- Cropping to improve the composition is one of the most powerful, but underutilized editing tools you can use.
- Color Balance is usually adjusted to correct an entire image that is off-color, but can be creatively used to "warm up" or cool down" selected areas of the photo.
local editing
Processional photographers also edit their photos in small areas or spots. Here are several ways photographers do partial edits of the photograph, often called local or spot adjustments.
- Dust spots, particularly will show up in sold areas of the image.
- Intentional blur of background to make the main subject stand out better.
- Vibrance adjustment increases the color of the less saturated pixels and leaves the saturated ones as they are.
- Exposure adjustment will affect the highlights whereas brightening will affect all of the pixels
- Darkening of distracting overly light parts of the photo.
- Brightening of areas that are too dark.
- Cloning is copying small areas to cover other areas in the composition.
- Sharpening the subject to make it stand out.
example of a pro photographer's edit using photoshop
This is just one example why, as a professional portrait photographer, I shoot RAW and how I do my photo editing.
SITUATION: I was setting up my lights while this young boy struck this pose before I was ready. I aimed my camera and took a quick photo. As you can see the original, unedited photo was overexposed.
 Over exposed and Uncropped Photo
I did a global adjustment of reducing the exposure and adjusting the color balance in the photo above to get this corrected and adorable photo below of this toddler and his older sister giggling at the situation.
 Edit of the photo included reducing exposure and adjusting color balance
Although it's a cute photo, my intent was to take an individual portrait of this young lad by himself. The final adjustments included cropping to make it a vertical composition and shading the edges of the cropped composition to get the individual portrait below.

One of the great advantages of shooting digital instead of shooting film is the many ways we can improve the photo before we print it or share it with friends and family.
Even professional portrait photographers like myself make plenty of photography mistakes, whether it's exposure or composition.
Pro photographers Make the following Global Adjustments:
BAD EXPOSURE. Under and over exposure can be corrected in several ways. Underexposure is the most common mistake that needs editing. To learn how to fix AND, better yet, avoid it, go to Underexposed Photo Help.


In the photo above all of the lighter tones in the scene fooled the camera's automatic exposure metering and the resulting photo was underexposed. Camera's are programmed to give you good exposure for average scenes, but sometimes fall short with certain subjects.
Photoshop was used to add exposure and get a more pleasing photograph.
BAD COLOR BALANCE. Have you ever taken a digital photo and when you take a look at it, the color is very strange, unflattering or just wrong? Cameras are programmed to give a good average color tint for the average subject. You can change the color temperature.
POOR COMPOSITION. You can crop your photo in any way you wish to improve it. Cropping is likely the least used and most powerful editing tool there is. There are no laws that force you to keep the same width and height dimensions. We're all guilty of grabbing the quick snapshot without taking the time to carefully compose each photo we take. See more on how to improve your composition.

In the photo on the left, I couldn't get any closer to the primate with my zoom, so I used the crop tool in Photoshop to improve the composition. Notice I eliminated the distracting blue blob and simplified the photo. The primate is the main subject and cropping closer show it better and still has a background that looks appropriate.

I used a blurring retouching tool called Gaussian Blur, combined with some darkening and "cloning" in Adobe Photoshop to do the photo retouch in this photo of the two girls. Blurring and darkening just the background makes them stand out better because the background is less distracting.
Almost all digital photo editing software now comes with a button dedicated just to red eye removal. Usually you just set the size of the retouching brush to match the size of the red eye reflection. The tool then changes the color from reddish and mutes it or "desaturates" it to look more natural.
most often used photo editing tool is Photoshop
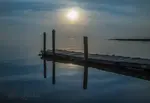
Photoshop is perhaps the granddaddy of all for photo editing tools used by professional photographers. It's used by pros in all the different types of professional photography, whether it's portraits and weddings, landscapes and nature, Let's take another look at an example, this time what a professional landscape photographer might do.
The side by side comparison of an unedited photo and its edited version show how much of a difference that even the simplest of editing tools can make. The original photo on the left, straight out of the camera, lacked in contrast because of the atmospheric haze.
 Zion National Park: Unedited vs. Edited Landscape Photo Comparison.
The photo on the right was adjusted using curves in Photoshop. This is a powerful technique used to control both shadow and highlight contrast in your photograph. The photo on the right was then sharpened a bit to add a little more impact.
It's a unique technique that I use with my landscape photography and absolutely love the control I get in adjusting the image to what I envisioned when I observed and subsequently photographed the scene.
 Photoshop Curves
It takes a bit of experimenting to get to your desired result, but my adjustments to the curves often resemble a lazy "S" shape. This shape increases contrast in the shadow areas and the highlight areas, but has little effect on the mid-tones.
I hope this post on pro photographers image editing was helpful. For related posts see the links below my signature. To search this entire website for specific topics, use the search for a topic page.


ABOUT BRUCE LOVELACE
Bruce is the publisher of this website. He is the author of the book "Improve Your Photography Instantly." Read more on Bruce on his Bio Page. He's been known as The Traveling Photographer ever since 1994. Read more about this website.
View some of Bruce's photos on Instagram. Visit the Facebook Page. Watch him on YouTube. Bruce runs photo workshops for kids and adults, and provides one-on-one photography coaching.
Digital Photography Education Location on Google My Business
You might like these
5 Basic Photo Editing Tips For Beginners. Make Your Photos 10X Better
Easy ways to improve your pictures. These Top 5 photo editing tips for beginners are the ones to do first to turn your average photos into winning photos
How to Resize Pictures For Free, Using Software or Free Online Service
Easiest way to resize pictures. Updated for 2023. Helpful guide on reducing or enlarging your photos for emailing, printing or sharing at no cost to you.
10 Best Website Posts For Digital Photo Software Reviews in 2023. List
This list will save you time with your search for the best editing software. Here Are the Best Websites on Digital Photo Software Reviews.
3 Digital Photo Editing Steps To Take in 2024 Before Anything Else
Don't retouch your photos until you read this. Before you get bogged down with editing software, save time. Use these 3 digital photo editing tips first
3 Simple Tricks on How To Blur The Background In Your Photo
How to get a blurry background on purpose, Tips on how to blur the background to get a better digital photo


Recent Articles
-
Macro Photography Lighting Tips For Indoor Photography With Flash
Mar 29, 26 11:21 AM
 What is the best macro photo lighting set-up to use? Strobe lighting or spotlight? Several articles covering macro photography lighting tips.
 -
Nature Photography Composition Tips- Guide on How to Nail it Everytime
Mar 28, 26 01:46 PM
 Read these Nature Photography Composition Tips. Improve your digital photography technique.
 -
Are HDR Nature Photos Overdone? Answers to Your Questions About HDR
Mar 27, 26 03:44 PM
 Do you want high-impact HDR images rfor personal use? You're looking for the "wow factor" that High Dynamic Range provides. Is HDR photography still overdone
 -
20 Photography Tips-How To Instantly Improve Your Photography in 2026
Feb 09, 26 07:09 PM
 How to easily get better photos. These simple photography tips will steer you in the right direction for quickly improving your results as a photographer.
 -
How To Fix an Underexposed Photo + Simple Steps to Avoid Dark Photos
Feb 08, 26 07:18 AM
 Dark photos? How to avoid an underexposed photo. 5 simple ways to on how to fix underexposed photosed photos. Easy correction steps
Improve your photography instantly. Get the 2 most important chapters of my photography book for free.