HOW TO POSTS: LIGHTING AND COMPOSITION
what is color temperature in PHOTOGRAPHY
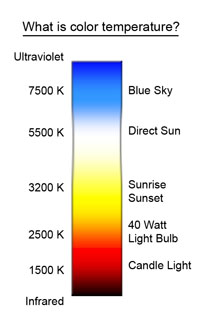 Color temperature is expressed
with a K (kelvin) number
This post will give you want you want to know on what is color temperature?
It’s a familiar story and it usually goes like this. You've taken a photo with your camera. You glance at your camera's LCD screen. You see you photo and you're a little ticked because it's got a strange color cast to it.
You wonder why it looks so different than what you see with the naked eye. This disappointing result is what you get sometimes when you set your camera to Auto White Balance (AWB). When AWB fails you, you can set your camera to a specific color temperature.
The concept of color temperature is an important part of photography, but most photographers have no idea what it means.
You can get a lot of technical information on why the term color temperature is used but let's skip the detailed technical jargon, keep the explanation simple, and get to what you need to know to help you take better pictures.
Just like we use a temperature scale to describe our weather, photographers and videographers use a color temperature scale. A simple understanding will help your pictures come out the right color that YOU want. That's the right color balance!
It is measured in degrees kelvin or "K" for short. Here's the main thing you need to know. The higher color temperature number mean cooler colors or more bluish. The lower numbers are more reddish or yellowish. We call them warmer colors. See the color temperature scale below.
 "White" daylight color temperature is considered to be around 5000K K
As you learn this concept, you will know what camera setting to use to control the color tint of your photograph. Here is an example. You can trick the camera by adjusting the camera setting to one that is different from the actual lighting conditions. If you want to "warm up" the color of your photo, use your camera's temperature setting (K) that will tell the camera to "think it's a cooler" light source like shade or blue daylight.
Rather than use one of the preset white balances on your camera, you can set the white balance (color temperature in photography) to a specific K number to get the exact color balance you want.
How To Set Color Temperture
Here's the simple step-by-step directions on how to set the color temperature balance on your camera.
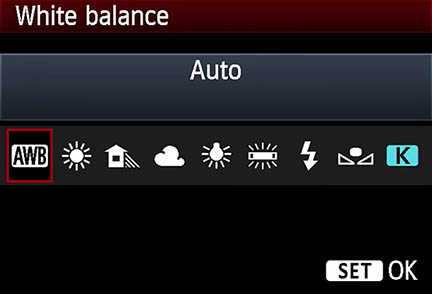 Rather than select AWB (auto white balance) or another preset,
select the K setting and adjust it to get the color YOU like.
- Go into your camera's menu and select "white balance."
- Select "K."
- Adjust the color temperature number up or down to change the color balance.
- Take another photo. Observe the result. Adjust again if desired.
Like most things in photography, you'll learn best by experimenting rather than just reading about it or watching a video. Have fun with this. Change your color temperature in several different lighting conditions to get a feel for it. The best feature about digital photography and setting your color temperature is that you get instant results and can adjust settings easily.
chart of color temperatures and light sources
Here is a simple color temperature chart with seven different color temperatures.
| DEGREES K | LIGHT SOURCE | |
| 1500 | CANDLE LIGHT | |
| 2500 | 40 WATT LIGHT BULB | |
| 3200 | SUNRISE/SUNSET | |
| 5500 | DIRECT SUN | |
| 5500-6000 | FLASH/STROBE | |
| 6500 | BRIGHT OVERCAST | |
| 7500 | BLUE SKY |
In the photo below, you can see the three different temperature preset settings produce 3 different looking photos. Using a "shady" light setting on the camera in the middle photo gives you a "warmer" look. This is often a great way to get flattering skin tones.
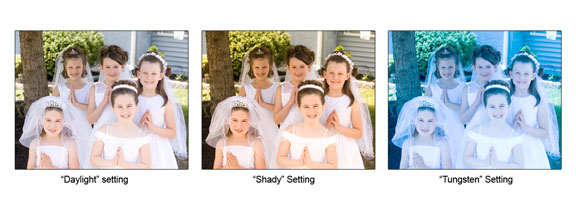 Different camera color settings
Using the camera's preset color balances
It was a bright sunny day, so I had the young ladies stand in a shaded area to avoid harsh shadows and squinting eyes.
DAYLIGHT COLOR SETTING: For this particular lighting situation, setting your camera to daylight balance gives the most accurate color rendition. Their white communion dresses appear to be white in the final photo.
SHADY COLOR SETTING: This color setting gives you a "warmer" more yellow temperature color and is often good for pleasing skin tones.
TUNGSTEN COLOR SETTING: Should only be used when your subject is being lit by a tungsten light source.
color temperature and white balance video
The following video does a great job of explaining how to set your camera's white balance, based on the lighting conditions (the color temperature). If you've got 7 minutes to invest, the payoff will be a good understanding of how you can use to get a big advantage with your color photography.
How kelvin TEMPERATURE affects color BALANCE
Here's an example of how you can use a specific color temperature in degrees kelvin ( K color balance setting) to completely change the mood of an image. Rather than make the changes in color temperature in my camera settings, I shot in RAW format and processed it afterwards with software.
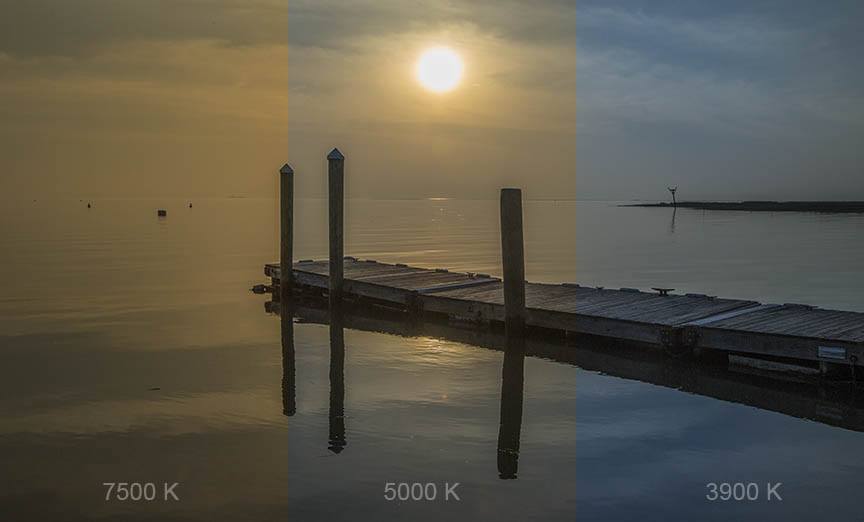
The photo below is a composite of those three different versions of color temperature processing.
The middle section of this image is fairly close to how it looked to my eyes when I photographed the scene that day. It was a kind of an unusual eerie feeling, not typical of that environment. The section on the left is just a version I did for writing this article. The section on the right shows how I processed the image and won a contest for inclusion in a special art show in my hometown.
ALTERNATIVE ways to play with color temperature balance
GRAY CARD. One fairly simple way to accurately get a good accurate balance in your color temperature is to use a gray card to do a custom white balance. I do this when I am doing product photography and the client needs an accurate color rendition of their product for advertising purposes.
You simple photograph a 18% gray card at the same time of your shoot, under the same lighting conditions, and use the custom white balance feature in your camera's settings menu.
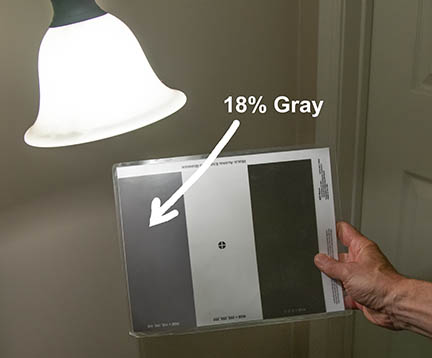 My gray card for setting a custom white balance
WHITE BALANCE BRACKETING. This technique gets very little attention or use and it's a shame. It can be used to expand your creativity as well as your understanding of color. Just like it sounds, this technique has you shoot several images of the exact same scene using different color temperatures.
You can use this if you only shoot jpg images and don't want to shoot in RAW mode and process color variation later with software. You'll get a range between the bluish and the reddish range of color temperatures. You'll find white balance bracketing in your camera's settings.
color temperature surprise
Particularly when it comes to nature photos, landscapes, and seascapes, you may not always want to have your image come out perfectly color balanced. One of the common myths regarding color temperature is that you should always strive to achieve "correct" white balance.
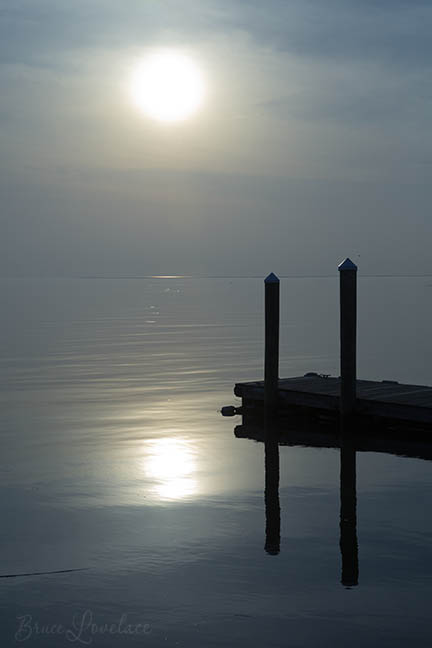
I'm often guilty of aiming for perfect color balance and this one experience reminding me to get a little more creative sometimes. Late one afternoon, when I was on the way to a small marina on the Delaware Bay side of southern New Jersey, I was anticipating finding a nice orange or red sunset to photograph along the shoreline.
As it turned out it was one of those hot muggy days where the air was thicker than pea soup with humidity. Rather than be met by a beautiful blue sky and a glowing sun, I arrived to find a stagnant sky dominated by a light gray.
I was intrigued by the scene before me, the stark contrast between the docks, the reflections, and the sky. I shot dozens of photos, and surprisingly, I preferred the cooler blue images more than the ones with the correct color balance.
As the creative artist, it's your option to portray a scene accurately or to enhance it in camera or post capture to get any desired effect you wish.
The best digital photo tip with respect to color temperature is to try a few different settings first. Look at your light source and take the same exact picture using different camera settings.
Reading this article is a good start and you can refer back to the "What is Color Temperature" picture above. Learning by actually doing it will be the best way to learn this photography technique.
CLOSING remarks on color TEMPERATURE
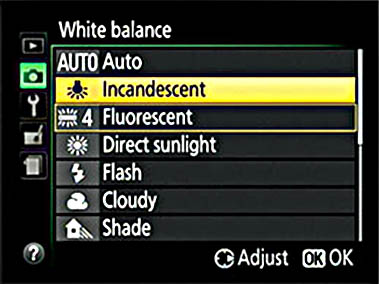
Your camera's auto white balance setting does a reasonably good job at setting color temperature for you in average photographic situations most of the time, but you will benefit by changing it in certain circumstances.
When shooting under unique lighting situations, or when you want to create a certain effect or mood to your photo, you may want to select a preset white balance or will want to set the color temperature to a specific K temperature.
Keep shooting. Keep playing. Have fun!


ABOUT BRUCE LOVELACE
Bruce is the publisher of this website. He is the author of the book "Improve Your Photography Instantly." Read more on Bruce on his Bio Page. He's been known as The Traveling Photographer ever since 1994. Read more about this website.
View some of Bruce's photos on Instagram. Visit the Facebook Page. Watch him on YouTube. Bruce runs photo workshops for kids and adults, and provides one-on-one photography coaching.
Digital Photography Education Location on Google My Business
