HOW TO POSTS: LIGHTING AND COMPOSITION
Balancing the Lights in a Holiday Photo. How To Adjust Your Flash
by Matt
(Indiana)


Adjust Your Flash Manually
Hi. Thanks very much for allowing me to ask questions. My cousin wants me to shoot some Christmas pictures of their one yr old son for Christmas cards etc. What settings would you suggest to get a good exposure with flash and still have the Christmas lights exposed well and not washed out? I have Nikon D-7000 and several Nikon speedlights along with some Alien Bee studio strobes...
My frustration is not knowing how to set everything up for a nice balanced picture that includes flash, whether it be speedlights or Alien Bees. Seems there are hundreds of ways and hundreds of settings to choose, which I understand is all about the effect one is looking for... How would you set up for some nice Christmas shots of a child around the tree and with some lights.
Thanks very much.
Matt
Hi Matt, Thanks for your question how to balance the lighting when shooting a portrait with Christmas lights and supplemental flash.
There are too many variables for me to give you one set answer, but I'll try to share some ideas on getting the exposure right. The big plus for you is you get to see the results right away with digital photography and can make adjustments early on in your photo shoot before you miss a cute expression because of a bad exposure.
Balancing strobes with holiday lights
I used to do face this same situation with film cameras many years ago, so I would have to have both meter my strobes with a flash meter and also take a reflected light reading of the background and balance the two different light sources. Technology is so much better now-although it can be very confusing because there are several approaches that will work.
The main thing is to learn how to control the output of the flash. Whether it's to go to total manual control (see the photo at the beginning) and set your speedlight to 1/4, or 1/8, or even 1/16th power, or to override the automatic setting my adjusting a "stop" or 2 under normal. See the photo below.
You need to have the ability to shoot at lower flash outputs so that the light from either a speedlight or an Alien Bee doesn't overpower the dimly lit holiday light bulbs.

Do a Practice Run First
Rather than give you a formula, I'd suggest you take photos of a large doll or stuffed animal with clothing ahead of time before you go live with a one year old.OPTION 1. You can set your camera with a high ISO number and put it on auto-exposure. Attach your flash, set it to automatic, and set it to minus 1 stop so that it will only put out about 1/2 of the power it meters is needed.
OPTION 2. You will likely "drag" the shutter a bit, meaning slow it down to the 1/15 to 1/60th of a second range to get the tiny Christmas tree lights to show up. Your subject will have to be fairly still to use this method.
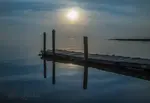
OPTION 3. Shoot without flash if possible. Photograph your subject during daylight hours with natural room light. If possible move the tree and holiday lights close to a large window and take advantage of the natural soft lighting. See the example below where there is a nice balance in the lights on the tree with the light on the subjects of the portrait.

With the D7000, you can also shoot at higher ISO settings and use some other continuous light source that is already there in the room, such as daylight from a large window, a reflector, or the regular incandescent lights that are in a floor lamp in the room.
I've been shooting location portraits around the holidays for almost 30 years and I can tell you that every situation is different.
Variables in balancing the light
Variables include the distance between the lights and your subject, your subject and the background, the strength of the bulbs on the tree, brightness of your other light source, your shutter speed and f-stops.If your one-year old subject sits still enough, you could easily shoot at 1/30th second with a tripod and get sharp results. A tripod is certainly a must in either case.
I've even done portraits where Christmas tree lights are the light source by spreading them around the child in addition to behind him or her on the tree. High ISO is needed
If you have any experience in photo editing, you could also shoot images exposed well for the Christmas lights and other images exposed well for your subject and combine them in a variety of ways in Photoshop or similar software.
I love digital photography because of all of the control you have. You can set the light sensitivity with higher ISO settings. You can evaluate the exposure and the composition of the image on the LCD screen and make an adjustment right away. Additionally, you have an infinite number of ways to improve, adjust, and create effects with editing software after the photoshoot.
Good luck and make it a fun experience for your one year old and the smiles will be the most important aspect of the photo.
Bruce
Comments for Balancing the Lights in a Holiday Photo. How To Adjust Your Flash
|
||
|
||
Wedding Photography at Night
by Cheryl Houlden
(Brandon MB Canada)


Wedding - Bride With Father
Yes, that's me and my daughter.
I have a Nikon D3000 Camera, and have been experimenting with photo shoots but I have yet to take a decent night picture. What kind of aperture etc would I need to use?
I am doing a wedding in August and it's in the evening so i would like to capture some beautiful sunset shots and low light shots. Any suggestions would be very helpful
Please email:
mchoulden@mymts.net
Thanks
Cheryl
Hi Cheryl,
Thanks for your question. Shooting weddings and doing night photography are both very in depth photographic situations and can't be answered in a simple blog post. There is so much online advice you can learn from, but experience is the best teacher of all.
Seriously, if you are shooting a wedding at night as the hired professional photographer for the wedding you should practice night photography of people in advance of the big day before trying it for a first time.
Night Wedding Photos With or Without Flash
Here's a good comparison of the difference between using your flash to illuminate your bride and groom versus using only the natural light that was present. In this first photo the flash was set to automatic to properly expose the bride, groom, and all the guests that were lined up for this photo.
In the second photo of the same scene, I turned my flash off and the bride, groom and guests were illuminated by the sparkers.

Compare the lighting in these two photos with the lighting in the photo of the bride and her father at the beginning of this post. That photo was taken inside the reception hall where there was a bit more ambient light. Here the photographer balanced the existing light in the barn with the output of her flash to get a real pleasing balanced light.
You can also get some great ideas from Pinterest and try to duplicate those photos on your own with your Nikon D3000. It can be a challenging situation, but also an opportunity to get very creative with your wedding photographs when it's dark outside.
Having a "fast lens" with a large maximum aperture like f/2.8 or f/2.0 will be a big help in those low existing light shots. If you are interested in night photography, I recommend this book: Night Photography: Finding your way in the dark
Wedding photography takes a lot of experience to master. I suggest you find a local photographer and ask to assist him or her for free on several weddings before you attempt one on your own.
In terms of what aperture to use, it depends on the situation, the Depth of Field you wish to achieve,the amount of light there is, and whether you are using flash or existing light. In general for sunset and low light shots, you use a wide open aperture (a small f-stop number) to prevent motion blur from too slow of a shutter speed.
Here is a highly rated book on lighting and shooting weddings: Captured by the Light: The Essential Guide to Creating Extraordinary Wedding Photography
Best wishes,
Bruce
half part of the picture was black
by uma sanker
(srikakulam,andhra pradesh,india)


High Speed Flash Sync or Slower Shutter Speed Needed
when take photos at f/5.6 and shutter speed 300 and iso is 100 the picture was half part is black. I don't know why this is happen please help me.
Hi Uma,
Thanks for your question to Better Digital Photo Tips on a partial dark edge to your photo.
Your camera has a focal plane shutter, literally a curtain that travels across the film plane. When using very fast shutter speeds (like 1/300 second) the shutter opening is smaller than the entire picture frame when the flash is firing.
Part of your sensor is being blocked by the curtain.That causes an underexposed portion of your image along one of its edges. The solution is to use a slower shutter speed to allow the flash to fire at the instant when the shutter window is fully open.
Depending on the make and model of your camera, 1/125 second may be the fastest shutter speed you can use to guarantee a full synchronization with the firing of the flash.
A second solution is to use "high speed" flash sync where the flash actually fires several times in very rapid succession to insure the entire frame gets exposure from the flash.

You may find this article helpful: High Speed Flash Sync Explained
Hope that helps. I don't know what camera you are using-so you'll have to find out how to set for high speed flash sync from your camera or external flash's manual.
Good Luck.
Have fun!
Comments for half part of the picture was black
|
||
|
||
What is Scrim in Photography?
by Mika
(Oklahoma)

Fotodiox kit including black to block the light and diffuser to soften the light


|


|
What is the meaning of scrim?
Thanks for your question, Mika.
A very broad definition of a scrim in photography is a "light modifier."
A more specific definition of a scrim is that it's a material positioned in between the subject and a light source that reduces and/or diffuses the light source.
Example of a Scrim in Photography
While in photography school, we used the term scrim to include objects place between the light source and the camera or more often between the light source and the lens. We used these quite a bit in the studio because some of the lights were very large and blasted light in many directions.We used scrims to feather or block part of the light from hitting part of the subject being photographed. This would place emphasis on the more brightly lighted parts of the subject. In studio situations when we used several lights we often had to block the light from the studio lights from directly hitting the lens, causing lens flare and reducing image quality.
For indoor studio portraits I use a scrim (small barn doors that attach to my light head) on my overhead hair light, which is above and behind my subject in portrait set-ups, which feathers the light on my subjects head as well as blocks any light from hitting my lens.
In outdoor photography I have occasionally used the diffuser panel (shown in the first photo) to soften the light from the sun and prevent harsh shadows in portrait shoots.
The most well known definition is used in the film and television industries and refers to large panels to diffuse both natural and electric light sources.
More photography terms
Photography lighting equipment
Have Fun!
Bruce
You might like these
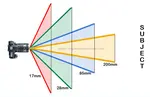
Best Focal Length Lens For Travel Photography
The Ultimate Travel Lens Showdown: Why You Might Be Overpacking. Pro and Cons of travel lenses. What's The Best Focal Length Lens For Travel Photography
Why Are Fast Lenses Expensive And How To Save Money on Fast Lenses
Recommended for sports, wildlife and nighttime photography, fast lenses are valuable but pricey Here are the reasons why are fast lenses expensive
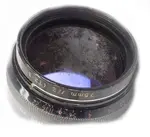
How to Clean a Camera Lens- Helpful Guide With Cleaning Tips and Tools
Spotless Shots: A Guide to Camera Lens Cleaning. Biggest mistakes revealed. How to clean a camera lens the right way.
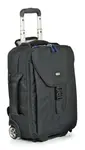
How to Choose The Best Travel Camera Bag For Airline Travel
It's a personal choice based on what you need to carry. You can copy the foolproof method I came up with to choose the best travel camera bag for airline travel
5 Digital Camera Accessories For Beginners. Camera Gear You'll Love
What camera gear to get first.Get great deals on the essential Digital Camera Accessories for your DSLR. Beginners Guide to 10 DSLR camera accessories.
What is a Battery Grip For, Is it Worth It and How to Install a Grip?
An intriguing digital camera accessory for several reasons, but what is a battery grip?

Sitemap: Better Digital Photography Tips Website. Photography Articles
The complete sitemap for better-digital-photo-tips.com Better Digital Photo Tips Index of Articles and Blog Posts
Useful Photography Resources For You That I Use and Recommend
These are the photography products or services that I personally like and use. Helpful photography resources for you to improve your photography.
About The Digital Photography Tips Website and Finding Inspiration
It's all about inspiration. What Inspired me to build this website for you. Find out more about the Digital Photography Tips website and inspire yourself.

Search for a new topic on this site:
Recent Articles
-
Macro Photography Lighting Tips For Indoor Photography With Flash
Mar 29, 26 11:21 AM
 What is the best macro photo lighting set-up to use? Strobe lighting or spotlight? Several articles covering macro photography lighting tips.
 -
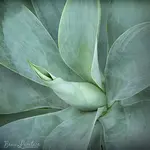
Nature Photography Composition Tips- Guide on How to Nail it Everytime
Mar 28, 26 01:46 PM
 Read these Nature Photography Composition Tips. Improve your digital photography technique.
 -
Are HDR Nature Photos Overdone? Answers to Your Questions About HDR
Mar 27, 26 03:44 PM
 Do you want high-impact HDR images rfor personal use? You're looking for the "wow factor" that High Dynamic Range provides. Is HDR photography still overdone
 -
20 Photography Tips-How To Instantly Improve Your Photography in 2026
Feb 09, 26 07:09 PM
 How to easily get better photos. These simple photography tips will steer you in the right direction for quickly improving your results as a photographer.
 -
How To Fix an Underexposed Photo + Simple Steps to Avoid Dark Photos
Feb 08, 26 07:18 AM
 Dark photos? How to avoid an underexposed photo. 5 simple ways to on how to fix underexposed photosed photos. Easy correction steps

Improve your photography instantly. Get the 2 most important chapters of my photography book for free.