HOW TO POSTS: LIGHTING AND COMPOSITION
5 Must Know Photoshop Tricks For Photographers
This post on Photoshop tricks for photographers was written as a guest post for better-digital-photo-tips.com by Sentil.
Over
the years, I've come across many photographers who say they only need
Lightroom to handle their post-production work. I'm a graphic
designer who does edits and post-production work for several
photographers and I have to disagree with such a statement. Yes,
Lightroom is a great program and can do many wonderful things in a
neat and user-friendly way. However, when you look at it, Lightroom
is like a pistol whereas Photoshop is like a full-blooded machine
gun. Mastering such a program could, no scratch that, WILL take
years. Learning and mastering Photoshop is not a practical solution
if you're a photographer who's looking to make a few quick edits to
push the reaction of your clients from 'Good!' to 'Wow!'.
However, that does not mean that you should completely ignore Photoshop. You should ideally work with your own in-house graphic designer but if you cannot afford to hire one, fret not for there are several simple tricks you can learn to get the desired effects yourself using Photoshop. Let us now take a look at a few such must-know Photoshop tricks for Photographers.
healing
The healing tool is one the favorite photoshop tricks for photographers to use. If you are someone who shoots people regularly, the healing tools in Photoshop will be a godsend. People always want to look perfect in pictures.
There will be skin blemishes, moles, spots, and pimples that you will definitely need to edit out from your photographers. Thankfully, Photoshop has two super useful tools that do the job for us in a single click.
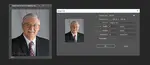
The Spot Healing Brush Tool
The spot healing tool is one of the smartest tools that is available in Photoshop. It uses the pixel data from around the spot that we click and uses that to predict what the clicked region would look like without the spot.
This is so wonderful to use because spots often
hide partially behind hair strands and manually correcting it will
most certainly damage the hair, thus making the photo look
artificial. Since the spot healing tool uses a predictive technology,
it is able to replicate the hair strands and the results are amazing.
Let us take a look at an example:
I've manually added a red spot here to illustrate how effective the spot healing brush tool can be.
 Spot Healing Brush
With a single click over the spot using the spot healing brush tool, this is the result:
 After Spot Healing Brush
the healing brush tool
The healing brush tool is similar to the spot healing tool with just one small difference. Instead of Photoshop predicting what should be done to remove the spot or blemish, we need to manually set the source pixels by Alt-clicking(Windows)/Option-clicking (Mac) on the region we would like to use as the source.
blending modes
Layer Blending Modes are basically settings that affect the way a layer blends with all the layers underneath it. The blending options are grouped into buckets based on what they do. For example, Darken, Multiply, Color Burn, Linear Burn, Darker Color are grouped together, because, as the name suggests, they blend with the layers underneath by darkening them.
Similarly, there are groups that lighten, enhance the colors, add hues, and even reverse colors. These modes are particularly useful when trying to change the color tone of the image or the subject. I have had clients who wanted to get a nice tanned look in their vacation photos. Let us take a look at a small example to see how this can be achieved using Blending modes.
Here's the image before we begin the editing:
 Skin needs to be darkened
In order to darken the skin to give it a nice tanned feel, we will be using the Multiply Blending Mode. To get started, we will simply duplicate the image layer by pressing Ctrl+J (Windows)/Cmd+J (Mac).
Then, to finish it off, we simply change the blending mode of the new duplicate layer to Multiply. However, you will notice that the entire image looks way too dark now. To reduce the intensity of the darkness added, we can simply reduce the Opacity of this Duplicate Layer until we achieve the desired effect.
 Retouching made skin darker.
However, you will notice that in addition to the skin, the hair, hat and other objects have also become dark. In order to prevent this from happening we will need to use a layer mask and show only the skin regions. Let us take a look at how this can be achieved in this next section.
Skin Selection
Skin selection used to be one of the most challenging tasks in previous versions of Photoshop. However, the good folks at Adobe have made it super easy for us nowadays by adding what is called the Colour Range Selection. This option can be found in the Select Menu of Photoshop.
 How to select skin in Photoshop
To select the skin, simply open the Colour Range window and select the Skin Tones option in the 'Select' dropdown menu. This will automatically select the skin tones in the entire image. We can adjust the fuzziness slider to include more or fewer skin tones in the selection. Once we are satisfied, all we need to do is hit 'Ok'.
 Mask
MaskThe Skin selection will be ready and we can use it to create masks, add effects, etc. In the below image, you can see that the tan effect now affects only the skin while the hair, hat, and clothes retain their original color.
 Retouched Photo
Glamor Glow
Have you ever picked up a fashion magazine, seen the cover image, and exclaimed, 'Wow, she has such wonderful skin!'? If yes, then I'm sorry to say you've been deceived by Photoshop's Glamor Skin Glow. This effect has become so popular over the years that it is a staple for almost all images that you see in magazines and even on Instagram.
Yes, those gorgeous model photos you see on Instagram -
glamor skin glow. So as photographers, if you can make your subjects
appear stunning, just like the models on Vogue, you can be sure that
your client base will soon start multiplying. So without further ado,
let us take a look at how you can create this neat effect.
We'll be using the same image from the previous example to illustrate the power of this effect. Here's the image without any retouching.
 Glamor Glow
Adding Skin Mask
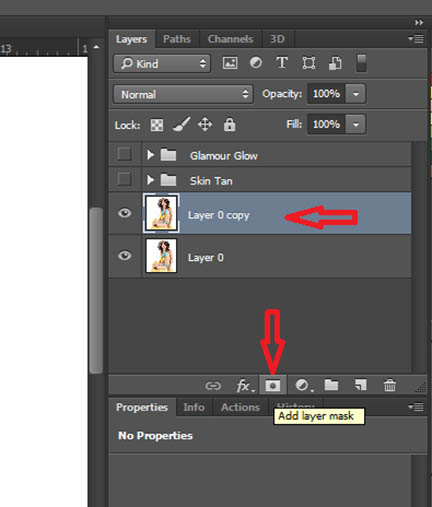
To get things started, we will go ahead and duplicate the image layer using the key combination - Ctrl+J(Windows)/Cmd+J (Mac).
We will then use the technique illustrated in the above section to select the subject's skin. Using this selection we will now create a layer mask for the duplicate layer.
To create the mask, simply click on the Layer Mask button at the bottom of the Layers Panel after ensuring that the duplicate layer is selected.
another of the best Photoshop Tricks For Photographers - Adding Gaussian Blur
Once the layer mask has been applied to the skin selection, we can go ahead and smoothen the skin. To do this, we need to apply a Gaussian Blur effect. Simply select Filter->Blur->Gaussian Blur to open the Gaussian Blur Window. Inside the Gaussian Blur Window, simply adjust the Radius slider such that the subject's features are barely recognizable. With that, hit 'Ok' to apply the Gaussian Blur effect.
 Softening the skin with blur in Photoshop
Changing the Blending Mode
Of
course, the image will now look all wrong but fear not for we only
need to do one more thing to get the glamor glow effect - Change the
blending mode to Overlay. And boom, there's the glow in all its
glory. If you feel the effect is too much, you can, of course, tone
it down by reducing the opacity of this duplicate layer.

There you have it, three simple steps to give your clients that wonderful glowing skin.
Hue Saturation
We come to the last of our Photoshop tricks for photographers. Hue Saturation is one of those tools that I use all the time. It is extremely powerful and can help rescue what could otherwise be totally lost shots. I often get model shots from Photographers for editing.
Sometimes, the Photographers might need the color of the
clothing to be enhanced or even changed a bit to make them look more
attractive. The same is the case with the model's hair, lips, and
more often than not, their nail color too! Thanks to Photoshop's
powerful Hue Saturation tool, all this becomes super simple to
achieve. I'll illustrate it with an example below.
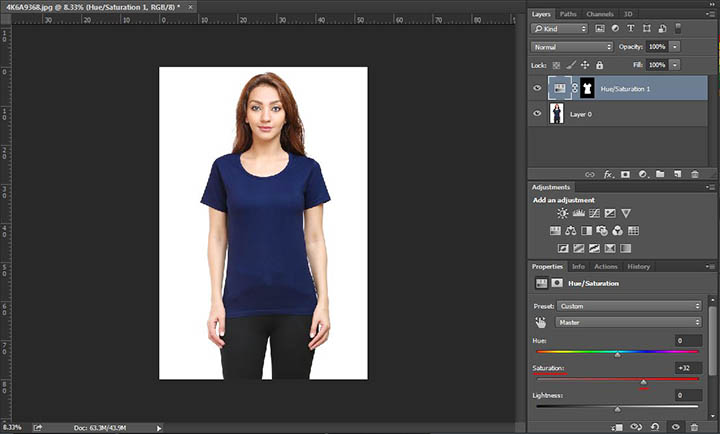
 Hue saturation adjustment in Photoshop
Here's the image of the model. My photographer wanted to enhance the color of the T-Shirt and make it look a richer blue to make it more attractive. Here's how this can be easily done. Simply adjust the saturation slider to the required level and you are done!
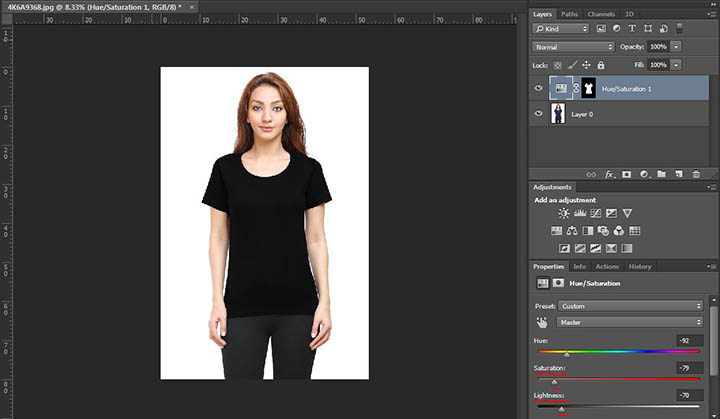
Let me also illustrate the incredible power of this tool by going ahead and completely changing the color of the tee to a nice bottle green and cool black color! All you need to do is play around with the Hue, Saturation, and Lightness slider to achieve your desired look.

And below, we can see that we've changed the color of the t-shirt to black.
That brings us to the end of this post on photoshop tricks for photographers. Do try these on your images and remember to do this: Keep shooting. Keep learning. Keep improving.


ABOUT BRUCE LOVELACE
Bruce is the publisher of this website. He is the author of the book "Improve Your Photography Instantly." Read more on Bruce on his Bio Page. He's been known as The Traveling Photographer ever since 1994. Read more about this website.
View some of Bruce's photos on Instagram. Visit the Facebook Page. Watch him on YouTube. Bruce runs photo workshops for kids and adults, and provides one-on-one photography coaching.
Digital Photography Education Location on Google My Business
You might like these
3 Digital Photo Editing Steps To Take in 2024 Before Anything Else
Don't retouch your photos until you read this. Before you get bogged down with editing software, save time. Use these 3 digital photo editing tips first
5 Basic Photo Editing Tips For Beginners. Make Your Photos 10X Better
Easy ways to improve your pictures. These Top 5 photo editing tips for beginners are the ones to do first to turn your average photos into winning photos
How Professional Photographers Do Digital Photo Editing-For Beginners
Unlock Pro Secrets: A Look Inside a Professional Photographer's Digital Editing Workflow This is how the pro photographers do their digital photo editing.
How to Resize Pictures For Free, Using Software or Free Online Service
Easiest way to resize pictures. Updated for 2023. Helpful guide on reducing or enlarging your photos for emailing, printing or sharing at no cost to you.
10 Best Website Posts For Digital Photo Software Reviews in 2023. List
This list will save you time with your search for the best editing software. Here Are the Best Websites on Digital Photo Software Reviews.


author BIO:

Senthil is a Photography Enthusiast from India who has travelled the World with his camera for over 5 years. He also runs an online store called Swag Swami selling cool Photography T Shirts. He also grooms young children to take up Photography and experience the joy that comes with clicking that perfect picture.
Search for a new topic on this site:
Recent Articles
-
12 Unique Camera Tripod Accessories. Get The Most Out of Your Tripod
May 12, 26 06:47 AM
 Tripods are essential in some situations, optional in others, but also vital is the tripod head + other camera tripod accessories. Check out these cool gadgets.
 -
Macro Photography Lighting Tips For Indoor Photography With Flash
Mar 29, 26 11:21 AM
 What is the best macro photo lighting set-up to use? Strobe lighting or spotlight? Several articles covering macro photography lighting tips.
 -
Nature Photography Composition Tips- Guide on How to Nail it Everytime
Mar 28, 26 01:46 PM
 Read these Nature Photography Composition Tips. Improve your digital photography technique.
Before and after retouching example
 Unretouched image
Inside the national aviary in Pittsburgh, this Inca Tern, like the other birds, wears a band around its ankle. I wanted to make it more like a natural habitat image, so I used the healing brush in Photoshop to easily remove the band.

Improve your photography instantly. Get the 2 most important chapters of my photography book for free.