HOW TO POSTS: LIGHTING AND COMPOSITION
How To Avoid, Reduce, Fix, and Test For chromatic aberration
Color fringing, also known as chromatic aberration, sucks. Sorry for the harsh language, but it does. You've just pixel peeped at your most recent photo and you're aghast to see those bands of color interfering with the image quality.
Lenses have shortcomings, but don't despair. Read on.
 Example of Green/Magenta Chromatic Aberration
First of all, take a deep breath. You're in the right place. This article will teach you how to fix chromatic aberration (abbreviated as CA), how to reduce or eliminate it altogether, as well as an easy way to test for chromatic aberration with your lens.
Just like me, you want sharp, distortion, and aberration free photographs. Photographing certain subjects and using specific lens settings can ruin your otherwise attractive photo.
Initially, if you can't avoid it, CA can easily be corrected with software. Ideally, you want to avoid it, but if the lens you're using and the conditions you're shooting under produce that annoying color fringing, it only takes a minute to improve the image quality of your photo using your favorite editing program.
Let's start with the best ways to reduce lens chromatic aberrations first, without having to use software.
How to Fix Chromatic Aberration
Here are the 4 easy ways to reduce or eliminate chromatic aberrations from your lens before you even look at them on your computer.
1. Close Down Your Lens Aperture
The easiest way to cut down on color fringing is to simply stop down your lens. You may have to use a slower shutter speed or faster ISO to compensate, but it beats having chromatic aberrations ruining your photographic masterpiece.
Rather than leave your lens wide open at its maximum aperture stop down 2 full f/stops. Most lenses have much less CA when the lens is set to a smaller opening than when it's at its widest setting. Using a slightly smaller aperture has other image quality benefits. You'll improve on sharpness and get greater depth of field.
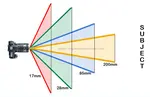
2. Use the middle of your lens zoom Range
You can reduce the amount of CA by limiting the focal length you use with your lens. Stay away from both the widest angle and the strongest telephoto focal lengths of your zoom lens.
The wider the zoom range, then the more likely your lens will produce chromatic aberrations, particularly at both ends of its zoom range. Compromises must be made in lens design when zooming capabilities are added to a camera lens.
3. Use a Prime Lens
Non-zooming prime lenses generally have less CA than zoom lenses. Without the optical complications of zooming built into a lens, lens makers can use lens elements that will minimize defects.
All lenses are distinctly unique in their particular characteristics and performance. Image quality in prime lenses is superior to image quality with zoom lenses in most instances. Of course, lens makers manufacture both budget and high quality lenses to fit your particular needs. That makes testing your specific lens for CA is a smart step to take.
4. Only Use the Middle of your Image area
Leave extra room at the edges of your photo when you compose it in your camera. Keep your subject somewhat close to the middle of the photo. Then, crop afterwards, if you have to, to get your desired composition.
The center of your lens will produce less color fringing. Because of the curvature of the lens elements, the worst CA is at the edges of your image. If you only use the center of your image circle you'll avoid the areas of your lens that aberrate the most.
 Avoid chromatic aberration by only using the center of your image.
In the photo of the ferns above, the worst of the CA, the areas at the corners of the image, is "cropped" from the original. This technique adds the extra step of cropping, but cropping often makes an image more powerful.
5. Avoid subjects with high contrast objects near the edges
Areas of high contrast produce the most havoc with your lens. You can avoid high contrast subjects when you're composing your photo.
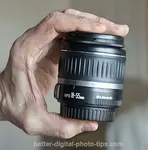
 Canon EF-S 10-18mm Lens
Chromatic Aberration isn't too bad
Enlarged High Contrast Area From Corner
This is not the most popular fix for chromatic aberrations, I agree. You may not want to shoot your subject in a different way just to avoid the CA, although having the understanding about chromatic aberrations and high contrast subjects will be helpful.
There will be times when you can change the angle or position of your camera or shoot at a different time when the lighting has changed. Just the fact that you have an understanding of where it's most likely to show up gives you an advantage.
6. Use the lens that's made With the right Material
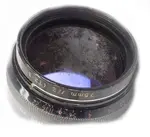
 Low Dispersion Glass Elements
Use a lens that was made with low-dispersion glass elements, particularly those make of fluorite. They will give you less of an issue with chromatic aberration than traditional lens glass.
Lenses that are labeled "achromatic" are designed specifically to reduce lens chromatic aberration. When considering the purchase of a lens, just look for those phrases in the description of the lens.
7. Use Your Camera's Built-In Correction
Depending on your specific camera model you own, you may already have correction built-in to your camera's image processing.
For instance, here is the CA correction on my Canon 90D.
 The camera knows the chromatic characteristics
of the lens that's mounted on it.
Search in your camera's menu or go back to your camera manual to see if this is an option for you to use. If not, you can always edit your image in a multitude of ways once you've uploaded it to your computer.
8. post capture fixes for chromatic aberrations
Whether it's in your camera or on your computer, you can fix lens chromatic aberrations with software.
BLACK AND WHITE. Convert your photo into a black and white image. For some, this may defeat the purpose of the photo depending on the subject matter that you're photographing. Surprisingly, many subjects that look good in color also look good in black and white.

No matter what, make a copy of the original file and convert that to black and white. That gives you the option of using either the color version or the black and white without any aberrations.
CHROMATIC CORRECTION. Photoshop is the most well known software of professional and advance photographers. This software comes with the option of either manually or automatically correcting color fringing. In the software it's located under the filters tab in "lens correction."
 You can use a filter called "Lens Correction"
in Photoshop to correct the color fringing.
In Adobe's Lightroom, there's an option under "Lens Corrections" specifically designed to reduce chromatic aberrations.
 You can fix chromatic aberrations in Adobe Lightroom
How to TEst YOur Lens For Chromatic Aberrations
There are several easy targets for you to use when you do a do-it-yourself test for CA with your particular lens. Even duplicate copies of the same lens model can have variations in how they perform. It makes sense to be able to test the very lens that you have mounted to your camera.
Here is the simple 6 step way to test your own lens for chromatic aberrations:
 Use a printed test target to test for chromatic aberration
- Shoot a subjects with high contrast elements near the edges of your frame.
- Use a stable tripod to eliminate any blur lack of sharpness from movement.
- Test at different focal lengths. Use the widest angle setting, the middle setting, and the most telephoto focal length of your zoom lens, all with the SAME aperture.
- Test at different apertures ( large, medium, and small f/stop numbers) to see the differences-all at the SAME focal length.
- Use pen and paper to make notes of your settings and your results.
- Examine your photos closely, doing side by side comparisons, zoomed in close, to determine the particular chromatic characteristics of your lens.
CA Test Targets:
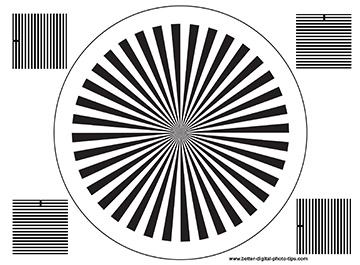 Chromatic Aberration Test Target
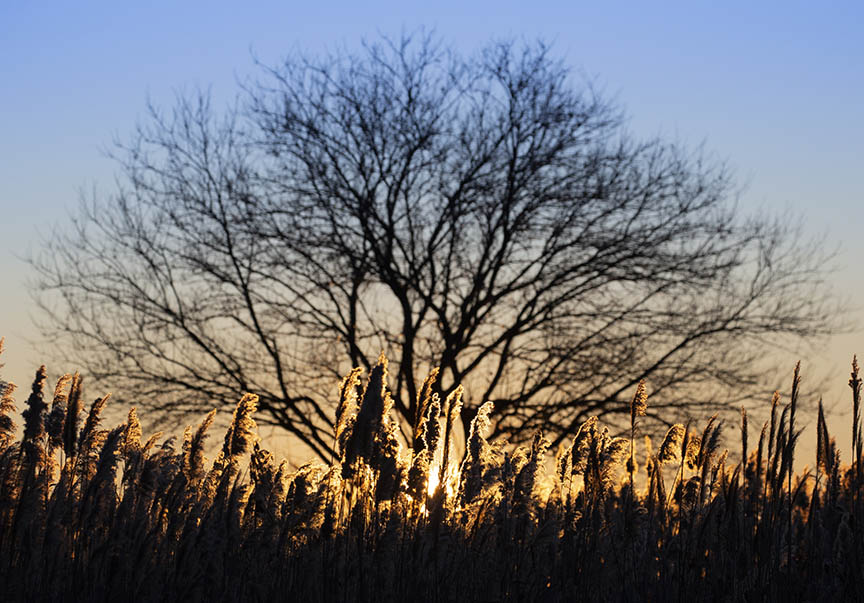 Natural High Contrast Target
Here's the link to a test target that you can download for free: test target, and you can print out. When you photograph it, make sure to compose your photo so that it fills the frame. That will ensure that you'll get to to see the chromatic
What Causes Chromatic Aberrations
 of how the different wavelengths of light focus at different distances.")
Several different factors can contribute to the amount of chromatic aberrations your lens gives you.
most common ways you'll get chromatic aberrations
CHEAP LENSES: Budget lenses don't use the very best materials when it comes to fixing chromatic aberrations. You get what you pay for when it comes to budget and quality camera lenses.
HIGH CONTRAST SCENES. Dark trees against a light sky, building, snow scenes, and other situations with high contrast areas, particularly near the long edge of your photograph.
MAXIMUM APERTURE. Shooting with your lens set at its widest aperture. Image quality is often its worst when your shooting at the lowest f/stop number.
ZOOM SETTING. Shooting at the widest angle your lens will give you can increase the likelihood that you'll have some CA in your resulting photo.
final remarks on camera lens chromatic aberrations
Almost all camera lenses have some degree of chromatic aberration. It comes down to how much CA is acceptable and what steps you are willing to take to eliminate, avoid, or fix it.
Purchasing a new high quality lens can be expensive. One great way to get "pro" quality lenses at an affordable price is to buy used. When I want to test a lens I buy my used lenses from KEH Camera. I highly recommend them and they're listed on my photography resources page.
I hope this post was helpful. For more lens articles, see the list below my signature, or search for any topic on this website using the Google search box below. For one of my in-depth articles on camera lenses, read this.
Search for a new topic on this site:


ABOUT BRUCE LOVELACE
Bruce is the publisher of this website. He is the author of the book "Improve Your Photography Instantly." Read more on Bruce on his Bio Page. He's been known as The Traveling Photographer ever since 1994. Read more about this website.
View some of Bruce's photos on Instagram. Visit the Facebook Page. Watch him on YouTube. Bruce runs photo workshops for kids and adults, and provides one-on-one photography coaching.
Digital Photography Education Location on Google My Business
You might like these
Best Focal Length Lens For Travel Photography
The Ultimate Travel Lens Showdown: Why You Might Be Overpacking. Pro and Cons of travel lenses. What's The Best Focal Length Lens For Travel Photography
Why Are Fast Lenses Expensive And How To Save Money on Fast Lenses
Recommended for sports, wildlife and nighttime photography, fast lenses are valuable but pricey Here are the reasons why are fast lenses expensive
How to Clean a Camera Lens- Helpful Guide With Cleaning Tips and Tools
Spotless Shots: A Guide to Camera Lens Cleaning. Biggest mistakes revealed. How to clean a camera lens the right way.
What Is A Kit Lens Good For And How To Get The Most Out of One
Are kit lenses any good and what are kit lens good for? Advantages and disadvantages. Helpful guide to getting the most out of a kit lens
What is a Pancake Lens Used For And Why You Should Want One Too
They seem to have gotten a boost in popularity. What is a pancake lens and is one of these unique lenses right for you? Helpful guide to short, lightweight lenses.

Recent Articles
-
Macro Photography Lighting Tips For Indoor Photography With Flash
Mar 29, 26 11:21 AM
 What is the best macro photo lighting set-up to use? Strobe lighting or spotlight? Several articles covering macro photography lighting tips.
 -
Nature Photography Composition Tips- Guide on How to Nail it Everytime
Mar 28, 26 01:46 PM
 Read these Nature Photography Composition Tips. Improve your digital photography technique.
 -
Are HDR Nature Photos Overdone? Answers to Your Questions About HDR
Mar 27, 26 03:44 PM
 Do you want high-impact HDR images rfor personal use? You're looking for the "wow factor" that High Dynamic Range provides. Is HDR photography still overdone
Improve your photography instantly. Get the 2 most important chapters of my photography book for free.