HOW TO POSTS: LIGHTING AND COMPOSITION
the rule of thirds in photography
(What it is and when to use it)

The rule of thirds in photography is likely the most commonly used rule of composition and it's one of the easiest techniques you can use to improve your photography.
It's a good rule rule to use in many situations, but not all. You can use this article as a rule of thirds tutorial to teach yourself how and when to use this useful rule of composition.
Some of these examples of the rule of thirds in this post will show you subtle uses of the rule and other examples will give you more obvious situations for you to use it. Pour your favorite beverage, relax, and take a few minutes to dive in. Rather than just scroll through the article, take a little time to really study the images and their compositions. You'll get a deeper understanding of the rule of thirds and be able to use it more appropriately and more effectively.

In the "After The Snowstorm" photo, I composed the photo by visualizing imaginary lines, both vertically and horizontally that divide the photo up equally into 3 sections. I aligned the top of the snow area and the bottom of the blue sky area approximately on the two horizontal lines. However, I did NOT place a center of interest object at any of the intersections of those 1/3 lines which is the standard way most instructors describe it. The result is a nicely balanced photo.
You'll see more obvious standard examples of using the rule in a second, but first let's check out the how to use it.
1. FIRST STEP TO USE THE RULE
Simply imagine dividing your view into thirds (both horizontally and vertically) with lines. You'll have an imaginary 9-part grid overlaid on top of your image as a guide. Those imaginary lines also intersect at 4 points in your field of view. You do this when you are holding your camera horizontally (like the fisherman photo below) or if you are shooting vertically, up and down orientation (sometimes called "portrait" orientation).

Some digital cameras have a setting where you can have those rule of thirds lines show up in your viewfinder or on your LCD screen to help you when you are composing your photo.
2. second STEP TO USE THE RULE
Move your camera position and adjust your lens zoom setting until you have the important parts of your photo along one of those lines and/or one of the 4 intersecting points. Take a few subtle variations while your shooting and evaluate them later on the larger screen of your computer.
 Place the horizon at one of the imaginary 1/3 lines.
These photos show you an interesting subject and how you can change the emphasis with your composition. The first photo shows you the common mistake of dividing your photo in half. The second photo is better by placing the horizon at a 1/3 spot. The third photo is altogether different by changing the horizon to be placed at the top third. The middle photo emphasizes the sky and the photo on the right emphasizes the waves.
Okay, You see it's an easy rule to understand, but there are obvious, as well as more subtle situations on when to use the rule of thirds in photography.
typical use of the rule of thirds in photography
Landscape photography often includes horizons and as a general rule of thumb you should not take the photo with the horizon dividing the frame into two equal parts. Use one of the 1/3 lines instead. You can see how the horizon was placed almost exactly on the line 1/3 of the way down from the top.

If you follow the shoreline with your eye you will see an "s" curve and that is another composition technique that can work well with the rule of thirds to give you a winning composition.
subtle uses of the rule of thirds in photography
The photo on the left shows what is usually a common photography mistake, The Bulls-Eye Technique. That is placing your focal point, your center of interest, directly in the middle of you photograph. See the tower in middle of the photograph? In this case, it's not such a big deal. The tall tower is fairly small in the photo and both the globe on the left and the tree on the right act like large framing devices.

The photo on the right used the rule of thirds in a subtle way. I zoomed in a bit and I aimed my camera just a little more to the left. This moved the two towers to about a one-third the distance from the right edge of my photo. Okay, Bruce, what's the big deal here? This isn't a huge difference in this example. I agree.
It this instance it is a subtle difference. Sometimes it makes a BIG difference in your photo. It is an small improvement though, and sometimes those small differences make a good photo into a great photo. Next, is another example below, of an improvement in composition by using this rule of thirds again in a subtle way. The original is on the left. The improved photo is on the right.
 With and without the rule of thirds
Here is a very short video below of the same technique used to improve your photography. The rule can be used when shooting video with your camera as well. It is a bit more difficult when you have a moving target as many video clips do.The standard thing many photographers do is to simple aim the camera directly at the main subject.
If the photographer had zoomed in even closer, I think it would have improved the composition even more.
The photo below shows how to use the rule of thirds when shooting a close-up of a bird. It wasn't one of my favorite photos, but you can see that placing the bird's eye at one of the intersections of the 1/3 lines created a pleasing, balanced composition.

Here's the 3-step formula to figure if you should use this technique or not with your photography.
- Use the rule of dividing into thirds to compose your photograph.
- Compose another photo of the same subject, but this time without using the rule.
- Compare the two and see which one you like.
Of course, the saying goes that all rules are meant to be broken. Or is it, all records are meant to be broken? In any case with compositions rules, they should only be used as good guidelines that will help you compose better photographs in most situations.
There are, or course, situations where you will want to break the rule of thirds, and you can always crop your photograph afterwards. It's just a guideline for balancing elements in your photography.
definition of the rule of thirds
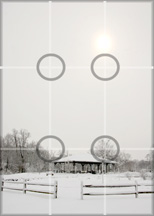
This composition rule has been used in painting, art and design for a long time, perhaps since the time of the art created by the caveman.
It says you should divide your viewfinder into nine equal parts by two equally spaced horizontal lines and two equally spaced vertical lines. You are dividing the picture in thirds, side to side, and top to bottom.
Those imaginary lines intersect at 4 points in your field of view.
As you look through your camera viewfinder or at the screen on the back of your camera or camera phone, points of interest in your photograph should be placed at or close to the intersection of the lines, shown by the circles in the illustration.
This gives the photo more energy and interest.
The Rule of Thirds in Photography can be used almost instantly to improve a photograph. Good use of other composition rules such as balance, leading lines and perspective are often more involved. With the inclusion of zoom lenses on almost all digital cameras, it's a simple matter to zoom in or to zoom out, to recompose your photo and employ the rule of thirds at least to some extent when it "feels" right.
The recap of what is the photography rule of thirds: it's a way to divide your image into imaginary sections by superimposing vertical and horizontal line across your camera frame at 1/3 distances. Even with cell phone cameras to some extent, you can adjust your composition by changing the the magnification and combine that with a slight change in your cameras direction to achieve a better photo.
Photography composition rules are subjective and should not be followed religiously. The best part of digital photo editing is that you can try a few slight variations when composing and choose your favorite afterwards.
Keep shooting. Keep learning. Keep improving.


ABOUT BRUCE LOVELACE
Bruce is the publisher of this website. He is the author of the book "Improve Your Photography Instantly." Read more on Bruce on his Bio Page. He's been known as The Traveling Photographer ever since 1994. Read more about this website.
View some of Bruce's photos on Instagram. Visit the Facebook Page. Watch him on YouTube. Bruce runs photo workshops for kids and adults, and provides one-on-one photography coaching.
Digital Photography Education Location on Google My Business
You might like these
When and Why You Must Break The Rule Of Thirds In Photography
Do you dare break the rule of thirds in photography? Here are unique examples you can learn from and quickly improve your photo's composition
Examples of Rule of Thirds in Photography And When NOT To Use It!
7 Unique Examples of the Rule of Thirds in Photography and How You Should NOT Follow It Too Closely

How To Use Framing in Your Composition-Quick Improvement To Your Photo
Is framing any good as a compositional technique? Simple guide to one technique that usually works well is to use framing in your composition
10 Simple Photography Composition Techniques to Improve Your Photos
Helpful guide to quickly improve your photography. Use with these 10 Photography Composition Techniques to change your photos from good to great!
How To Get Great Dog Photos. Photo Composition Tips For The Dogs
How to take great photos of your dog. Dog photo composition tips that pros use. Learn how to take good pictures of your dog. 7 tips for great dog photos.


Recent Articles
-
Macro Photography Lighting Tips For Indoor Photography With Flash
Mar 29, 26 11:21 AM
 What is the best macro photo lighting set-up to use? Strobe lighting or spotlight? Several articles covering macro photography lighting tips.
 -
Nature Photography Composition Tips- Guide on How to Nail it Everytime
Mar 28, 26 01:46 PM
 Read these Nature Photography Composition Tips. Improve your digital photography technique.
 -
Are HDR Nature Photos Overdone? Answers to Your Questions About HDR
Mar 27, 26 03:44 PM
 Do you want high-impact HDR images rfor personal use? You're looking for the "wow factor" that High Dynamic Range provides. Is HDR photography still overdone
 -
20 Photography Tips-How To Instantly Improve Your Photography in 2026
Feb 09, 26 07:09 PM
 How to easily get better photos. These simple photography tips will steer you in the right direction for quickly improving your results as a photographer.
 -
How To Fix an Underexposed Photo + Simple Steps to Avoid Dark Photos
Feb 08, 26 07:18 AM
 Dark photos? How to avoid an underexposed photo. 5 simple ways to on how to fix underexposed photosed photos. Easy correction steps
 -
10 Useful Nature Photography Tips For Beginners That You Must Know
Jan 31, 26 08:12 PM
 Want to take better pictures of nature? These simple nature photography tips are sure to help you take better digital photos with your camera.
RELATED TOPICS
- Top 10 Simple Composition Techniques
- How To Use Framing in Your Composition
- 7 More Examples of Using The Rule Of Thirds
- When NOT To Use the Rule of Thirds
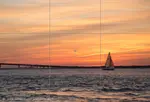
 Bridge Reflection
Horizon placed at 1/3 position
Improve your photography instantly. Get the 2 most important chapters of my photography book for free.