HOW TO POSTS: LIGHTING AND COMPOSITION
understanding lighting ratio
A Simple 3-part explanation
I've been shooting photos with different lighting ratios since 1982. That's 20 years before digital photography and camera LCD screens. Understanding ratios of light between the highlights and the shadows of your photos is critical to your success as a photographer.
Let's get one thing straight, though. The exact lighting ratio is not something you need to calculate in order to take a great photo, but understanding it will help you be a better photographer.
Fortunately, you only need a basic understanding on how to control this ratio to the extent that gives you the effect you want.
WHAT'S IN THIS POST:
But first, you're probably wondering what is and why it matters. Here's a simple definition.
1.definition of lighting ratio

The lighting ratio in photography is simply a comparison of the amount of light that is supplied by the main light compared to the amount of secondary fill light that hits the shadow areas of your subject.
You use the main light (also called the "key light") to highlight the shape and dimension of your subject and you use the fill light to control the contrast. A stronger fill light will lighten the shadow areas and give you less contrast.
Why does it matter? These ratios are used more in portrait photography and cinematography than any other type of photography.
2. The IMPORTANCE of the relationship between shadow and highlights
This lighting relationship is important because it dramatically affects the look and feel of every single photograph you take. Let's check out the comparison of the different lighting ratios in the portraits of Mabel the mannequin below. On the left you have the lighting that had the least amount of fill light and has the most contrast.

As you go from left to right, each successive photo has more fill light, less contrast, and a smaller highlight-to-shadow lighting ratio. In the 8:1 photo on the left, there is about 8 times more light hitting the brighter areas of Mabel's face than the shadow areas of her face.
These particular lights aren't the best for shooting portraits, but they do a good job of illustrating how lighting ratios affect the shadows and overall contrast of lighting on the human face. Here's how to measure and calculate lighting ratio.
3. how to measure and calculate lighting ratio
 Polaris Light Meter
If you want to be able to accurately measure lighting ratios, you need a light meter. You can approximate it by adjusting the distances of your lights to the subject, or vary their brightnesses, but that can get tricky depending on their size and shape.
This Polaris light meter has served me well for over 35 years. I used it to write this article and it reminded me of the good old days when you had to depend on a light meter just to get the right exposure on every photo you took.
You really don't "need" one at all in today's world of digital photography. You can view your exposure on your camera's LCD screen and make a judgement on the contrast and shadow-to-highlight ratio subjectively.
Writing this article also reminded me of how much fun it was to tinker around with lighting and a light meter. It's one of those geeky photography tools that you can enjoy using if you're a lighting nerd like me.
To use it for setting up light ratio, it's critical that you use it to measure each light source independently without the second light interfering with your meter reading.
 and the shadow(from the fill light) separately.") You can use a light meter to measure both the bright and darker spots on your subject.
You can use a light meter to measure both the bright and darker spots on your subject.Light meters give you your brightness readings in f/stops, which is the lens opening the meter is telling you to use. Here's the trick. Each f/stop represents a doubling (or halving) of the light. An f/stop of f/4.0 on your meter tells you that that area is receiving only half as much light as an area where the meter says f/5.6. Here's a simple chart that shows you the common sequence of f/stops.

- In the example above you took a measurement from your key light of f/5.6. Then, you measured your fill light area and get a reading of f/4.0. This will lead you to a lighting contrast ratio of 2:1 because there is one f/stop between f/4.0 and f/5.6 and each stop doubles the amount of light.
- If the highlight area gave you a reading of f/8.0, then it's two f/stops (twice the light per f/stop) = four times as much light at f/8.0 than at f/4.0. So, f/4.0 and f/8.0 would be a 4:1 or 4x lighting ratio.
Here's the simple setup I used to make the initial photos shown in the beginning of this article. I used Novatron (discontinued manufacturer) lights and the standard incandescent bulbs as a continuous light source and not their flash capabilities.
portrait Lighting setup
This is how I photographed Mabel the mannequin in the example above. It was a simple lighting setup, done in my TV room with the window shade pulled down to provide a simple background for my always cooperative model.
 Simple Lighting Setup
I placed the lights at about a 45 degree angle and adjusted the distance of only one of the lights to change the ratio. I used the light meter mentioned earlier and was careful to block the light coming from the secondary light when I was metering the primary light.
The relationship between the shadow areas and the highlight areas is important in all types of photography. In addition to portrait photography, you want to pay attention to the amount of lighting contrast in studio setups with still life photography.
compare these two examples of lighting ratios
But wait, there's more! Here's another example. Rather than use the human face, this illustration is a simple still life photo of my favorite vessel for craft beer along with a frosted mug. You can move your mouse cursor on and off the photo to see the difference in the ratio between the two photos.

 The Set-up for this still life photo
This comparison shows a somewhat subtle, but still significant difference in the two photos.
The photo, where did I did not use the reflector, actually has a small amount of fill light coming from the white painted cinder blocks in my basement, where these photos were taken.
But the fill is much brighter as when I move in the large reflector panel closer to the subject.
Notice how the fill light also had a significant effect on how the background rendered. Both the softbox and the reflector panel are quite large in comparison with the mug and growler and this combination will give you very soft look with light scattering in all directions.
high contrast Light ratio
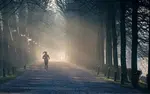
The sunset photo below shows a natural setting with no control over the contrast ratio. Although the sun was diffused from passing through the clouds the lighting ratio was likely in the hundreds. Essentially, in a situation like this, you are photographing the actual light source with a tremendous amount of light entering directly into your camera and striking the sensor.

The fill light that was hitting the dock on my side was minimal compared to the brightness of the sun. Lesson learned: Sometimes experimenting with super contrasty lighting can give you some very interesting photos.
Bottom line, you will rarely ever have to use an exact lighting ratio in your photography, but it's very helpful for you to know what it is and plan or design your lighting based on the effect you want to achieve. If this article was helpful, please share it.


ABOUT BRUCE LOVELACE
Bruce is the publisher of this website. He is the author of the book "Improve Your Photography Instantly." Read more on Bruce on his Bio Page. He's been known as The Traveling Photographer ever since 1994. Read more about this website.
View some of Bruce's photos on Instagram. Visit the Facebook Page. Watch him on YouTube. Bruce runs photo workshops for kids and adults, and provides one-on-one photography coaching.
Digital Photography Education Location on Google My Business
You might like these
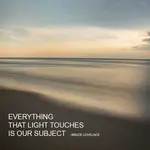
See The Magic of Light! Everything That Light Touches is Your Subject
Photographers react to remarkable side by side comparisons. See how everything that light touches is your subject for great photography.
3 Unusual Photography Lighting Techniques To Improve Your Photography
Three quick tricks for learning to see your lighting. Use these photography lighting techniques and get better digital photos.
What is fill flash photography? When and Why You Can Use Fill Light
You've heard the term fill flash photography. Now get an easy understanding of fill in flash here.
How to Use Morning Light To Get Great Photos The Natural Way
Call it "sweet light." Soft and directional lighting. Examples showing how to use morning light to get stunning photos-Make ordinary subjects look extraordinary
Photography Lighting Made Simple. Lighting Tips. All You Need To Know!
Stunning photo lighting examples. The simple tips you really need to know to take remarkable photos. Complete helpful guide to photography lighting.

related lighting articles
examples of contrasty light ratios
 Big Highlight to Shadow Light Ratio
At this angle, the main light (sometimes referred to as the "key" light) does a great job of showing the beauty and form of the female face.
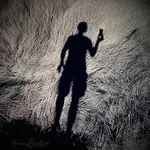
 Mysterious Effect With No Fill Light
The key light is so high above the subject's head and the absence of fill light make this photo very secretive. Do you think this gentleman is feeling content and at peace or is he in a state of anxiety or depression?
 Lighting Ratio Creates Eerie Effect
The bare fluorescent bulb is the only source of light in this image so there really is no lighting ratio to calculate. My own opinion is that it would be more powerful photo if a different shirt had been chosen.

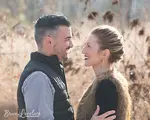
examples of low lighting ratios
There are shadow areas with this lighting, but the ratio between the highlights and shadows is small. I posed this couple in the open shade of a building and there was a lot of fill light coming from the sun striking the sidewalk and the buildings behind me.

I set my flashgun at full power to counteract the super bright backlighting from the sun. This gave me a 1:1 shadow to highlight ratio in the lighting.
Photo lighting products On Amazon
As an Amazon affiliate I may receive a small commission from qualifying purchases, at NO added cost to you.
Improve your photography instantly. Get the 2 most important chapters of my photography book for free.