HOW TO POSTS: LIGHTING AND COMPOSITION
How To Fix Red Eye in Your Photos

Don’t you just hate it when you're photo comes out with that annoying look of glowing eyes? I know, it's not what you were hoping for. This post will reveal how to fix red eye, once and for all.
You've got an opportunity to take a memorable photo and bang, you get nailed by the irritating look of red eye. What's the best way to fix it, or better yet, how can you completely avoid red eye reflections in the first place?
It really is a simple matter to fix this issue when you're shooting a photo with your iPhone, Android, or other smartphone. There are dozens of free and super affordable apps you can download right onto your phone. Snapseed, Pixlr, and of course Adobe PhotoShop Express, are 3 apps for fixing red eye on your phone.
What if your want to get rid of red eye with the photos from your DSLR? That's a little more complicated. You've got to upload your images to your computer and then choose and use the right software.
"If you to take just a minute to understand why red eye happens, you'll be able to make a simple change and avoid getting it in the first place and never have to waste your time fixing it with editing software." - Bruce Lovelace
How red eye REFLECTION occurs
What causes red eye to occur? It's the reflection of light bouncing off of the back of the inside of your subject's eye. You get the reddish devil-like look because of the rich supply of blood in the choroid, the connective tissue in the back of your eye that nourishes the retina.
When the angle of light from the light source to the eye and back to the camera is aligned, you're literally getting a red-eye reflection.
 from very near the lens reflects on the back on the subject's eye and reflects back (red line) to the camera sensor.")

Okay, I know what you're thinking. That's gross! But squelch your nausea for a minute and think about what's actually happening.
Okay, enough science, here's what you need to understand. If the main source of light is coming from the same angle as your camera to the subject, and your subject's pupils are somewhat widely open, your going to get a reflection strait back to your camera sensor.
Imagine what it would be like to avoid red eye completely. That's what this post will focus on. You have to change one or both of these two factors, either the size of your subject's pupils or the direction of the light.
How fix red eyes before it happens?
1. CHANGE THE EYES BY NARROWING THE PUPIL
Add more light. The human eye reacts almost instantaneously to a change in the amount of light. If you turn on a room light, you can get your subject's pupils to constrict at least somewhat and they may be enough to stop the issue.
 pupil photo is adapted from the nei.neh.gov website.") Dilated pupils let more light into the eye allowing for more chance of red eye.
Dilated pupils let more light into the eye allowing for more chance of red eye.You can also try to move your subject to a lighter area, like closer to a window or to a brighter spot in the room. Anything that will get more available light on your subject will help narrow their pupils and stop the red eye.
Set your camera to a "red-eye reduction" mode. That's the theory used for those annoying pre-flashes that are used. With that setting, your camera fires one or more flashes before the actual picture is taken to get your eyes to react and your pupils to constrict. They can reduce red eye somewhat but they often result in a missed moment or a poor expression.
SIDE NOTE: If your subjects are under the influence of alcohol, their pupils will react much slower to a change in the light levels.
2. CHANGE THE LIGHT

Move the flash away from the camera. Because of their compact design, cameras place the pop-up flashes too close to the lens.
This gives you a perfect recipe for getting some annoying red eye reflection. Try adding a diffuser or use an external flash mounted to your camera's hot shoe.
Turn off your camera's built-in flash. If you can't get the pupils to constrict from adding more existing light to the situation, you've got to get that main light source farther away from the lens.
That could mean turning off the pop-up flash or using a different camera setting that doesn't use the camera's flash function. Look what happened when I changed the light in the three photos below.
1
 Pop-up Flash=Red Eye
2
 External Flash=No Red Eye
3
 Added Light=No Flash=No Red Eye
I set up this photo in the darkness of my garage, using a tripod and the camera's self-timer function. The first photo shows the typical red eye result you get when you use your camera's built-in flash.
In the second photo I turned off the built-in flash and mounted a speedlight to the hot shoe of the camera. Because the flash was a few inches higher, the angle of reflection was different and I avoided red eye.
In the final photo I added light by opening up the garage door. I raised the ISO ( ISO=640) enough to eliminate the need for any flash.
SUMMARIZED tips for fixing red eye
- Set your camera's ISO setting really high to eliminate the need for flash. You may loose a little image quality and get a little "digital noise" but that's often a better choice than capturing your best friend's photo with eyes that make her look like she's possessed by the devil.
- Using an external flash that is farther away from the lens. This will change the angle of reflection. If your camera has a hot shoe, an added-on speedlite will raise the flash away from the camera lens.
- For even more flattering lighting, aim your flash upward toward the ceiling. Most flashes have a tilting feature and many even have a swiveling feature too.
3. CHANGE YOUR CAMERA'S ISO SETTING
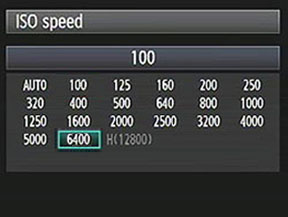
Raise the ISO setting on your camera. That will make your sensor need less light to take a photo and give you the conditions to stop the need to use your camera's flash. How well this will work to fix red eye depends on exactly how dark it is where your shooting.
Use AUTO ISO. It's a little more of an advanced camera setting, but you can shoot using manual settings without flash and let your camera set the required ISO setting and still get a proper exposure without flash.
How to fix red eye REFLECTION after it happens
 Photoshop red eye tool
Because it's such a big issue for many photographers, a lot of photo editing software has a dedicated tool to fix red eye. Many of these applications have a one-click solution to correct red eye.
You may be reluctant to venture into a new software program, but you've just got to dive in and give it a try. I prefer avoiding red eye, but if I did have to retouch red eye on an image I could use the dedicated tool in Photoshop.
If you are a take-complete-control kind of photographer who likes to retouch in steps, here is a tutorial on how to fix red eye in photoshop manually, without using the dedicated too. If you want to use free red eye removing software on a website you can use www.fixredeyes.com/.
How to fix red eye REFLECTION on a printed photograph
 Red Eye Pens
There's nothing wrong with doing it the old fashioned way too. Before the arrival of digital photography, this was my only choice on how to fix red eye in my photos. I had a complete set of retouching pens.
I had over 20 different shades of colors that I used for retouching spots, scratches, and yes, even an occasional case of red eye. This is least desirable method for me personally. I live in Photoshop anyway, so I do all of my retouching on the digital files, rather than on the prints.
Your situation may be different than mine. Then pens are easy to use, but you may have to practice a bit to find out what kinds of situations will work best.
This challenge, like any other in digital photography can be overcome. Use a childlike curiosity and keep a playful attitude about taking photos and you're sure to create some great photos. Have a blast!
Keep shooting. Keep learning. Keep improving.


ABOUT BRUCE LOVELACE
Bruce is the publisher of this website. He is the author of the book "Improve Your Photography Instantly." Read more on Bruce on his Bio Page. He's been known as The Traveling Photographer ever since 1994. Read more about this website.
View some of Bruce's photos on Instagram. Visit the Facebook Page. Watch him on YouTube. Bruce runs photo workshops for kids and adults, and provides one-on-one photography coaching.
Digital Photography Education Location on Google My Business
You might like these
9 Common Photo Mistakes and How To Quickly Avoid or Fix Them
Avoid these 9 common photo mistakes. Helpful examples of blur, composition blunders, camera setting errors.Comparisons-Get tips on avoiding photography mistakes
3 Simple Tricks on How to Fix Blurry Digital Photos-It'll Surprise You
Need to know how to fix blurry digital photos? Depending on the cause, there are many ways to repair your blurry photos
How To Fix an Underexposed Photo + Simple Steps to Avoid Dark Photos
Dark photos? How to avoid an underexposed photo. 5 simple ways to on how to fix underexposed photosed photos. Easy correction steps
7 Reasons Your Camera Won't Focus And The Simple Ways to Fix It!
That's annoying! You missed another important photo because your darn camera won't focus. 5 simple tips to fix or avoid missing that great shot.


 Deer caught in the headlights
The more distance between the lens and the flash, the less likely you will have red eyes in pictures.
 Dilated Pupil + Camera Lighting
Gives You Red Eye
 Constricted pupil + Side Lighting
You Get No Red Eye
related posts:
Improve your photography instantly. Get the 2 most important chapters of my photography book for free.