HOW TO POSTS: LIGHTING AND COMPOSITION
digital camera settings
digital camera modes

Here's a simple explanation of digital camera settings and a guide telling you when to use each one of them.
This makes it easier for you to get your camera to perform like the brilliant computer it was designed to be. Digital camera functions are very sophisticated and it can be confusing on where to start when you have so many options.
Let's jump right in. Some of the camera settings make all the decisions for you and some make some of the desired settings. This article will give you a breakdown on your options and how you can get your camera to perform like a finely tuned race car.
automatic digital camera settings
Automatic (and the newest camera setting, A-DEP) and Program camera settings are thought to make all of the decisions for you but there are differences between these two modes.
When you're in too much of a hurry to put any thought into the photographic process you can turn to either one of these modes for the quick snapshot. "Just set it, and forget it."
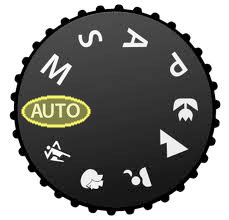
automatic mode
Probably the most widely used mode of all digital camera setting. The automatic mode has your camera decide on just about everything for you. It's that "set it and forget it" mentality that permeates our society because we're always looking for shortcuts.
That includes aperture, shutter speed, ISO, focus method, and color balance. It is generally a good safe setting in most situations, but learning the other modes will advance your photography to a new level.
Without you giving the camera any specific requirements, the camera is evaluating the scene, guessing what it is and making the decision based on complex mathematical algorithms. Fully automatic mode is great when you're in a hurry and you want a strong likelihood that your photo will come out fine.

what is a-dep setting mode
One of the increasingly asked questions that came up in a Basic Digital Photography course I taught was: what is A-DEP. The letters stand for Auto Depth-of-field. It's a relatively new kid on the block in terms of digital camera settings. In A-DEP mode, you instruct the camera which parts of your photo that you want to be in sharp focus.
Your the camera will then pick the best f/stop (aperture) to give you the best solution for the focus points and the rigth depth of field.
A-DEP is a fully automatic mode, meaning that it will also pick the shutter speed for you too. I've heard of a few photographers who get frustrated with using A-DEP in low light situations. The camera may pick a slow enough shutter speed to get you the desired depth of field, but also give you some image blur from a small amount of camera movement during exposure.
You, the photographer, have to be aware of this and you might have to bring in a tripod for better sharpness with those slower shutter speeds.
how to use a-dep
- Set your camera mode to A-DEP
- Aim the AF points over the subjects and press the shutter button halfway.
- All the subjects covered by the AF points flashing in red will be in focus.

program mode
Program mode is an automatic mode but it gives you control over several things. Technically I think you would really define it as a semi-automatic mode.
Typically the setting you make include the use of flash, the setting of the ISO, and exposure compensation (adjusting to make lighter or darker). You make those settings and then the camera takes over and decides the rest.
I am a big fan of using as little flash as possible. I like natural lighting as a portrait photographer, but when fill flash is needed it's nice to have the ability to turn the flash on or off.
New cameras with bigger sensors make the use of higher ISO settings. That means you can avoid using flash in darker situations without the huge loss in quality with sensors made just a few years ago. Program mode varies with each camera model and needs an entire article dedicated to it so look for that one to be coming soon.
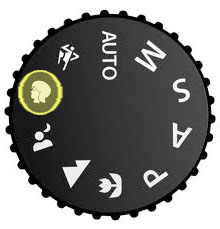
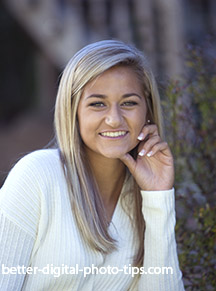
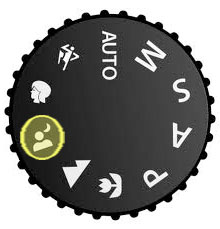
portrait
As the name implies, use this for photographing individual or small groups of people. This setting will set the camera to have a reduced depth of field, keep everyone in reasonably sharp focus, and let the background go blurry.
In other words, it will favor your camera to focus on the subject closer to the camera and will allow the background to be less focused.
Depending on the lighting situation the camera will put a priority on a small f-stop number.
That gives you a sharp subject and visually separate it from the slightly blurred background.
landscape camera setting
It's usually desirable to have a large range of things in focus for landscape photography. This camera setting prioritizes a large depth of field and using a small aperture.
Holding the camera very steady is important because the shutter speed may be a little slower to get a properly exposed photograph. You will want to avoid any motion blur so a tripod is always a good idea, particularly if you are not shooting a bright scene.
Higher ISO settings are another way to stop motion blur because your camera can use a higher shutter speed and still have enough light to get a good exposure.
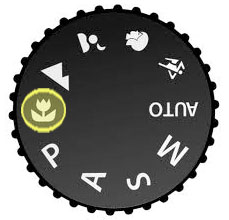
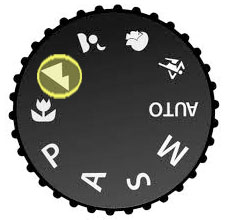
macro - close-up
Macro mode allows you to get good photos when photographing things close-up. Tripods are almost always a necessity when shooting macro photos. Manual focus, if available is, much better to use with macro photography. Accurate focusing is critical because there is such limited depth of field at close distances.
Macro is one of the instances where I highly recommend using the optical viewfinder to focus manually. Unfortunately many of the newer cameras only have an LCD screen to use.
When shooting close ups, the regular viewfinder may not give you a perfectly accurate view of what you are actually taking a picture of. Start by checking your camera instructions to see what the closest distance is that you can get to your subject.

sports - action setting
Use this camera mode to "freeze" the action. Your camera will use a high ISO setting and a high shutter speed to minimize blur from fast moving athletes or balls.
Sports mode is needed for action photos, but also helpful for high speed photography is situations where you have have lots of light.
 Not fast enough
This is to get a very fast shutter speed to stop motion blur and still get a good exposure.
In darker situations, using a DSLR equipped a "fast" lens are a big advantage.
A "fast" lens means it has a very wide lens opening or aperture and lets a large amount of light into the camera.
This means you can use a faster shutter speed and still get the right photo exposure.
night scene
This is one of the really unique digital camera settings to use. Night mode will have a slow shutter speed to create the right exposure and will use the flash as well.
It changes the timing on when the flash fires during the long exposure for a better effect. You can get some really cool photos in night mode. It is a lot of fun to play around and experiment, combining blur from movement and sharpness created by the quick burst from the flash.
Since I grew up using film cameras, before the programmed settings above were available, I prefer the settings described below. Aperture and shutter priority modes are really semi-automatic in that once you make a setting then the camera automatically calculates the correct exposure.
semi-automatic camera settings
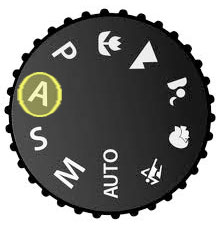
aperture priority setting
Aperture priority means you have control of the aperture. It's my favorite of all the digital camera settings.
Aperture is the size of the opening that the light travels through to hit the sensor inside your camera. You set that and the camera will set the shutter speed to give you the best photo exposure. This is my favorite digital camera setting and I use this setting primarily in two photography situations:
1. When I am shooting portraits. I use a wide open (small f-stop number) to have my subject in focus and my background be blurry.
2. I use a small aperture when I am doing landscape photography. I want to be sure that things close to the camera AND things that are far away from the camera are in focus. Using a high f-stop number like f-16 or higher gives us a large depth of field.
3. In addition to the definition of aperture priority, you can learn other photography definitions here: Photography Definitions.
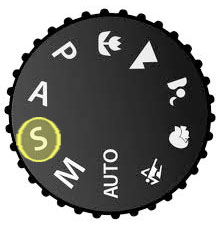
shutter priority
Shutter priority mode is indicated by an "S" or sometimes "Tv" (for time value). With shutter priority, you choose the shutter speed and the camera sets the aperture.
This is a popular digital camera setting in sports photography. Different sports or activities will require different shutter speeds to "freeze" the action.
Look at the difference in the two photo below. I used the shutter priority setting for these two photo of water running my my kitchen sink. In the blurry photo of the running water, I set the camera on a one second exposure and it determined the right aperture to get the right exposure.
In the second photo I set the shutter speed to 1/200 of a second to freeze" the action. The camera decided on the right aperture to get the right photo exposure.
 Not a great photo, but look at the different effect
you can create by using shutter priority and controlling the shutter speed.
This is a popular digital camera setting when photographing waterfalls, fireworks and similar time exposure photographs where the longer length of exposure has a dramatic effect on the final photograph.
A shutter priority setting also make perfect sense to use when you want to stop the action. Use a high shutter speed for sports photograph (like Photographing Kids Soccer Games) and wildlife photography. I played around with my shutter priority settings while photographing a bike race. You may be interested in how I controlled the amount of motion blur in these Bike Race Pictures.
Some photographers want to know what shutter speed to use for outdoor portraits. I just updated that post here: Best Shutter Speed For Outdoor Portraits.
manual mode

Shooting in Manual gives you complete and total control of your camera's settings.
It also gives you the most chances for screwing up the exposure. ;-) Using the LCD monitor to check your exposure is a good idea.
If you don't know a good starting point for setting your aperture and shutter speeds, shoot a trial photo with your camera on Auto mode.
Notice what settings your camera choose for that photo, switch back to manual mode and then set your camera to those settings.
Using the camera's histogram is even a better idea idea if you are shooting in manual mode.
For more sophisticated use and understanding of shooting in a manual setting, here is a link to an article by a professional photographer on using manual mode: Manual Camera Setting.
Manual mode works great with your camera's Auto ISO setting.
other critical digital camera settings
We're not through yet.
- EXPOSURE COMPENSATION. You can override your camera's exposure decisions. I use this a lot with the beach photos I take to lighten them up.
- ISO. You can adjust your camera's sensitivity to light.
- WHITE BALANCE. You can change the overall color balance to make it either more accurate or create a particular mood to your photo.
- RAW MODE. The ultimate quality and versatility in editing camera setting. Being a professional photographer, I choose to shoot EVERYTHING this way and then process the images in a variety afterword on my computer. There are several reasons for shooting in RAW mode and there covered in more detail here: JPG vs. RAW Sharpness.
creative camera mode
You can use the self-timer mode to get creative with a selfie.

Self-timers are usually able to be set for either 2 seconds or 10 seconds.
This photo was done by combining 2 exposures. The self-timer mode was used, set at 10 seconds, to give me enough time to position myself with the frame in the first photo.
The camera was mounted to a tripod so that both photos would be in the exact same position. The second photo was taken of the hallway without me in the photo.
When the two photo were combined in software, I removed the area inside the frame to reveal the hallway behind me.
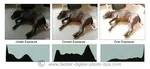
auto Exposure override - exposure compensation
 Plus 1 f-stop of Exposure
This camera function is usually not included on the camera's main setting dial. Some cameras have a separate adjustment on top of the camera.
With other camera it's often found within the menu you view on your screen on the back of your camera. With a professional DSLR it can be found in a variety of places. I use this function quite a bit.
Most cameras are programmed to read a scene as typical and give a good average exposure. There are instances though, because of the unique subject matter, this will result in a bad exposure. You can "tweak" by adding exposure (making it brighter) or subtracting exposure (making it darker).
 Should be a little brighter
 Should be a little darker
Here are two scenarios where exposure compensation is need to override the camera's automatic setting.
With beach scenes or snow scenes where most of the photograph is light or white, the camera exposure system initially may expose it a little too dark. You may want to compensate and overexpose by one f-stop.
With scenes that have almost all dark colors and background with a few small light areas, you may want to underexpose a little. The camera may accidentally overexpose it initially.
camera ISO setting
Manual ISO setting. You set the ISO number and decide how much light (how sensitive it is) your camera sensor needs for a good exposure when you're using one of the "creative modes" we've already talked about. Here's a detailed artilce on understand how aperture, shutter speed, and ISO work together, along with a video explanation: Understanding Exposure.
For now, just understand these two ideas:
- A higher number ISO, like 800, 1600, or higher means your camera does not need as much light to get a good exposures.
- You lose at least some quality for each higher level of ISO you set your camera to.
Auto ISO is really not a camera mode. It's more of a setting, but I recently (I was way passed due) just discovered how incredibly powerful it is, particularly when used with your camera set for Manual mode.
With AUTO-ISO you get to set the aperture to get the right depth of field and you get to sets the shutter speed to freeze to blur the action. The camera then sets the right ISO to give you a good exposure. Here's more on the reasons why you should definitely consider setting your Camera ISO on AUTO.
white balance setting
Here's a quick comparison of how setting the white balance affects your photograph. Whether you set color balance in your camera's menu, or whether you set it afterwards when shooting in RAW mode like I do, you can see what a dramatic difference there is.
 My Decision
Set at 4400K
 Tungsten
3000K
 Daylight
About 5500K
 Flourescent
About 3800K
These photos were taken inside a castle in Bunratty Ireland. Almost all of the light was coming through the castle window. This castle does not allow any flash photography because of the fragile artwork hanging from its towering walls.
Color balance can sound pretty technical, but you really don't need to understand it fully. Let's keep it simple.
- Set it for Auto Balance.
- If you don't like it, change it to match the scene.
- Use a K setting if you still don't like the result.
Just remember that if you don't like the photo you get with Auto White Balance, you have the option of changing it. Both the AWB and the pre-set color balance settings that are programmed into your camera's do a pretty good job, most of the time.
The photo below show how different the color temperature is between the electric lights of the castle and the natural daylight coming in through the window.

 Photo with both daylight and tungsten light sources.
The daylight is blue-ish and the electric lights are yellow-ish.
If you choose a daylight setting, the electric lights will come out very yellow-orange. If you choose a tungsten color setting, the daylight through the window would be very blue. You can see it's subjective and it's up to you to decide the effect you want to achieve with this particular camera setting. For a better understanding of color balance you can read my post on color temperature.
What is RAW mode?
FACT: RAW mode is one of the digital camera settings that the majority of snapshot shooters won't and probably shouldn't use.
What is raw mode? RAW is a file format that captures all image data recorded by the sensor when you take a photo. Rather than have your camera decide how to process the data into a regular viewable jpg image, you have to process the image with software on your computer.
 RAW Mode for Flexibility
I personally shoot everything in RAW because I like playing around with all of the editing options with professional photo editing software like Photoshop and Lightroom.
advantages of choosing Raw as the digital camera setting
The reasons are sometimes complicated, so the specific details are a good subject for an in-depth article on the subject, but here are the basic advantages of setting your digital camera on RAW.
- Better correction of errors in exposure.
- Take advantage of some amazing effects in RAW processing software.
- More exact control over white balance.
- Bragging rights that you shoot RAW like the pros do.
- Opportunity to edit several different ways without affecting the original data.
- Smoother transitions between tones.
disadvantages of shooting with raw setting
- Requires that you process the images later on your computer.
- You can't shoot as many frames per second.
- RAW files are proprietary, meaning different camera makers have different formats, and they may change over time.
- Image file sizes are much bigger to copy, edit, and save.
- You'll spend more time and more money on software
parting thoughts on digital camera settings
Let's recap. The proper use of your digital camera settings enables you to take take advantage of an incredible piece of technology and create some breathtaking images.
Understanding the different settings for your digital camera and when you should use them will help you become a better photographer. As with all of the topics covered on this web site, enjoy the learning process. It takes time, but remember that time does fly when you're having fun.
Once you've gotten a better understanding of how to use camera settings, you'll be looking for more inspiration on how to get creative with your photography.
Keep shooting. Keep learning. Keep improving.
p.s. Individual cameras may have slight variations on these digital camera settings, such as snow scene mode, fireworks mode, or sunset mode where it's use becomes obvious by its name. Check with your camera manual to be sure.


ABOUT BRUCE LOVELACE
Bruce is the publisher of this website. He is the author of the book "Improve Your Photography Instantly." Read more on Bruce on his Bio Page. He's been known as The Traveling Photographer ever since 1994. Read more about this website.
View some of Bruce's photos on Instagram. Visit the Facebook Page. Watch him on YouTube. Bruce runs photo workshops for kids and adults, and provides one-on-one photography coaching.
Digital Photography Education Location on Google My Business
You might like these
What is Bokeh. Why It's So Important And How To Get The Best Bokeh
With multiple meanings and false definitions. Find out what is bokeh in photography. It's a simple way to improve your photos by controlling the out of focus areas of your subject. How to get the best bokeh effect
Which is Sharper, Raw vs JPG? Is Raw Better Than JPG. Simple Answer
You want sharper photos so you need to know which gives you sharper and better photos. Article reveals a surprising suggestion.
Camera Lens Basics - Helpful Guide to Understanding Camera Lenses
Ultimate guide to understanding Digital Camera Lenses-Lens Types-Specialty Lenses and Camera Lens Basics
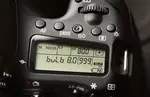
What is Bulb Exposure And How to And Why Use Bulb Mode To Take Photos
What is the bulb exposure mode setting and tips on how to use it. 6 examples of when you should use the "B" bulb setting on your camera for breathtaking photos
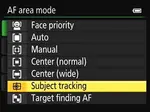
What Focus Modes Should You Use? Simple Explanation of Focusing Modes
Simple explanation of the Focus Modes. Keep it simple. Get sharp photos with your digital camera


Go back from Digital Camera Settings to Digital Camera Instructions
Go to Digital Camera Definitions
Basic Digital Photography Information

when to use shutter priority setting
Sports. Wildlife. Action Photos. Any time you want to freeze the action with a fast shutter speed or have intentional motion blur by using a slow shutter speed.


when to use aperture priority setting
Landscapes. Portrait Photography. Any time you want to be able to set the f/stop to a certain number and control the depth of field.
Use a small aperture ( a big f/stop number) to get everything in sharp focus.

Use a large aperture ( a small f/stop number) to get only your subject in sharp focus.

Improve your photography instantly. Get the 2 most important chapters of my photography book for free.