HOW TO POSTS: LIGHTING AND COMPOSITION
avoid these 9 common photo mistakes
learn from examples of bad photography
WRITTEN BY: BRUCE LOVELACE
PUBLISHED ON: NOVEMBER 14, 2023
 I could write books
full of my mistakes.
Have you made any photo mistakes? I feel your pain.
I confess that I've taken my share of bad photos. In fact, I'd bet you I've made more photography mistakes than you have.
Heck, I could write a few books on all the photography mistakes I've made. No worries, help is on the way!
This article will help you cut down on those photography mistakes to avoid and assist you in and turning your photos into spectacular works of art. Okay, maybe I am exaggerating a bit, but avoiding and fixing mistakes will definitely give you much better photos.
Here is a list of the most common photo mistakes people make. Below this list you will find detailed tips on how to avoid or fix each of these photography blunders.
- Blurry photos - There are two main reasons for getting blur. This helpful article on this website explains both mistakes as well as how to avoid them or fix them if needed.
- Bad composition - It's a very common mistake in photography. Maybe the most common. This sends you to the section on composition in this article.
- Choosing a bad background - This is an easy mistake to fix. Find out how to easily remedy it.
- Red eye reflections. - Boy, are they annoying and so are the attempts by cameras to prevent it from happening. It's easier to fix than you think.
- Using the wrong camera setting - I've done this once or twice....or more. Read more on this.
- Pixelation - This one is becoming less common. Cameras are better now, even cell phone cameras, but more megapixels isn't always the best answer. Clicking this will show you a good example of pixelation.
- Bad photo exposure - Your camera's auto-exposure will handle most situations fairly well, but there are exceptions where they fail miserably. Visit this section to see a classic example of when your camera will fail you. You can learn how to trick your camera into the right exposure every time.
the chart of 7 deadly photography mistakes and their fixes
Before I updated it, this post had 7 common photography mistakes, but I found 2 more that I wanted you to know about.

1. blurry photo mistake
Blurry pictures and bad photo compositions are two of the biggest reasons why you are going to see a bunch of examples of bad photography.
Blurry Photos can occur from three main causes.
- 1. The first reason many photos come out blurry is movement. Either the subject or the camera moves during the exposure when the shutter is open. Sometimes it's only the slightest amount of motion and the photo is only a little unsharp. You may not even be able to see the blur, it just looks a little bit unsharp.
Other times it's severe blur like the Alaska photo below. This is very common mistake amateur photographers make with photos.
 Too slow of a shutter speed can cause motion blur
- 2. The second blurriness problem is usually caused by the camera's auto focus choosing the wrong spot to focus on. You can learn how to trick the auto focus into working the right way for you.
- 3. The third cause of blurry photos is a dirty camera lens. For now, it's enough to just remind you to keep your lens surfaces clean.
We can learn a lot from each others' mistakes. You can share any mistake you've made while taking a photo and we all can learn from it.
How to Fix Blurry Photos
There are a few ways to combat blurry pictures caused by camera or subject movement.
A fast shutter speed will stop blurry photos from occurring whether it's from camera movement or from the subject moving during the exposure. If you raise your camera's ISO setting, you can use a faster shutter speed to decrease motion blur.
Try using a tripod or a monopod to stabilize your camera. Steadying the camera by bracing it against a stationary object will also help blurriness caused by movement. If this is a big problem for you, get detailed help by going to an article titled avoid blurry pictures.
Monopods are probably one of the most useful yet under-used pieces of photography equipment. You can avoid some of the blurry photo mistakes if you learn how to use a monopod.
Understanding how a camera's auto focus works will prevent blurry photos caused by focusing problems. Most auto focusing cameras use the center of the viewfinder to set the focus. Sometimes this is the wrong thing to do.
Take Charge of Your Camera's Focusing

In the first photo above, the blue oval shows the area used to focus with a center-weighted focusing system. Photo 2 shows that the camera focused too far in the background because none of the the bears were included in the center focusing area.
In Photo 3, I aimed the focusing area at one of the bears first, pressed the shutter button halfway and then recomposed the picture before pressing the shutter button the rest of the way down. This "locked" the focus on my subject and resulted in a sharp, focused photo.
Keep it Clean, Please!
The third blurriness problem occurs when you have dirt, condensation or a smudge on your camera lens. Keep special lens tissue handy and use it carefully. Your picture quality depends on the quality and condition of the lens. The light has to travel through your lens to get to the camera sensor.If you are shooting in cold weather, keep your camera warm.
A cold camera coming into warm moist air will cause lens fogging. Blowing your hot breath on the camera lens can fog it up to. This was actually a technique in the olden days for creating a soft focus effect intentionally. Now if you want to soften the focus just a bit, you can do it when you do your photo editing afterwards.
2. bad composition
Here is a good example of bad photo composition. Huh? You can fall into this trap when you see something you want to photograph, aim, and quickly shoot, without taking just a second to think about your framing. I set my coffee mug on my workbench in my office.
The first photo I took, the one on the left, is not composed as well as the photo on the right. It has wasted space, a distracting highlight from the sun, and is oriented wrong.
 Photography Composition Mistake And It's Improvement on The Right
Simply by habit and without thinking, many photographers typically shoot pictures while holding their camera in a horizontal position. For this subject, this is Photo Mistake #1. This subject looks better composed as a vertical (portrait orientation), rather than a horizontal (landscape orientation).
Another common mistake is not to fill your frame with your subject. The photograph on the right is a much better picture. The mug is vertical and the vertical format looks much better.
Zooming in closer also eliminates the distracting sunlight on the table and eliminated the excessive space around the mug. Here's a related article on Photography Composition.
3. choosing a bad photography background
This is photo mistake #3.
This may be the most frequent photography mistake of all. Usually this is best handled by moving the camera or moving your subject to a different spot. In this photo of "Mocha", you can barely see her head. Her dark fur blends right in with the dark area of the fish pond.
 Distracting background
There is poor visual separation of her head from the dark background of the fishpond.
In addition to that mistake, the green plastic and the wooden boxes, behind her on the left, are also very distracting in the background.
Learn how to look through your camera's viewfinder and observe the background in addition to just framing in your subject properly. Then, it's simply making an adjustment of in position of your camera or your subject.

Look how much better this photo of Mocha looks than the one up above. Same dog. Same backyard, just a different background and better lighting. Choose an angle so that our subject stands out against the background.
Your subject can separate from your background because a difference in color, a difference in the lighting, or a difference in the sharpness. Mocha is visually separated from the background because of the difference in color AND the narrow depth of field (the range of things in sharp focus).
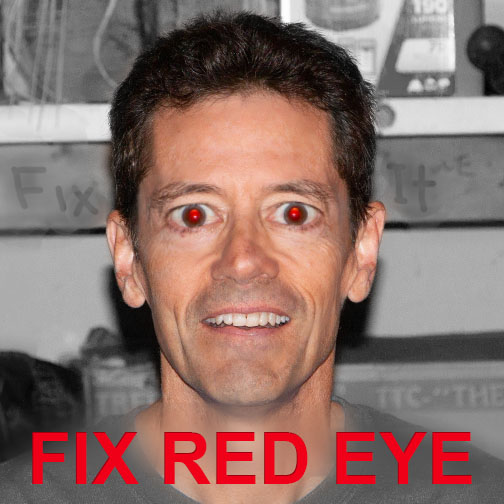
Have you ever taken a photo of your friend and gotten that annoying and scary looking red-eye reflection?Red-Eye Reflections is very common with point and shoot cameras, but also can easily happen with your DSLR camera and it's pop-up flash.
4. red eye reflections
Red eye is caused by the reflection of light off the back surface of the eyeball. When it's dark, our pupils are dilated. This allows more light to enter the eye and reflect back out of the eye. This is a problem when the light is provided by the camera's flash. It reflects directly back to the camera at the same angle and appears red.
The blue line in the diagram below shows the light made by the camera's flash traveling to the subject. The red line is the reddish reflection from the eye heading back to the camera's sensor.
 The Common Mistake of Getting Red-eye In Your Photo
How to get rid of Red Eye Reflections
- Don't use the camera's flash. It's too close to the lens.
- Get more light on your subject, so her pupils constrict. That's the theory behind those annoying "red eye reduction" pre-flashes. The red eye reduction camera setting may help a bit but, usually the main result of using that camera function is bad expressions on your subject's face.
- Turn on room lights if possible or move your subject closer to a window.
- Use an off-camera flash. This may not be possible with many point and shoot camera's. I use a professional bracket that raises the flash unit high above the camera. This changes the angle of reflection and I never have to worry about this photo mistake.
5. using the wrong camera setting

This mistake is made when you don't understand what each camera setting does. Many people take the easiest route and choose Auto or Program. This is okay if you want to be like everyone else and auto settings do work well most of the time. Unfortunately, you need to use different settings occasionally to avoid exposure mistakes.
If you want to take better digital photos, then learn what the camera settings do. Reading the your specific camera instructions before you start shooting is the smart thing to do. It's the best photo tip I can give you. For a simple cheat sheet to understand when to use each one try: Digital Camera Settings.
Even professional photographers are guilty of making mistakes when taking pictures. I know I have made many. If you want to know what my worst camera mistakes have been, click here: My Photography Mistakes
This post will give you several ideas on avoiding these common photography mistakes. You'll also find it valuable to use printed books to improve your photography skills. LOL. I ought to know. I have my own collection myself. Here are a few options.
6. pixelation
Pixelation is now a real word and it does describe a typical photo mistake that we all can make. Pixelation occurs when you try to print a big picture from a small file. Whether it's from starting with a tiny file or because of cropping too much, it results in a lack of sharpness or, in extreme situations, you actually see the individual pixels in the image.
This Alaskan bear was far off in the distance when I aimed my 400mm lens at him. I cropped very tightly using Photoshop and the resulting photo suffered. There just aren't enough pixels left to keep the image sharp.
You can see the individual pixel squares in the example below. They show up when you use extreme cropping.
You should never, ever use anything but the highest quality setting on your camera.
You can always reduce the size of a photo when you are doing your editing. If you use a reduced quality setting on your camera, you are ruining what may be a great photo for enlarging later.
The photo on the right of my model shows a lower quality setting. I resized it to have the same dimensions of the high quality photo on the left. Clearly a mistake to use a low quality setting. Avoid digital zooming. Digital zooming in the camera means you're only using a smaller part of your camera's sensor. Digital Zooming vs Optical Zooming.
7. bad photo exposure
The most common photo mistake involving exposure is usually underexposed images. The small built in flash units that come with point and shoot cameras are not very powerful.
Depending on the wimpy, under-powered, built-in, camera flashes to get a good exposure can be a mistake. If you have a DSLR, using an external flash makes a huge difference. Or you can use other camera accessories, like good Photography Lighting Equipment will make sure you avoid underexposure.
In the under-exposed image below, the camera's auto-exposure mode was fooled by the very bright sky light and under-exposed the inside of the conservatory.

8. Crooked Horizon
This mistake shows up worst when the distant horizon is a significant part of your photo's composition. See the example below.

Photos that have a crooked horizon seem unbalanced and sometimes even give you an uneasy fell when you look at them.
Look at the improvement that happens when the horizon is photographed correctly. You can either fix it by using the electronic level built into your camera or with software like Photoshop. See the fixed crooked photo below.

9. Eye-Level Shooting
I put this mistake last because I made this mistake all the time in my early years of photography. It's only natural to stand in front of a subject, raise the camera to eye level and press the shutter button. You'll get the same photo everyone else does and portray the "normal" perspective of your subject.
It's better to vary your position in several ways for any give subject. Shoot at different angles and different distances with different focal lengths.
"Changing perspective" was the first chapter I wrote in my eBook and you can explore the benefits and examples of controlling perspective in detail in this section of my home page.
most common photo mistake after you're done shooting

I realized I forgot to mention another common photography mistake that can cause you some real emotional pain. It's the failure to backup your memorable photographs after you're done shooting. I know you're busy with many things in your life. So am I.
I'll be honest with you. I struggled with finding a good backup system that was convenient, but still protected any loss of my images by accidentally deleting them or having a computer or memory card crash. We're all guilty of thinking that happens to other photographers, but not me.
You do have several free and reliable options on backing up your precious photos or you can pay for an automatic backup system like I eventually did. Here's the article on photo backup systems.
more resources to help you avoid photography mistakes
Once you get basic understanding of shutter speed, aperture and ISO settings, everything will start to make sense to you. Reading other articles about lighting on this digital photo tips web site will help too. Learn more about Photo Exposure..
Even the pros make common photo mistakes occasionally. Paying attention to how these mistakes are made will help you become a better photographer. Learning from your own mistakes is the best way to learn anything. If this page has been helpful please share it with others.
One way to avoid the mistake of bad exposure is to use your camera's histogram. What is a histogram you ask. Find out more by clicking on What is a Histogram? Another big photography-related mistake is using a bad photo for your LinkedIn profile picture. Here area a few simple, but very important Tips for LinkedIn Photos.
Also related are the LinkedIn Photo Mistakes people make and how many LinkedIn members don't even realize how much it's costing them to have a bad profile picture. Explore this digital photo tips website for answers to all of you questions on how to stop making mistakes and learn how to take better pictures. And here are some photo mistakes in magazines that will make you smile.
Want to add one of your worst photo mistake stories to this page, then do it right here:
Let's Learn together
have you ever made a bad photo mistake? can you top my bad story?
Do you have a story to tell about your worst photo mistake? Share it!
other worst photo mistake stories:
Click below to see contributions from other visitors to this page...
The Worst Photography Mistakes You Made 
=Getting ready to take my son's senior tennis photo, when the camera beeps at me. I attempted to take the photo again and it did the same thing. Thinking …
These aren't the only photo mistakes to avoid, but if you eliminate these shortcomings for your photography, your success rate will skyrocket. Keep shooting. Keep learning. Keep improving.
Thanks so much for reading this post on photography mistakes. If you've enjoyed any of my posts it would mean the world to me if you'd share with others, or reach out let me know through Pinterest or Facebook.


ABOUT BRUCE LOVELACE
Bruce is the publisher of this website. He is the author of the book "Improve Your Photography Instantly." Read more on Bruce on his Bio Page. He's been known as The Traveling Photographer ever since 1994. Read more about this website.
View some of Bruce's photos on Instagram. Visit the Facebook Page. Watch him on YouTube. Bruce runs photo workshops for kids and adults, and provides one-on-one photography coaching.
Digital Photography Education Location on Google My Business
You might like these
7 Reasons Your Camera Won't Focus And The Simple Ways to Fix It!
That's annoying! You missed another important photo because your darn camera won't focus. 5 simple tips to fix or avoid missing that great shot.
3 Simple Tricks on How to Fix Blurry Digital Photos-It'll Surprise You
Need to know how to fix blurry digital photos? Depending on the cause, there are many ways to repair your blurry photos
How To Fix Red Eye in Your Photos. Remove or Avoid Annoying Red Eye!
Find out how to remove and avoid glowing eyes in your photos with your iphone, Android or DSLR camera. Simple tricks you can use. How to fix red eye in your pictures.


Speaking of common photo mistakes, I've failed plenty of times too. This was the first attempt at making a simplified infographic about the common mistakes we make with our photography.
I didn't like this one at all. I think the second one, was a bit better. What do you think?
Recent Articles
-
1 Super Simple Macro Lighting Technique That Works Remarkably Well
Jun 14, 25 10:11 AM
 Macro photography lighting can be done with flash or continuous lights, but here is a super simple macro lighting technique you can copy using natural light.
 -
Are You Using Your Selfie Pole for Narcissism or Creative Growth?
Jun 14, 25 09:27 AM
 You're thinking about a selfie pole, but are selfies a sign of narcissism? Are selfie sticks evil or do they help improve our lives? A fascinating issue.
 -
Best Self Portrait Monopod. 3-Step Method on How To Choose The Best
Jun 14, 25 08:54 AM
 Beyond Arm's Length: Finding Your Perfect Selfie Stick. Selfie photos are in. But which pole makes the best self portrait monopod. Reviews of selfie monopods
Improve your photography instantly. Get the 2 most important chapters of my photography book for free.