HOW TO POSTS: LIGHTING AND COMPOSITION
macro photography equipment
(3 basic equipment needs for BEGINNER macro photographers)

So you're interested in macro photography equipment, but you don't know where to start.
Here's the deal. It's a great time to be interested in digital photography, and even better time to want to shoot some macro photos with the latest gear. That goes for macro photographer beginners and advanced macro shooters.
You have a lot of options when it comes to macro equipment, but you don't need to spend a lot on equipment to get great close-ups. This article will help you get started by keeping it simple.
Technology has given us great options and you can get fully involved in taking some great macro photography without having to understand the technical side of things.
You only need 3 basic pieces of macro photography equipment to get started.
MUST HAVE EQUIPMENT FOR MACRO PHOTOGRAPHY
| MACRO EQUIPMENT | EXPLANATION |
| 1. TRIPOD | A tripod will help you with getting sharp photos and good composition. Required, unless you're shooting under very bright conditions to enable using both a fast shutter speed and a small lens aperture. |
| 2. MACRO LENS | To get decent macro magnification a macro lens is needed. Alternatively, you can use extension tubes with a regular lens to focus at a much closer focusing distance. |
| 3. LIGHTING | Gear that adds or modifies the light on your subject is a must have for good macro photography. You can shoot macro in direct sunlight or use direct flash but the photos usually come out with too much contrast. |
The basic macro photo gear that most photographers use
The easiest way for you to dive into getting the macro photography you need is to stick with the basics. You have other options of course, but if you want to keep it simple, these are the 3 pieces of macro photography that will give you the most chance for success.
You can certainly play around with close-up photography without using any of these gadgets, but you're more likely to avoid the common mistakes that beginning macro photographers make.
A macro lens will insure you'll get up close and focused on your subject. A tripod will give you images free of motion blur and help with focusing. A macro flash will make it so much easier to get the correct exposure and achieve good depth of field.
Macro Lens

Macro tripod

Macro flash

The first piece of macro photography gear that comes to mind is the standard macro lens. Well, guess what. I've taken dozens of really stunning macro images without using a macro lens. We'll get to that in a minute. This article covers the lesser-known lens set-ups and related macro accessories. For more popular types of macro gear, read this post on accessories for macro photography.
There are also many dirt cheap macro photography equipment choices available to you that can get several macro "toys" and take your macro photography to a whole new level. Some accessories are more affordable than others. Some are super simple and some are super complex. Okay, enough of the introduction. Let's dive in.
1. macro lenses
You only need to look at what lenses are compatible with your camera and then simple choose the right focal length. Generally, beginner macro lenses that are around 60mm in length are great lenses to start with. Starter lenses will perform admirably, and are very affordable. Often your working distance to the subject is less than 6 inches.
 Canon 100mm Macro Lens
Longer lenses, with focal lengths of 80 to 105mm, are the choice for more advanced macro photographers. Longer lenses give you a farther working distance. This is valuable if your shooting insects or objects that you can't quite get real close to. Usually your working distance from the front of the lens is about 1 or 2 feet with lenses this size. These are the most popular option for serious macro photography.
180-200mm macro lenses have more glass and are heavier and pricier. They give you a superior working distance of several feet. Additionally, with longer lenses you will have plenty space to use larger lighting gear without interfering with the light. You can also save money on a lens by looking at alternatives.
2. macro tripods
Almost any tripod can be adequate for your macro photography. Tripods that can position your camera at ground level are more versatile and better suited for shooting insects, flowers, and other vegetation that lucks down low.
 Macro Photography Tripod
Tripod heads with long handles are better for shooting macro than tripods with ball heads. Camera position adjustment is magnified because of the close working distances you're dealing with in macro photography. You can make the smallest camera position adjustments needed with macro work much easier. It all depends on the type of macro photography subjects you're shooting.
Generally, you don't need a particularly tall tripod to shoot macro photos. It's better to look for tripods that have variable angle legs or an adjustable angle center post to give you versatility with your shooting angles.
Here's more on tripods for macro photography.
macro photography flash

The big advantage of using flash lighting for macro photography is lightning-quick exposures prevent motion blur and the brightness gives you the ability to use a smaller aperture and get better depth of field which is critical in close-up photography.
I use natural macro lighting whenever possible, but due to the challenges associated with this kid of photography, electronic flash is very convenient and used by many macro photographers.
You can soften the harsh shadows by using a diffusing material of any kind in front of your flashes or by bouncing them off of a larger surface to scatter the light.

Ring flash is perhaps best known for use with scientific and medical photography where shadow-less lighting is desired.
It provides very even illumination for macro photography. You can often easily tell it has been used by looking at the highlights or reflections in a macro photo when a ring flash or O-flash was used.

o-ring flash lighting
The idea behind the O-flash is that it is not a complete circle of light so it will give you a little bit of desired shadowing.
It does not provide a 360 degree circle of light, so may get a little bit of the feel of a directional light, depending on the size and the closeness of your subject.
There are additional ways to modify your macro photography lighting and I discussed them in this article: macro lighting equipment.
my recommended "macro photography lens"
Now, you've got an idea on the 3 basic pieces of macro photography gear. Here's an alternative choice instead of getting a dedicated macro lens. Surprisingly, I never purchased an expensive macro photography lens until 2022. For more than 10 years I used extension tubes.
I got great image quality, enjoy the versatility, appreciate the durability and absolutely loved the price of my macro photography extension tubes.

Extension tubes are the piece of equipment I recommend more than any other for newbie macro photographers. Although they have no optical elements in them, they attach in between your camera and the lens you already have.
Think of them as a spacer that increases the distance between your lens and your camera sensor. They decrease the minimum focusing distance for m your lens to your subject. I use my extension tubes with an 85mm prime (non-zooming) lens for super sharp results.
my favorite accessory for macro photography
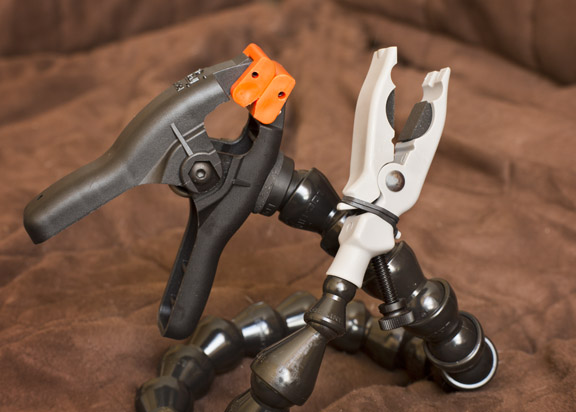
The accessory I use most (Not counting my tripod, of course) for shooting macro photos is a photographer's clamp made by Wimberley.
It's called the Wimberley Plamp II. It's kind of weird looking, , but it was designed for function, not looks. It's really like having a third hand available to assist you.
You can use it to precisely hold your subject in place, hold a reflection or diffusing panel and improve your lighting, or even use it to hold an off-camera flash. You can read more on this unique piece of macro gear on this separate review of the the Wimberley Plamp II.
the reversing ring is very simple macro photography equipment
A reversing ring, also known as a reversing adapter, is a very affordable piece of equipment that allows you to use your one regular lens by mounting it to your camera in a reverse manner. It's a bit on the gimmicky side, but us camera geeks do these kind of things.

It enables you to attach the front of your lens to your camera body. That gives you a nice magnification factor of your subject. The downside of using a set-up like this is that you are forced to use manual focusing and manual aperture control.
For my money, they are too limited in function. It makes more sense to go ahead and spend money on a true macro lens.

The reversing ring is not a horrible place to start if you already have a camera with interchangeable lenses and you're on a super strict budget. Remember your regular lens was not designed to be a piece of macro photography equipment, so the optics won't be perfect. It is still an option to use to dabble in macro photography if you already have this equipment.
bellows as macro equipment

Known as extreme macro photography or micro photography, macro photography using a bellows give you the ultimate flexibility in terms of controlling the amount of magnification you wish to achieve with your macro photography. Bellows work in the same way as extension tubes, but at a much higher level.
With extension tubes, you must change the number of tubes you attach to change the magnification. Using bellows as your macro photography equipment gives you a continuous range of magnification possibilities without changing lenses or tubes.
Extreme magnification is possible with a bellows arrangement. Extremely narrow depth of field and longer exposure times come along with that extreme magnification. One drawback to using a bellows is its size and weight, making a little less agile to work with while photographing tiny objects, especially out in the field.
If the object of your macro photo is stationary, bellows are a great option to get super close-ups.

most important piece of macro equipment
I saved the most important macro equipment recommendation to emphasis again for last. You can use a variety of different cameras, lenses, and accessories to take good close-up photos.
You can find favorable lighting conditions without any equipment, but the one universally needed accessory taking for sharp macro images in a good tripod.
Camera stability and precise focusing are critical components of getting sharp photographs. I dedicated an entire post on this subject. You can read more about how to choose the best tripod for outdoor macro photography here.


ABOUT BRUCE LOVELACE
Bruce is the publisher of this website. He is the author of the book "Improve Your Photography Instantly." Read more on Bruce on his Bio Page. He's been known as The Traveling Photographer ever since 1994. Read more about this website.
View some of Bruce's photos on Instagram. Visit the Facebook Page. Watch him on YouTube. Bruce runs photo workshops for kids and adults, and provides one-on-one photography coaching.
Digital Photography Education Location on Google My Business
You might like these
5 Famous Macro Photographers Worth Watching And What Can You Learn
The secret is to specialize in one type of macro photography? Check out the remarkable , unique macro images of these famous macro photographers.
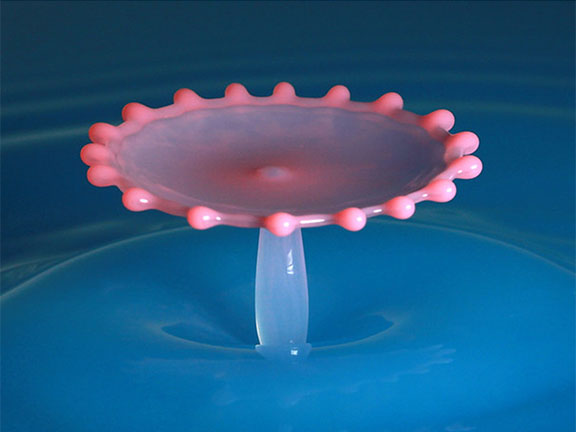
Macro Water Drop Photography- How to Photograph Water Drops + Splashes
4 Simple steps with examples on how to take great water drop macro photography and a surprising macro photography accessory
Cheap Diffuser For Macro Photography. Reviews-Low Cost Recommendations
Should you use household items to make one or buy a low-cost cheap diffuser for macro photography Reviews and do it yourself macro lighting hacks
11 Macro Photography Ideas You've Never Thought Of - How To Find Them
Do you need some macro photography ideas or inspiration? This will help. Look at these sample macro photos.
Definition of Macro Photography. What is Macro Photography.Explore It!
It is often technically mis-used but the precise Definition of Macro Photography isn't that important for most photographers.


As an Amazon affiliate I may receive a small commission from qualifying purchases, at NO added cost to you.
Recent Articles
-
What is Auto ISO? Tips On When to use it and When Not to Use Auto ISO
Apr 24, 24 05:44 AM
 Auto ISO Simple Guide. Questions and answers on when to use AUTO ISO and when not to use it. How you can use it to improve your photography.
 -
Best Photo Backup System - Never Lose a Photo Again, Ultimate Guide
Apr 21, 24 01:45 PM
 You're at risk to lose your precious digital photos. What's the best photo backup system? Read on my firend
 -
What is Bokeh. Why It's So Important And How To Get The Best Bokeh
Apr 19, 24 02:12 PM
 With multiple meanings and false definitions. Find out what is bokeh in photography. It's a simple way to improve your photos by controlling the out of focus areas of your subject. How to get the best…
 -
7 Reasons Your Camera Won't Focus And The Simple Ways to Fix It!
Apr 19, 24 01:41 PM
 That's annoying! You missed another important photo because your darn camera won't focus. 5 simple tips to fix or avoid missing that great shot.
 -
How to Take a Self Portrait With a DSLR or Mirrorless Camera
Mar 30, 24 02:27 PM
 Selfie Superstar: Master the Art of the Self-Portrait. Simple steps on how to take a self portrait with a real camera, not just a smart phone selfie.

 Basic Macro Lens
READ THE MACRO GEAR REVIEWS ON AMAZON:
 Simple Close-up Filter
 Macro Reflector Disk
Improve your photography instantly. Get the 2 most important chapters of my photography book for free.