HOW TO POSTS: LIGHTING AND COMPOSITION
macro photography tips
Frequently Asked Questions
You're looking for macro photography tips and have lots of questions about macro photography. There's a lot you can learn. This FAQ will help you with an overview of where to start and what to do. You'll also find a list of helpful macro photography articles with specific aspects you can explore and use to get great close-up photos.

Macro Photography FAQ:
How can I make my macro photos sharper?
How can I make my macro photos sharper?
There are several ways to make you macro photos sharp. Getting blurry photos is the biggest issue photographers have when shooting macro. Camera movement and missed focusing are the two biggest obstacles to overcome.
- USE A TRIPOD. This will prevent your camera from moving during the exposure and will keep the focusing distance between your lens and subject constant.
- SMALLER APERTURE. Using a smaller lens opening (larger f/stop number like f/11 or f/16) will give you a larger range of sharp focus.
- INCREASE LIGHTING. Adding light to your subject will allow you to use a faster shutter speed and/or a smaller aperture to get sharper macro photos.
What is the best focus setting for macro?
What is the best focus setting for macro?
There are two best focus settings for getting sharply focused subjects when shooting macro. Both work equally well and have advantages and disadvantages.
- USE MANUAL FOCUS. Focusing manually guarantees your camera/lens won't make a mistake choosing the wrong precise focusing point.
- SINGLE POINT AUTO-FOCUS. You can set the exact focusing point location and your camera will automatically focus on that point. Advanced point-and-shoot, DSLR, and mirrorless cameras have an auto-focus setting option to pick a single point to use for automatic focusing.
What is the best aperture for macro?
What is the best aperture for macro?
Use an aperture of f/11 of f/16 as a starting point for lens aperture when shooting close-ups. Although you'll lose a marginal amount of sharpness from lens diffraction, use smaller apertures like f/22 or smaller when you want more of your subject in sharp focus. Use larger apertures like f/5.6 or f/8 when shooting macro in dimly lit situations.
How many megapixels is good for macro photography?
How many megapixels is good for macro photography?
For a regular APS-C "crop" camera 16 megapixels is plenty enough for shooting macro photography. For a full frame sensor camera 20 megapixels if good.
For professional quality macro photos, or photos that will be significantly cropped, I recommend 24 MP for APS-C and 30 MP or more for full frame photos.
Do I need a ring light for macro photography?
Do I need a ring light for macro photography?
Although they function very well for macro photography, ring lights are not a required piece of macro photography equipment. Ring lights are useful in dimly lit shooting situations and are good at "freezing" moving targets and getting sharp photos.
Alternatively, you can often use bright natural light or a bounced or diffused single flash unit for spectacular macro images.
Is mirrorless better for macro?
Is mirrorless better for macro?
Mirrorless cameras are not better for shooting macro than traditional DSLR cameras. Although mirrorless cameras have great technology and are exploding in popularity, DLSR cameras and some advanced point-and-shoot cameras also work great for macro photography.
The most important thing is the availability of a macro lens for your camera and the technique you use when using your camera.
What is the best magnification for macro photography?
What is the best magnification for macro photography?
The standard magnification that is used for comparing camera lenses with respect to shooting macro is a 1:1, or a one-to-one magnification. A 1:1 magnification means that the projected image on the camera sensor is the same size as the subject. In other words, it's life-size.
A lens that can reproduce objects at double like-size has a magnification ratio of 2:1. A lens that only reproduces objects at half-size has a magnification ratio of 1:2. The best magnification with macro photography is subjective and depends on the effect you want to achieve.
What is the best shutter speed for macro photography?
What is the best shutter speed for macro photography?
When shooting macro photography, a shutter speed of 1/250 second is a good starting point because you need to use a shutter speed fast enough to avoid motion blur if your subject is moving. Fast shutter speeds are also needed if you're shooting without a tripod.
Using a tripod will allow you to use slower shutter speeds when you're photographing subjects that aren't moving. At high magnification, blur from camera or subject movement is amplified and shutter speeds of 1/400 second or faster may have to be used to get sharp images.
Should I use a flash for macro photography?
Should I use a flash for macro photography?
You should use flash when shooting macro in these 5 different situations.
- Dim light. Use a flash when you're shooting in a dimly lit environment and you can't use a tripod and slow shutter speed to get a proper exposure.
- Freeze motion. When you can't use a super fast shutter speed to stop all blur from a moving subject, the super short duration of a flash will freeze your subject's movement.
- Depth of field. When you can't stop down your macro lens to a tiny aperture to achieve deep depth of field in the existing light, the brightness of a flash will allow you to shoot at small lens openings and get more or all of your subject in focus.
- Darken background. Light from a small flash unit falls of quickly in brightness. Your subject will receive much more light than a background that is further away from the subject. The background will be darker in your photo and this will make your subject stand out more.
- Fill light. Setting your flash to a reduced power setting will make it good for filling in the dark shadows of your subject, but have much less effect on the highlight areas of your subject.
What focal length is best for macro?
What focal length is best for macro?
The best focal length for macro photography is 150mm to 200mm. Although they are the most expensive, telephoto macro lenses give you the best working distance between you subject and the front of your lens.
Long focal length lenses also give you a more pleasing out of focus quality (bokeh) background than shorter focal length lenses like a 50mm or 60mm macro lens.
Why are my macro photos blurry
Why are my macro photos blurry
There are two main reasons why your macro photos are coming out blurry. Blur comes from camera or subject movement during exposure or it comes from lens focus.
- To get rid of blur from camera and subject motion you can use a faster shutter speed, use flash, or use a tripod. Using a tripod won't help with motion blur.
- To get rid of blur from lens focusing, you can use manual focus, use a single point autofocus setting, or shoot with a smaller lens aperture to get better depth of field.
1. use a tripod
Here is more detailed information on the benefits of using a tripod mentioned above in the FAQ section.
Using a tripod is the single most important tip on macro photography you'll get from reading this post. Can you shoot macro without a tripod? Yes, I did in the photo below, but you're limited to shooting very bright conditions or using flash to light up your subject.
Usually macro photography usually involves smaller lens openings (high f/stop numbers) and longer exposures so you get enough light for a good exposure. Any movement of the camera is exaggerated when you're shooting at close distances under magnification. You need your camera to be completely still to prevent getting a blurry photo.
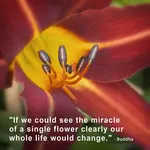
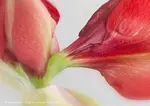
Some close-up photography can be very abstract in nature because of the extremely shallow depth of field. This close up photograph was shot at f/11 which is a pretty small aperture.
Despite this, you can see that surrounding petals are out of focus and isolate the flower's central tube called the stigma.

I could not use a tripod when I photographed the active butterflies and various other flying insects that were hopping form flower to flower on our butterfly bush.
I jacked up the ISO to 1600 so that I could get a high shutter speed and a small aperture while shooting in direct bright sunlight. This is not my favorite lighting, but it was the only way to get motion and focus sharpness with these very busy insects.
All of these macro photos were taken with a 31 mm OPTEKA extension tube which gave me a focusing distance of only a few inches from my rapidly moving subjects.
2. Use Aperture To control your depth of field
 Shoot 2 different f/stops
As mentioned in the macro FAQ section, there are recommended apertures to use. Most macro shooters choose a lens opening of f/11 or f/16 as a starting point to get sharply focused macro subjects..
These two close up photos of this purple flowering grass are great examples of how your choice of aperture affects what comes out sharp in your macro photos. That's called depth of field. It was very bright outside and I place a large piece of white foam core to block the direct sunlight and create a soft morning light effect.
Notice how the close up photo shot at an aperture of f/7 has a less distracting background than the f/22 shot. One of the other tips for taking digital photography that I've shared in many photography articles is to try several variations of the same photo. This is a good macro photography tip too.
Try using a large aperture for shallow depth of field first. Then take the same photo using a small aperture for a larger range of things in focus in your image. Remember this change in f-stop will require a change in shutter speed or ISO setting to get the same exposure. For more on that topic, visit Photo Exposure.
3. simplify your macro photography lighting
You are a beginner at macro photography and you want to keep things simple. That includes your macro photography lighting as well. Photography is really "painting with light," and just like all other genres of photography, lighting can make or break your macro photograph.
Shooting outside when it's bright gives you an advantage when it comes to getting a good shutter speed and aperture combination. For indoor macro shots, or macro photos in less than ideal amounts of light, you can use a single flash for the best results. Here are the two options.
OPTION A. USE NATURAL LIGHT
Start with natural lighting. Sure, you can use your pop-up flash or attach a flashgun and blast your subject with light for good sharpness, but your photos will come out contrasty with harsh shadows. For outside photos of flowers and bugs, go for bright conditions on days that are slightly overcast. The light is bright but still diffused and you'll get good exposures with softer shadows.
I've explored some other web sites discussing macro photography lighting tips and some of the advice is really bad. It is definitely a subjective topic and I am not the Macro Lighting Master of The World. Blasting your subject directly with a harsh direct electronic flash is not an attractive way to light your photo.
If you do want to dive into macro photography with flash, use a simple diffusion panel with one of these two macro lighting techniques. Although they are real handy to use, you don't have to buy one of the two of the macro lighting flash modifiers below. Any comparable material will do, but these two examples are very easy to use.
OPTION B. USE A SINGLE FLASH
Here's how you can avoid those ugly harsh shadows that your built-in flash or a hot shoe-mounted flash will give you.
diffuse your flash
You can aim your flash through any type of diffusion material to scatter the light and soften the shadows. You can handhold it, get models that attach to your flash, or attach to a bracket that will hold it for you.
 DIFFUSER
Bounce your flash
You can bounce the light from your flash off of any type of reflective material to scatter the light and soften the shadows. You can handhold it, get models that attach directly to your flash, or attach the reflector to a bracket that will hold it for you.
 REFLECTOR
 Simple (and successful) Macro Lighting
Soft bounced lighting created from a single small flash gun aimed at white cardboard
If you have a budget for added lighting options when shooting macro photos, you might be a good candidate to buy a macro ring light.
4. plan your macro photo ahead of time
 Keep a journal
Although you can simply go out exploring and hope to find a good close-up subject, you'll find yourself getting more winning shots by doing a little advanced planning. Although I confess, I do both spontaneous and planned macro shoots.
If I've seen or imagined a particular type of close-up I want to create, then I'll actually use my idea journal to jot down things I need to consider. Get my extensive list of macro photography ideas here.
Keeping a macro photography journal can be very useful to you in several ways. When I say "journal" you might think of it a place to record events that have already happened. That is definitely one useful thing to do. Keep track of the photos you have taken, as well as maybe some observations about lighting conditions, camera settings, or other details.
These notes can be great to have when you are evaluating and editing your photos after your photography session. You can learn a lot when you review your mistakes as well as your triumphs.
 Bug photos require planning
One of my photography professors required us to use a photography journal. We were required to not only list items such as equipment, background, location, and lighting, but also sketch out the photo ahead of time. Initially at the time I didn't like it. I thought it was a waste of time, but boy was I mistaken.
That planning and pre-visualizing habit actually helped me get much better results, particularly when we were trying a new type of photography. Using a journal or other type of record planning or recording will really help you learn any new photography technique including macro photography.
 Macro Subject List
I still plan photography shoots ahead of time. Sometimes, rather than the journal, I'll go into shortcut mode and have my notes within my calendar on my smartphone. That way I know I won't forget to have my notes with me at all times.
Whatever media you use, written or electronic, try this photography planning technique and see what happens. You'll be surprised with how helpful this will be.
improving your macro photography lighting technique is a lifelong process. Explore the other articles with indoor and natural macro photography lighting tips to get some more ideas.
The best way to improve is to shoot, shoot, shoot!


ABOUT BRUCE LOVELACE
Bruce is the publisher of this website. He is the author of the book "Improve Your Photography Instantly." Read more on Bruce on his Bio Page. He's been known as The Traveling Photographer ever since 1994. Read more about this website.
View some of Bruce's photos on Instagram. Visit the Facebook Page. Watch him on YouTube. Bruce runs photo workshops for kids and adults, and provides one-on-one photography coaching.
Digital Photography Education Location on Google My Business
You might like these
Macro Photography Tricks for Insects You haven't Used But Should Try
Collection of simple and advanced tips from pro and amateur photographers. Tricks For Shooting Macro Photography of Insects
Best Tripod for Outdoor Macro Photography + Its Best Features For You
How about a camera tripod that works like a standard one as well as a good tripod for outdoor macro photography. check it out.
Definition of Macro Photography. What is Macro Photography.Explore It!
It is often technically mis-used but the precise Definition of Macro Photography isn't that important for most photographers.
1 Super Simple Macro Lighting Technique That Works Remarkably Well
Macro photography lighting can be done with flash or continuous lights, but here is a super simple macro lighting technique you can copy using natural light.
How To Get Beautiful Natural Macro Photography Lighting-Stunning Photo
How to use natural macro photography lighting. Just 2 simple tips to getting great macro photos without flash.
Macro Photography Gallery of Flowers.How To Take Your Flowers Up Close
Spectacular macro photography gallery of flowers. The 3 Simple steps you can take to capture your own stunning macro images of flowers.
Macro Photography Equipment Guide - 3 Must Have Accessories To Start
Little Things, Big Gear: Macro Photography Equipment. Ultimate keep-it-simple macro gear guide for beginners. Must have accessories to start with
Macro Photography Lighting Tips For Indoor Photography With Flash
What is the best macro photo lighting set-up to use? Strobe lighting or spotlight? Several articles covering macro photography lighting tips.
The Best Camera For Macro Photography? 5 Must-Have Features For Macro
What the camera companies won't tell about the best camera for macro photography? What You Need to Know First. Comparison of DSLR vs. point and shoot cameras a
Best Budget Macro Photography Lenses And 5 Alternatives To Save Money
Extreme Detail, Extreme Savings. I break down the 5 cheapest and best ways to start shooting razor-sharp macro photos today. Try these macro lens alternatives.


Recent Articles
-
20 Photography Tips-How To Instantly Improve Your Photography in 2025
Jan 01, 26 03:42 PM
 How to easily get better photos. These simple photography tips will steer you in the right direction for quickly improving your results as a photographer.
 -
How to Buy a Digital Camera (2026 Guide): 7 Tips + The SLAP System
Dec 29, 25 11:44 AM
 Confused by camera specs? Stop feeling overwhelmed. Avoid the 3 costly mistakes-find your perfect camera. Easy 4-step SLAP guide for 2026. How To Buy a camera
 -
5 Best Family Portrait Pose Ideas for 2026 (Easy & Natural Posing)
Dec 28, 25 10:07 AM
 Stop taking stiff, boring photos! Learn 5 simple family portrait pose ideas to get natural smiles and flattering angles. Perfect for beginners and pros alike.
 -
5 Creative Camera Monopod Uses You Never Thought Of. Monopod Tricks
Dec 28, 25 07:50 AM
 Monopods are one of the most under-utilized camera accessories and are relatively unknown. Creative Camera Monopod Uses
 -
10 Pro Tips for Better Camera Phone Pictures in 2026-Fix Blurry Photos
Dec 24, 25 08:26 PM
 10 simple cell phone photography tips for taking better camera phone pictures that will amaze your friends
 -
10 Photography Creativity Exercises to Break Your Creative Block
Dec 22, 25 02:41 PM
 Stuck in a photography rut? Discover 10 simple exercises to boost your photography creativity today, from shadow selfies to intentional blur techniques
Try several different crops when doing your photo editing. In the flower photo below the original un-cropped version had a very dark background.
While it did give great separation, I felt it was a distraction. I cropped it tighter and simplified the photograph to make it more elegant.

Try going abstract. Abstract Macro Photography is a fun segment to explore. Although the photo below is identifiable as a flower, it has a surreal kind of feel to it because of the wide-angle lens used and the resulting spatial distortion.

Improve your photography instantly. Get the 2 most important chapters of my photography book for free.