HOW TO POSTS: LIGHTING AND COMPOSITION
macro photography lighting
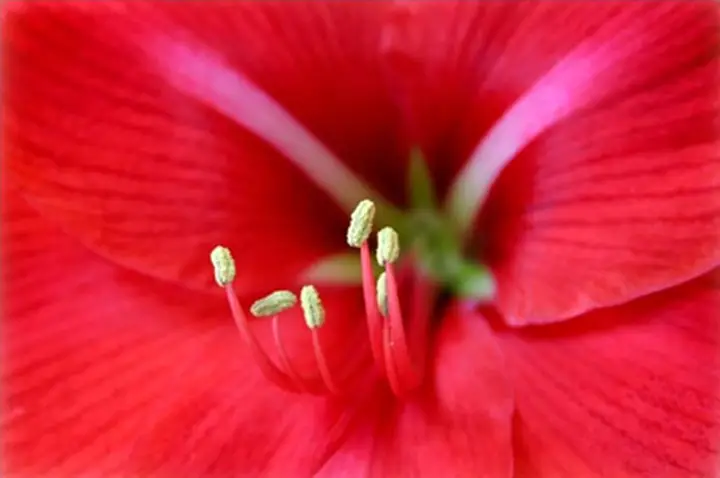
 "Pink Lily" When I succeed and get a photo like this I get excited. Yes,
I know I'm a nature geek, but seriously, I don't care what you call me. Photography is such a fun activity if you get past the technical stuff and make it your aim to make it fun.
"Pink Lily" When I succeed and get a photo like this I get excited. Yes,
I know I'm a nature geek, but seriously, I don't care what you call me. Photography is such a fun activity if you get past the technical stuff and make it your aim to make it fun.So, you want to learn a little about good macro photography lighting technique and it's a little confusing on where to start.
This article will give you the basics. I'm gonna show you quite a few examples of different lighting and critique each photo in detail. You'll also find links to more in depth information. Warning: it's gonna get a little geeky-but we can make it fun.
You have two choices. You can either use the existing light or create your own. This article will help you try both.
Here's the good news. Using good technique with macro lighting is easier than you think. Just like your subject itself, you only have to learn how to control the light in small areas. That makes it easier and I know you like easier rather than harder.
Let's dive into using existing light first. It's the easiest to use because it's already there, just waiting for you to use. Think of it as a gift you want to use. The only thing you have to do is look it closely and figure out if you need to use a little fill light.
The lighting for this close-up of the "Pink Lily" was 100% natural. It was taken at a nature conservatory about an hour from my home.
Conservatories are great locations to find good macro photography lighting because they are built to maximize the lighting for the health of the plants. Another location with good lighting for shooting close-ups is your own home. Just get your subject as close as you can to a window.
use window light for your macro photos
Use the light coming through a window. Remember the K.I.S.S. method; Keep It Simple Silly. Why not take advantage of an existing light for your macro photography? The two things to watch for are the direction the light is coming from and the amount of fill light that is present. You're in control of where you place your camera in relation to the window and whether you add a little fill light with a simple white reflector. Check out the set-up below.
 The only light is being provided for this close-up shot of these pencils is coming through a window. The window has a sheer curtain that diffuses the light. Generally, it's better not to shoot in a location if the sun is coming directly through the window and hitting your subject. The shadows are usually too harsh.
 You can hold any white or very light colored object close to your subject to provide fill light. Keep it just out of camera range. Even though it's relatively small, it is acting like a big light source because our subject is so small and it is so close to the subject.
Here are the 2 resulting photos from this set-up. I shot photos with and without using an 8x10 inch white reflector board. Which one do you like better? I actually like the one without fill light. I think it has a little more depth and that the shadows are not too deep.
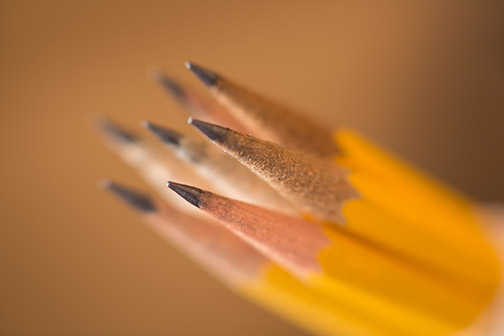
Move your cursor over top of this macro photo of the pencils and see what a difference the fill light makes in showing the details on the front of the pencils.
This is why you should shoot several slightly different variations of lighting.
The photo of the pencils without fill light actually shows the detailed wood grain better than the photo with fill light. The lighting in the fill light photo is a little too flat for my liking. This is a subjective judgement. What do you think?
use one single strobe light for your macro photography
Here's an example of using a single flash for lighting your macro photograph. The key is to bounce the light, rather than use it directly. The photo on the left shows what happens if you just keep the flash aimed in its default position.
 The only light is being provided by a mini flash gun attached to the camera's hot shoe. The flash was aimed directly forward. The resulting lighting is very uneven and made the background very light.
 If you aim the flash at a reflecting surface, it will scatter and give you a broader, softer light. It still had direction and it's still a more pleasing macro photography lighting.
macro lighting using flash - video tutorial
I borrowed the video below, from another site I blog on, to show you the set-up for the photographs of the red bell pepper. It's a simple technique you can use when you don't have any existing light available to light your shot. There are two advantages of using strobe lighting when you're shooting macro.
First, you can freeze the action and not worry about losing any sharpness from motion blur. Electronic flash duration is so short that if you're photographing a moving object you won't get any blur. Secondly, because your flash can be very close to your subject, you're going to be able to use a very small aperture which will help with your depth of field.
It can be challenging to judge the lighting conditions when working in such small areas and with flash. I use extension tubes combined with a prime telephoto lens to get a farther working distance from my subject.
Another challenge when working so close to your subject with good macro lighting is that you or your camera may create a shadow on your subject. Pay attention to whether you may be blocking any of the light that is hitting your subject.
outdoor natural macro lighting

Look at this gorgeous picture of the red flower and its anthers. Outdoor photography subjects are everywhere. Proper lighting and composition techniques must be used. It's easy to be distracted by the fascinating subject matter itself and your technique may be forgotten.
By choosing a time of day when the flower was in open shade, I took advantage of pleasing lighting with this shot. The light striking the anthers was just right to visually separate them from the brilliant red petals behind.
I'm not in love with the composition and if I were shooting it again, I'd move the camera ever so slightly to the right and angle it more to the left. That would give you better separation between the anthers and the red petal background.
It's also a good example of how a slightly out of focus background works well in a photo. The background doesn't compete with the center of interest. More excellent lighting in the photo below.
 Stigma and Anther of Lily Flower
This lighting was natural here too, but it was so flat. Because there was so much saturation in the colors, it really turned into more of an abstract macro photo.
I think it's a crowded composition too. The Stigma is somewhat lost amongst the anther and this composition lacks the depth that the image before it has.

Darrenhester used a simple backlighting setup in a controlled photography studio environment to get these great highlights on the wood grain. It almost appears to be glowing. Another one of the reasons this is a successful photograph is that it has good composition technique.
It also has an interesting effect with its shallow depth of field. The guitar strings almost appear to be vibrating. The warmer glowing tones in the wood grain, the choice of subject matter, the way it was composed, and the lighting all add up to an interesting macro photograph.

This is a real good example of macro photography lighting technique. A soft light source from the left was used and it brings out the 3 dimensional qualities and textures in this very small cylinder shaped pasta.
The photo also has a more interesting composition because of the diagonal direction of the pasta instead of straight verticals.
Some critics might comment on the dark space in the top right corner. It adds some contrast to the image , which I think is good. Perhaps if the camera was aimed slightly lower to the left that dark area would be a little bit smaller and would not be a distraction.

This is such an interesting photo. Macro photography can easily become abstract for two reason. One, you see such a close view that there are no visual clues on the perspective, size or the object's identity. Secondly, because the range of things in focus is often quite narrow, it takes on a kind of surreal look. The technique and subject matter make it appear as if it was taken on another planet.
Close up photography can often become quite abstract. It is more engaging when you have to look at an image for a few seconds before you can figure out what is actually is.

In this photo the gel tabs have a translucent quality because of the way they were lit. The lighting for this image is coming from one light source
Although there is no strong central focal point, it is still an interesting photo because of the arrangement of the individual tabs.

This is a great way to see how macro photography lighting effects your picture. These aren't true macro photos, but they are close-ups and the point on lighting is still valuable. The direct sunlight striking the daffodil on the left create harsh shadow lines on the petals. It is a high contrast situation.
The soft directional light on the daffodil on the right create 3 dimensional characteristics. Also look what a difference it makes to carefully choose your background. Which one of these flower photos do you like better?
links related to macro photography lighting
Natural Photography Lighting For Macro. Two sample macro photos and how two different lighting directions effect the final photographs.
Photography Lighting. Do you enjoy articles on lighting? Here is a general article on photography lighting with a number of related links to more specific articles on on light and photography.

This photo of the busy bee working on this Lily was done using early morning light. You'll find it a little more challenging to take close ups of moving objects for 2 reasons. First, accurate focusing is already challenging in macro work with stationary objects, due to such shallow depth of field. Even the slightest change in distance of your subject with throw off the sharpness.
Secondly, photographing a moving macro target limits you on how slow of a shutter speed you can use. Too slow and you'll get motion blur. Too fast of a shutter speed will limit how small of an aperture you can use to get good depth of field. that's why many insect photographers revert to using flash to freeze the motion and give ample light for better focusing depth.
I am a big fan of using natural lighting in most of my macro photography. It's likely a carryover from all of the outdoor portrait photography I do, but I still believe it gives the most pleasing results.
outdoor macro lighting with flash - video tutorial
Some macro photographers use electronic flash to add to the natural lighting. In this video below, photographer Don Gale does a great job of balancing the natural macro photography lighting with just the right amount of fill flash.
This is good example of using the right macro photography equipment to get beautiful diffused lighting.


ABOUT BRUCE LOVELACE
Bruce is the publisher of this website. He is the author of the book "Improve Your Photography Instantly." Read more on Bruce on his Bio Page. He's been known as The Traveling Photographer ever since 1994. Read more about this website.
View some of Bruce's photos on Instagram. Visit the Facebook Page. Watch him on YouTube. Bruce runs photo workshops for kids and adults, and provides one-on-one photography coaching.
Digital Photography Education Location on Google My Business
You might like these
5 Famous Macro Photographers Worth Watching And What Can You Learn
The secret is to specialize in one type of macro photography? Check out the remarkable , unique macro images of these famous macro photographers.
Macro Water Drop Photography- How to Photograph Water Drops + Splashes
4 Simple steps with examples on how to take great water drop macro photography and a surprising macro photography accessory
Cheap Diffuser For Macro Photography. Reviews-Low Cost Recommendations
Should you use household items to make one or buy a low-cost cheap diffuser for macro photography Reviews and do it yourself macro lighting hacks
11 Macro Photography Ideas You've Never Thought Of - How To Find Them
Do you need some macro photography ideas or inspiration? This will help. Look at these sample macro photos.
Definition of Macro Photography. What is Macro Photography.Explore It!
It is often technically mis-used but the precise Definition of Macro Photography isn't that important for most photographers.


As an Amazon affiliate I may receive a small commission from qualifying purchases, at NO added cost to you.
my 3 favorite macro helpers
 1. Small white reflector board
A small white reflector board is many times all you need to bounce fill light onto your subject. You can also use it to block direct sunlight from hitting your subject so that you won't have any contrasty shadows.
 2. Plamp - photographer's clamp
The Wimberley Plamp has a specialized jaw on one end that can easily hold a flower stem as well as a notch for wire rimmed reflectors. The other end is a powerful spring clamp that can attach to a pole and other sturdy object.
 Wimberly Plamp in action
The Wimberley Plamp has a specialized jaw on one end that can easily hold a flower stem as well as a notch for wire rimmed reflectors. The other end is a powerful spring clamp that can attach to a pole and other sturdy object.
What I like most about my Wimberley Plamp is the infinite number of ways it can be bent to get it in exactly the right position.
 3. Extension Tubes
I still only use extension tubes for my macro photography. You can buy them in sets of 3 and use them in combination to get a good variety of different magnifications
As an Amazon affiliate I may receive a small commission from qualifying purchases, at NO added cost to you.
- Macro Photography Equipment
- Macro Photography Accessories
- Macro Photography Ideas
- Macro photography Light Box
- Macro Lighting Equipment
- Gallery of Flower Close-ups
Improve your photography instantly. Get the 2 most important chapters of my photography book for free.