HOW TO POSTS: LIGHTING AND COMPOSITION
How to email pictures from your computer
Here are the five steps on how to email pictures.
This first section on how to send your photos by email covers the basic steps on preparing your picture to email.
Section two covers the three different software programs that are used: Outlook, Outlook Express and Netscape. Emailing photos Mozilla Thunderbird is essentially the same. If you use Yahoo, Gmail, or another host's email program, the steps are still quite similar.
The step by step method of emailing your photos using your computer
- Open your photo that you want to email. Use your favorite photo editing software.
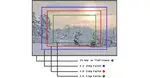
- Do any desired photo editing and cropping. Cropping will often improve the photos composition.
- Resize your photos so that they will make it through without clogging up your internet providers web server. Many email programs have a 1 MB {megabyte or 1,000 KB [kilobyte] limit}. You can go to www.shrinkpictures.com and resize your photos online. How COOL is that? Then save your digital photo with a different file name, such as 3457-email.jpg. This will prevent you from writing over the original photo.
- Make sure the person that you are sending picture by email is expecting it from you.
- When you send photos in an e-mail, the photos should go for the ride as attachments, just like any other files you would add to an e-mail. So, attach as a separate file. Do not Embed or insert as an image into the text area in your email program.

You should use the "attach" button or the button with the paperclip icon. This will insure the recipient of your emailed photo can save it as a separate file to their hard drive. Learning a new skill sometimes takes us out of our comfort zone, but once you get it, it's a lot of fun to play around with a new technology.
This Better Digital Photo Tips web site is committed to provide you with picture taking tips, including photo composition, lighting tips and better photo exposure.
Browse around and have fun with your photography. Use the search box at the top of the page on the left side. This How to Email Pictures page is just one of many pages with photography related tips.
how to email pictures with email software
To attach a photo in Outlook:
- Click New to open a Message window.
- Fill in the To and Subject boxes as usual and type any message you wish to accompany the photos.
- Click Insert File (the paperclip icon), locate your file through the Insert File box, click the file's name and then click the Insert button.
- If you wish to add multiple files from within the same folder, hold down the Ctrl key while clicking multiple files, then click the Insert button.
- Repeat Step 3 for any other files you wish to attach. Click Send.
How to email pictures using Outlook Express:
- Click Create Mail to open a New Message window.
- Fill in the To and Subject lines and type in your message.
- Click the Attach button, locate the file in the Insert Attachment box and click Attach. Use Ctrl-click to select multiple files.
- Click Send.
E-mail photos with Netscape Mail: -This is an old one!
- Click New Message to open the Compose window.
- Fill in the To and Subject lines, and type in your message. Click the Attach button or, in Netscape 6, click in the empty Attachments box.
- Select your file in the Enter Files To Attach dialog and click Open.
- To attach multiple files, repeat Steps 3 and 4.
- Click Send.
How To Email Pictures With Gmail
 Look for the symbol that looks like a paperclip
- Open your Gmail account.
- Type in the recipient who will be getting the picture
- Type in the subject line that an email is attached.
- Write your message.
- Click the symbol that looks like a paperclip.
- Select the photo to attach from wherever it is saved on your computer.
- Click on Send.
Sending Emails Frequently Asked Questions
How can I send email privately to separate people?
How can I send email privately to separate people?
To send an email privately to separate people, use the Blind Carbon Copy (BCC) field and enter the email addresses there instead of the "To" or "Cc" fields
How to ensure email deliverability.
How to ensure email deliverability.
Avoid using spammy language in subject lines and content, and always provide an easy opt-out option.
How do i know if somebody received my email?
How do i know if somebody received my email?
You can tell if someone received your email by requesting a read receipt or using a third-party email tracking tool. A read receipt is a notification that the recipient has opened the email, though the recipient can choose to decline it.
Email tracking software provides more advanced features, like notifications when emails are opened and how many times, and often works by embedding a tracking pixel in the email. A delivery or return receipt is a message a mail server sends you to confirm the email was delivered to the recipient's mailbox
How to politely check if someone received your email.
How to politely check if someone received your email.
To politely check if someone received your email, send a brief follow-up email with a clear but non-demanding subject line like "Checking in" or "Following up". In the body, you can say something like, "Just wanted to follow up to see if you had a chance to review my last email," or "I'm just checking in to see if you received my previous email."
I hope this article was helpful. Sending a photo though email has gotten a lot easier. For more topics on photography, you can use the handy dandy search box below and scroll down in the results for the article that interests you the most.
Search for a new topic on this site:
Stay inspired with your photography.


ABOUT BRUCE LOVELACE
Bruce is the publisher of this website. He is the author of the book "Improve Your Photography Instantly." Read more on Bruce on his Bio Page. He's been known as The Traveling Photographer ever since 1994. Read more about this website.
View some of Bruce's photos on Instagram. Visit the Facebook Page. Watch him on YouTube. Bruce runs photo workshops for kids and adults, and provides one-on-one photography coaching.
Digital Photography Education Location on Google My Business
You might like these
Digital Camera Definitions. What is a Digital Camera. Types of Cameras
Definition and types of different digital cameras. Beginners guide to meanings and explanations of digital camera terms. Links to digital camera posts to help you understand.
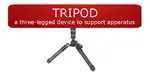
Definition of Tripod - What is a Tripod For And Guide to The Best One
Here is the most basic definition of tripod, What is a tripod and which type of tripod and tripod head to consider
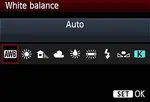
What is Color Temperature in Photography. (These Examples Will Help)
Simple definition of What is Color Temperature in photography with examples. How to set your camera for color temperature and how it effects your photo.
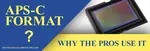
What is APS-C Camera Format. The Advantages and Disadvantages of APS-C
What does APS-C mean and the surprising reasons pro photographers use the APS-C camera format. Helpful guide to the pluses and minuses of a smaller sensor format

You might like these
Sitemap: Better Digital Photography Tips Website. Photography Articles
The complete sitemap for better-digital-photo-tips.com Better Digital Photo Tips Index of Articles and Blog Posts
Useful Photography Resources For You That I Use and Recommend
These are the photography products or services that I personally like and use. Helpful photography resources for you to improve your photography.
About The Digital Photography Tips Website and Finding Inspiration
It's all about inspiration. What Inspired me to build this website for you. Find out more about the Digital Photography Tips website and inspire yourself.
Improve your photography instantly. Get the 2 most important chapters of my photography book for free.