HOW TO POSTS: LIGHTING AND COMPOSITION
photography lighting techniques
3 Lighting tricks
Here are three unusual photography lighting techniques that will help you when you are evaluating your photograph's lighting. These aren't the typical lighting techniques you'd expect to find on photography websites, but using them can aid you in making some great photos.
 Photography is all about lighting and finding situations with strong
back lighting can work in your favor and give you interesting photographs.
Why? These techniques involve evaluating the light first.
These methods can all be used with or without lighting equipment. You can: 1) do the squint, 2) check the shadows, and 3) do the quick peek.
Without light, there is no photography. Improving your ability to understand lighting will advance your success at creating interesting images more than any other traditional lighting technique you can try.
The first technique you can use is one I learned while I was in photography school. It was particularly good to try with black and white photography, but it will work for color photography just as well.
1. the squinting technique
 Evaluate the light by using
The Squinting Technique
Your eyes, along with your amazing brain, do a remarkable job of viewing a scene and seeing both dark shadow areas and bright highlight areas with great detail. Digital cameras are built with advanced technology, but still aren't as good at "seeing" that same range of brightness and darkness as the human eye.
A quick way to preview how a photograph will actually look is to squint your eyes as you look at your subject. It sounds a bit unusual, but stay with me here for a second because with a little practice it will work well for you.
Squinting will give you a quick view of the brightness levels of all of the objects in your photo. Generally, we notice bright things at a higher level than darker things in a photograph. Our brains work in such a way that the bright areas are noticed first and are more dominant.
The squinting technique help you see a scene in a more similar way that it will be viewed in a photographic image. You don't even need a camera to use this technique at analyzing the lighting. You can practice this approach anytime you want to visualize how the scene in front of you will come out in a photograph.
I use this technique when doing landscape photography and find it very helpful in preventing me wasting time shooting images with bad lighting.
I know what you're thinking. This is a little strange, Bruce. Yes, you're right. It many be a little unusual to go around squinting, but I promise you that you'll see how it works if you try it a few times in a few different situations.
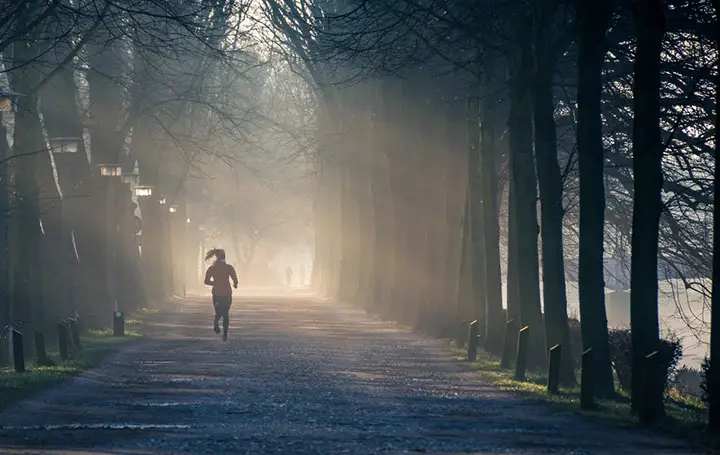
2. it's in the shadows

Look at the size and shape of the shadows in the scene in front of you. Notice where the shadows are falling. Paying attention to the shadows will give you an idea on the characteristics of the existing light as it hits your subject.
This technique is appropriate when you have a continuous light source like the sun, the sky, reflected light, light from man made electrical lighting, or some combination of these.
When you look at the characteristics of the shadows to tell what direction the light is coming from, whether it's direct or diffused, and if there is light coming from another source.
This action photo of superstar Rafael Nadal was taken late in the afternoon. Being the lighting geek that I am, I noticed the long shadows from the sun, so I thought it would be fun to include them in my composition. If I had walked around to the other side of the stadium, his shadow would have been blocked by his body.
They best way to master this lighting technique is to spend a little time seeking out interesting lighting conditions. Make it a point to look for interesting lighting, take a variety of photos, and then evaluate your various photos afterwards. If you want to get a little creative and have some fun try a day full of taking Shadow Photos. It's a great way to learn photography lighting techniques.
3. take a peek

Take-a-quick-glance-at-your-LCD-screen. And I do mean quick. The idea here is not give yourself enough time to look at the details within your photo. You want to get a real quick overall impression of what's light and what's dark.
When I was in photography school, one of professors would use a similar technique when our class would meet for a group critique of our photography. It was one of the most annoying things we ever did, but after a while I caught on on why it was so effective at helping me learn lighting.
He would show us the submitted prints for a very quick time frame, perhaps just 1/4 of a second. You only get a brief first impression, an overall feeling of what the photo was about. I must admit it was irritating at first, but it really made you evaluate the lighting, the dark and light areas of a photograph, as well as the overall composition. It's not a bad technique to get used to if you practice it a few times.
Examples of good photography lighting technique
Sometimes the best technique is just showing up. The more often you show up the more likely that you'll be able to photograph a landscape with interesting lighting. The Cliffs of Moher in Ireland is a notorious location known for being often being heavily overcast.

This is often a tough subject to photograph because of the poor lighting conditions that are often in play in Ireland. My wife captured this image on her 3rd trip to this location. What do you think?
In the family portrait below the lighting technique was simple-get my subjects out of the direct sun. The evergreens provided shade from the harsh winter sun and also made for a great background.

Unusual situations, like the snowy environment can sometime wreak havoc on your lighting technique. I really depend on my camera's histogram to make sure my exposure is spot on under such tricky conditions. In this case, the snow did a great job filling up the shadow areas.
resources related to photography lighting techniques
We only did Black and White Photography for the first year at photography school, but you can learn to see photography lighting even better when you are not distracted by any colors in your photo.
Photography Lighting Systems. There are a wide variety of photography lighting systems available for you to buy. Here are some thoughts on the pros and cons of each.
Photography Lighting Equipment. This photography lighting techniques article covered existing light situations. If you are interested in exploring 4 categories to consider when looking at adding lighting equipment to purchase read this.
How to Photograph Glass. Glassware lighting with an LCD flashlight. Super simple way to get an infinite variety of lighting effects while seeing the results in real time. Also includes a video showing the set-up used and 3 very different still photos resulting from the photography lighting techniques used with the flashlight.
Keep shooting. Keep learning. Keep improving. You've got this!


ABOUT BRUCE LOVELACE
Bruce is the publisher of this website. He is the author of the book "Improve Your Photography Instantly." Read more on Bruce on his Bio Page. He's been known as The Traveling Photographer ever since 1994. Read more about this website.
View some of Bruce's photos on Instagram. Visit the Facebook Page. Watch him on YouTube. Bruce runs photo workshops for kids and adults, and provides one-on-one photography coaching.
Digital Photography Education Location on Google My Business
You might like these
Shadow Photography-10 Ways How To Get Great Shadow Photos With Samples
10 Tips on how to get great shadow photos. Sample shadow photos and ideas for unique shadow photography, including how to get harsh shadows.
What is fill flash photography? When and Why You Can Use Fill Light
You've heard the term fill flash photography. Now get an easy understanding of fill in flash here.
How to Use Morning Light To Get Great Photos The Natural Way
Call it "sweet light." Soft and directional lighting. Examples showing how to use morning light to get stunning photos-Make ordinary subjects look extraordinary


Search for a new topic on this site:

Search Amazon for reviews on books on lighting or cool lighting equipment options:
Improve your photography instantly. Get the 2 most important chapters of my photography book for free.