HOW TO POSTS: LIGHTING AND COMPOSITION
portrait photography lighting Setup For Beginners
Great portrait photography lighting is a topic that could fill a dozen textbooks or a 20-part video series. You're just looking for a simple setup that's perfect for beginners. This post gives you 3 simple setups that you can copy.
Rather than starting with complicated multiple light set-ups we're going to start you with the simples lighting that you can use for portraits. Read on.
When done properly, using just one light can give you just want you want, a nicely lit portrait. Here is the first example of a portrait lighting that you can easily copy.
Simple Portrait Lighting Setup #1

This wedding photo was taken in a hotel room with no windows providing any natural light.
- Use a flash on top of your camera's hot shoe.
- Position your subject facing toward and not too far from a wall.
- Rotate/tilt the flash so that it bounces the light off the wall and possibly the ceiling some of the ceiling.
- Look at your LCD screen. Evaluate it and adjust the direction of the flash to get an altered lighting effect.
Each situation will be different. The walls, the ceiling, and how you pose your subject will vary, so you learn as you go.
It's my goal to provide you with good quality content and inspiration to take your portrait photography to the next level and lighting is maybe perhaps the most vital and lifelong skill you can master.
Simple Portrait Lighting Setup #2
This senior citizen portrait was taken in a room with a sliding glass door providing natural light.
- Use aperture priority and a wide lens opening for a blurry background.
- Position your subject as close as possible and behind the largest window/door. See the diagram of the setup below
- Use a large reflector white cardboard, bedsheet, photo reflector on the shadowed side of the subject's face.
- Adjust the distances between the subject and the window or the reflector and the subject.
Each situation will be different. The natural lighting, surrounding walls, and the size of your reflector will vary, so you learn as you go.


Simple Portrait Lighting Setup #3

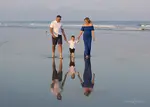
This outdoor family portrait was taken in the shade, but most of the light was coming from behind and above my subjects.
- Use a flash on top of your camera's hot shoe.
- Reduce the power of the flash so that it doesn't ruin the natural light that is present..
- You can either a reduced power setting in automatic or manual modes.
- Look at your LCD screen. Evaluate it and adjust the amount of the flash to get just the right amount of fill light.
- Each situation will be different. The direction, intensity, and quality of light will dictate how much fill flash to use.
the 3 basic CONSIDERATIONs For Setting Up portrait lighting
1. the number of lights you use
Nowadays I rarely use more then 2 lights for portrait photography. It's simpler that way. Fashion and glamour photographers usually use quite a few more than that, but for now, here are the basic 4 type of lights that I learned about in photography school long ago.
- MAIN LIGHT, also called the key light. This is often an umbrella light or a soft-box.
- FILL LIGHT. This is sometimes not an actual light, but a reflector bouncing light from the key light. The fill light is usually placed on the opposite side of the subject from the key light.
- ACCENT LIGHT, may be a hair light or a skim light that provides separation for the background. Some portrait photography lighting set-ups will use several of these.
- BACKGROUND LIGHT. This may be a light aimed at a backdrop or at the scenery in the background.
You don't have to use all four types of portrait photography lighting. In fact, I usually use 2 and sometimes just one. In the photo below, I wanted a low lighting ratio between just the two lights that I used, a main light and a fill light.

I positioned the single main light, up high and to the left of my subject and added a single fill light, behind and to the right of the camera to light this newborn. The lighting ratio between the two lights was low, giving me a soft flat lighting appropriate for the subject.
2. the characteristics of light
Light can be harsh or soft, broad or narrow, big or small, direct or indirect. A big, "soft" light will produce shadows with more gradual change to highlight areas. Smaller light sources will produce sharper edged transitions from the shadows to the highlights.
3. the lighting ratio

When the lighting ratio is high there is a big difference in the amount of light that is hitting the lit areas compared to the amount of light that is hitting the shadow areas.
A low lighting ration means there is not a big difference between the amount of light that is hitting the lit areas compared to the shadow areas.
Here's a more detailed explanation of lighting ratio.
HOW I GOT HOOKED on porttrait lighting

Portrait photography lighting is a subject near and to my heart and has been since I created my first portrait when I was 9 years old. Yes, I know what you're thinking, but stay here with me for a second.
You see what happened is that I got bit by the photography bug when my fourth grade class took a trip to the zoo. My parents gave me a cheap plastic Kodak film camera to use at the zoo. But that didn't matter!
Most of the photos I got back a week later were pretty, blurry, not well composed and the lighting was not good. But there was one that wasn't like the rest. Yes, there was one photo that came out perfect. It was a candid portrait of my 4th grade teacher. The lighting was just perfect and I didn't know it at the time, but it would influence me in some strange way and I became a portrait photographer.
No this isn't the photo of my teacher. Sad to say, I have no idea what happened to that photo.
But, something just clicked in my brain when I first looked at those black and white prints from the zoo. I didn't know anything about photography, exposure, f/stops, depth of field, or portrait lighting. I didn't even know why was great portrait photography lighting at the time. It just looked great for some reason.
It was only black and white film back then, but that actually can be a big advantage. You see, when you eliminate color as one of the elements in a photograph, you pay more attention to lighting. Lighting and composition become even more dominant.
I just got lucky and took a photo of someone who was in a great spot with beautiful natural outdoor lighting. I regret that the portrait of my teacher is long gone. It was one of my favorites from my childhood photography years. I wanted to tell you this little story for a reason. It is not to bore you with facts about my childhood. Sometimes it is the little experiences and decisions in our lives that shape our destiny.
I made a decision to pursue photography, just as a hobby at first, but then it became my life's passion. I encourage you to develop at least a small passion for understanding lighting. The mission of this photography site is to give people inspiration and instruction in all areas of photography including portrait photography lighting.
Keep a childlike curiosity with you, not only as you search for photography tips on my site but other photography web sites as well. Don't be afraid to spend a little cash on a few photography books as well, whether they are eBooks or printed books.
It is an investment in yourself and the emotional benefits to your personal development can't be measured in dollars and cents.
related photography lighting links
Lighting in Photography. This is a simple article written to illustrate the impact the direction of the light has on bring out the features in your subject. But before you click, I have a warning. I picked a very UN-interesting subject to photograph for the article.
Photo Lighting - using mannequins to practice. The impact that the direction, quality and intensity of the portrait lighting has on the human face. The mannequins stay in the same position with the same expression.
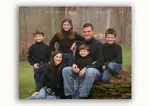
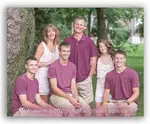
Outdoor Portrait Photography. I do my best to find a good location with excellent natural lighting when doing family portraits outdoors. Here are 4 family portraits where the lighting was almost ideal. In three of them I used large white reflectors to improve the lighting just a bit.
Photography Lighting. A diverse mix of lighting in 5 different photos. One of the photos shows 5 different appearances of the same object due to the lighting.
Photography Lighting Kits. You now have many photography lighting kits available. Digital cameras are really sensitive to low light situations and you can use non-flash lighting to super lighting in your portrait photography.
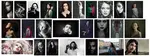
5 styles of portrait photography lighting
The following video was made by TheSlantedLens.
It does a great job of explaining the 5 styles of portrait photography lighting used for indoor portraits. These include Rembrandt, Split, Broad, Butterfly and Loop lighting.
You don't necessarily have to use the same kind of lights as depicted in this video to mimic these portrait lighting styles. I learned to follow them closely while taking a portrait photography course my freshman year in college, but I rarely use them now that I take portraits for a living.
With indoor portrait photography I tend to have my models change their head position frequently and that will change the lighting style if the lights are not moved as well.
The other things that have a big impact on your portrait photography lighting is the amount of fill light that is filling in the shadows as well as the amount of diffusion that you main(key light) and fill lights have. The amount of fill light light affects the lighting ratio as well as the contrast you will get in your final lighting set-up.
Don't get me wrong. These 5 portrait photography lighting styles are important to learn. Equipment has changed dramatically in the last 50 years, but peoples faces are pretty much the same.
Keep shooting. Keep learning. Keep improving.


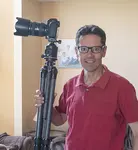
ABOUT BRUCE LOVELACE
Bruce is the publisher of this website. He is the author of the book "Improve Your Photography Instantly." Read more on Bruce on his Bio Page. He's been known as The Traveling Photographer ever since 1994. Read more about this website.
View some of Bruce's photos on Instagram. Visit the Facebook Page. Watch him on YouTube. Bruce runs photo workshops for kids and adults, and provides one-on-one photography coaching.
Digital Photography Education Location on Google My Business
You might like these
5 Best Family Portrait Pose Ideas for 2026 (Easy & Natural Posing)
Stop taking stiff, boring photos! Learn 5 simple family portrait pose ideas to get natural smiles and flattering angles. Perfect for beginners and pros alike.
How To Take Artistic Portrait Photography-5 Tips To Stunning Portraits
Use these 5 cheats to shortcut your way to creating stunning artistic portrait photography. Find inspiration from these sample artistic portraits.
Outdoor Family Photography Tip-Try These Ideas For Great Portraits
One of the oldest and most popular uses of cameras as been for outdoor family photography. Here are some posing tips


Recent Articles
-
20 Photography Tips-How To Instantly Improve Your Photography in 2025
Jan 01, 26 03:42 PM
 How to easily get better photos. These simple photography tips will steer you in the right direction for quickly improving your results as a photographer.
 -
How to Buy a Digital Camera (2026 Guide): 7 Tips + The SLAP System
Dec 29, 25 11:44 AM
 Confused by camera specs? Stop feeling overwhelmed. Avoid the 3 costly mistakes-find your perfect camera. Easy 4-step SLAP guide for 2026. How To Buy a camera
 -
5 Best Family Portrait Pose Ideas for 2026 (Easy & Natural Posing)
Dec 28, 25 10:07 AM
 Stop taking stiff, boring photos! Learn 5 simple family portrait pose ideas to get natural smiles and flattering angles. Perfect for beginners and pros alike.
 -
5 Creative Camera Monopod Uses You Never Thought Of. Monopod Tricks
Dec 28, 25 07:50 AM
 Monopods are one of the most under-utilized camera accessories and are relatively unknown. Creative Camera Monopod Uses
 -
10 Pro Tips for Better Camera Phone Pictures in 2026-Fix Blurry Photos
Dec 24, 25 08:26 PM
 10 simple cell phone photography tips for taking better camera phone pictures that will amaze your friends
Improve your photography instantly. Get the 2 most important chapters of my photography book for free.